Skip to content
 Compact Operatory: Achieving Ergonomics in Small Spaces

Compact Operatory: Achieving Ergonomics in Small Spaces
For many dental clinics, especially those in urban centers or cost-sensitive markets, space is a premium. The challenge is clear: how do you create a fully functional, safe, and comfortable operatory without the luxury of a large footprint? Many practitioners mistakenly believe that a smaller room inevitably leads to compromised ergonomics and workflow inefficiencies. This article is here to show you that a compact operatory can be just as ergonomic and productive as a larger one—if you approach the design with the right strategy.
Discover how to maximize functionality and maintain proper ergonomics in a limited space. This article provides practical tips on selecting compact dental chairs and arranging equipment to create an efficient, comfortable, and safe operatory without feeling cramped. We will explore how to apply established ergonomic principles to make every square centimeter count, ensuring both practitioner well-being and excellent patient care.
1. The Foundation: Mastering Ergonomics in Confined Areas
Before selecting a single piece of equipment, it’s crucial to understand the core principles of dental ergonomics. These rules are not just for preventing discomfort; they are fundamental to long-term career sustainability and clinical precision. In a small space, these principles become even more critical.
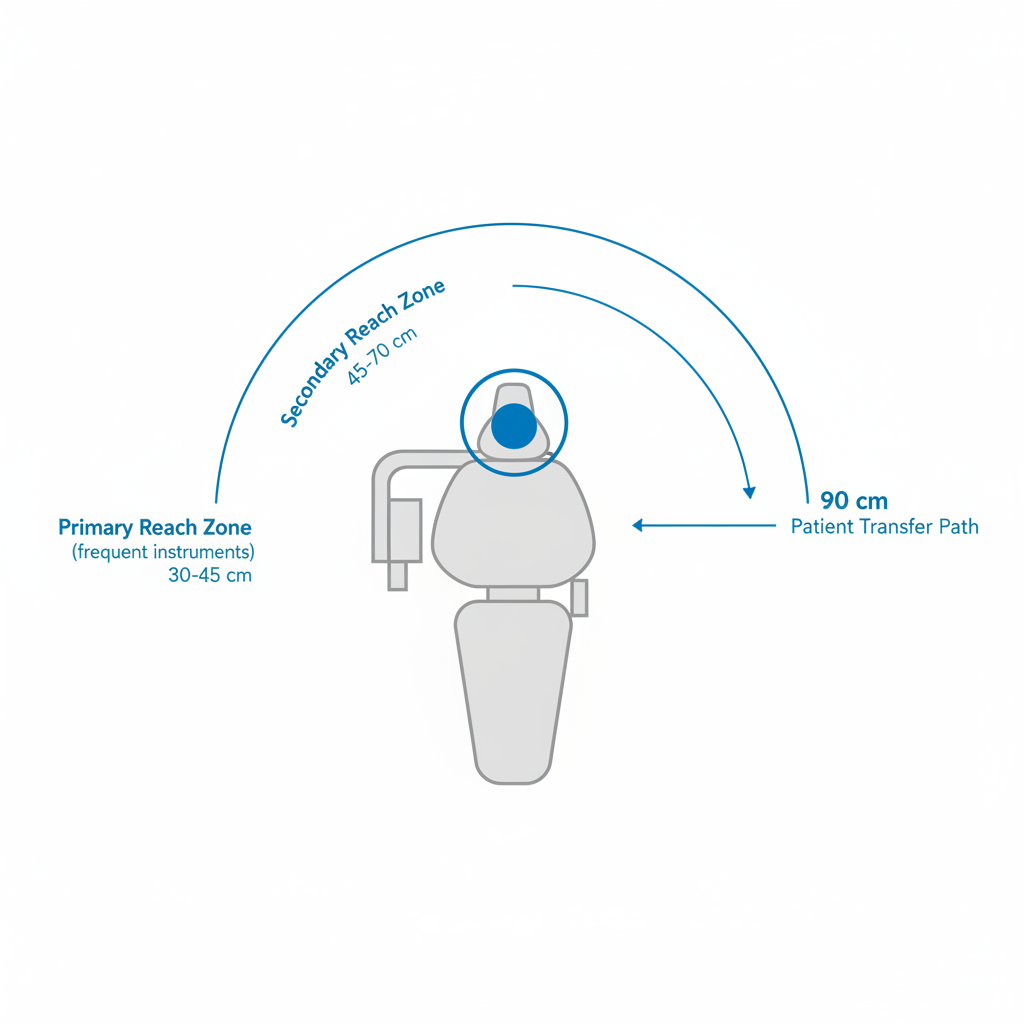
Understanding Your Reach Zones
I’ve learned from years of practice that the most significant cause of daily fatigue and long-term strain is repetitive reaching and twisting. The key is to organize your instruments and materials based on how frequently you use them. This concept is formalized into distinct reach zones.
- Primary Instrument Reach (30–45 cm / 12–18 in): This is the zone for your most-used instruments—your scaler, mirror, explorer, and air/water syringe. They should be accessible with a simple extension of your forearm, without needing to lean or twist your torso. Placing them just outside this zone forces thousands of micro-movements a day, leading to shoulder and back pain.
- Secondary Reach (45–70 cm): This area is for less frequently used items, such as materials for a specific procedure or a curing light. You may need to pivot slightly to access them, but it should not require a full body movement.
Arranging your delivery system to respect these zones is the first step toward an ergonomic setup. It’s a simple change that dramatically reduces the physical load during a procedure.
Ensuring Safe and Efficient Clearance
Proper clearance is not just about comfort; it’s a matter of safety and regulatory compliance. Quality management systems, as outlined in standards like ISO 13485:2016, require that the design and layout of a medical facility support the safe and effective use of its equipment. This translates to specific spatial requirements in your operatory.
- Lateral Transfer Path (min. 90 cm): This is the clear path on at least one side of the dental chair. It is essential for safe patient ingress and egress, especially for patients with mobility challenges. For more on this, consider reading about the ROI of an accessible dental chair in your practice, which touches upon patient access.
- Service Access (60–90 cm): Always leave adequate space behind the chair. I learned this the hard way when a simple hose repair required us to practically disassemble the operatory because the technician couldn’t access the chair’s utility box. This clearance ensures that maintenance is quick and minimally disruptive.
2. Strategic Equipment Selection for Compact Layouts
The right equipment is pivotal in a small space. Modern, compact designs can reclaim significant floor space without sacrificing performance. In fact, a well-chosen chair can be the cornerstone of an efficient, small-footprint operatory.
The Chair: Your Ergonomic Command Center
The dental chair is the largest piece of equipment and thus has the biggest impact on your layout. Look for chairs with a narrow base and backrest. An oversized base can easily steal valuable floor space and restrict your ability to get close to the patient, forcing you into awkward postures. An ergonomically designed chair isn’t a luxury; it’s an investment in your health and a core component of your practice. For a deeper dive, our clinic’s checklist for choosing comfortable chairs can be a helpful guide.

An integrated delivery system, where handpieces and controls are part of the chair itself, can also be a game-changer. This eliminates the need for a separate cart, which can free up 15–30% of your operatory’s floor space. These integrated systems are a key part of many cost-effective dental chair integration strategies.
Delivery Systems: Rear vs. Side Mount
Choosing between a rear-delivery and a side-delivery system often depends on the unique layout of your room, including the door swing and whether you are right- or left-handed.
- Rear-Delivery: This system keeps equipment completely out of the patient’s view, which can reduce anxiety. It provides a clean, open path for patient entry and exit. However, it requires the practitioner to twist to retrieve handpieces, which can violate the primary reach zone principle if not managed carefully.
- Side-Delivery: This setup places instruments within the ideal primary reach zone, minimizing twisting and improving efficiency. The trade-off is that it can create a slight barrier to entry on one side of the chair. It is often the preferred choice for maximizing ergonomics in tight spaces.
3. Intelligent Operatory Layout and Workflow
Once you have your core equipment, the next step is to arrange it intelligently. A thoughtful layout minimizes movement, reduces clutter, and ensures every tool has a logical home.
Debunking a Common Myth: Ergonomics Requires a Large Room
A pervasive myth in clinic design is that you cannot achieve proper ergonomics in a small operatory. This is fundamentally untrue. Ergonomics is not about having more space; it’s about using space more intelligently. A large, poorly organized room can be far less ergonomic than a small, meticulously planned one. The principles of reach, clearance, and workflow are scalable to any room size. The key is to prioritize movement efficiency over sheer square footage.
Checklist for a Compact Operatory Layout
Use this checklist to plan and validate your layout. It helps to avoid common pitfalls that can undermine your workflow and safety.
| Checklist Item | Best Practice & Rationale |
|---|---|
| Instrument Placement | Position the delivery system to keep primary instruments within a 30-45 cm reach. Reduces shoulder and back strain. |
| Patient Entry/Exit | Ensure a clear 90 cm lateral path. This is critical for patient safety and accessibility. |
| Technician Access | Leave 60-90 cm of clearance behind the chair. Prevents costly downtime during maintenance. |
| Cabinetry & Ventilation | Avoid placing heat-generating equipment like sterilizers or compressors in unventilated cabinets. Overheating can lead to equipment failure, a concern addressed by quality control regulations like the FDA’s 21 CFR Part 820. |
| Tubing and Cords | Route all utility lines through walls, floors, or dedicated conduits. Tubing across walkways is a major trip hazard. |
| Lighting Sightlines | Ensure the overhead light can be positioned for all common procedures without being blocked by cabinets or other equipment. |
4. Validate Your Design Before You Build
One of the most effective, low-cost steps you can take is to create a full-scale mock-up of your proposed layout. I have done this for every operatory I’ve designed, and it has saved me from countless costly mistakes.
Use cardboard boxes to represent your chair, cabinets, and delivery system. Place them according to your plan in the empty room. Then, walk through the space with your team. Sit in a stool and simulate performing a procedure. Can you reach your instruments without straining? Ask your assistant to move around the space. Is there enough room? Have someone act as a patient and walk in and out of the room. Is the path clear?
This simple exercise allows you to test your reach zones, clearances, and sightlines in a tangible way. It’s far cheaper to move cardboard boxes than it is to move plumbing and electrical outlets after they’ve been installed.
Wrapping Up: Big Ergonomics in a Small Footprint
Creating an ergonomic and efficient operatory in a compact space is not only possible but also presents an opportunity to be deliberate and intelligent with your design. By focusing on core ergonomic principles, selecting space-conscious equipment, and validating your layout before committing, you can build a workspace that is productive, safe, and comfortable for years to come.
The key takeaways are:
- Prioritize Ergonomic Zones: Design your layout around your primary and secondary reach zones to minimize strain.
- Choose Compact Equipment: Select a dental chair with a narrow base and an integrated delivery system to maximize floor space.
- Mind Your Clearances: Ensure adequate space for patient transfer and equipment servicing.
- Avoid Common Mistakes: Properly ventilate equipment and keep walkways clear of hazardous tubing.
- Mock-Up Your Design: Use a simple cardboard mock-up to test your layout and workflow before construction.
A well-designed compact operatory is a testament to the principle that smart design triumphs over sheer size.
Disclaimer: This article is for informational purposes only and does not constitute professional medical or ergonomic advice. The ergonomic principles discussed are intended as guidelines. Practitioners should consult with an ergonomics professional to assess their specific needs, especially if they have pre-existing health conditions. Always ensure your clinic design complies with local building codes and healthcare regulations, such as the EU MDR for medical devices if applicable.
References
About the Author