How to Safely Move a Dental Chair: A Step-by-Step Guide

You might think that moving a dental chair is a simple task, but it’s not. If not done correctly, it can result in severe injuries to you or your staff, along with costly damage to the equipment. This tutorial will take you through the whole process, starting from planning and preparation to actually moving it.
Here, we will emphasize taking care of each of the parts of the dental chair individually, and each step will be conducted safely and effectively. By doing so, you will not make any expensive mistakes, and you’ll be able to get your chair where you want it without any problems.
Why Is It So Crucial to Safely Move a Dental Chair?
A dentist’s chair is not just furniture; it is a complex and expensive piece of medical equipment. To treat it with anything other than a professional mindset during a move is a huge gamble. Understanding why safety is so critical is the first step towards a successful move.
Taking Care of Your Expensive Dental Chairs:
Dental chairs cost a pretty penny. They’ve got tricky hydraulic systems, fragile electronics, and sensitive parts. Just a tiny bump or drop can mess things up big time, and you could end up with a hefty repair bill. So, moving them carefully really helps keep that investment safe.
Preventing the Danger of Personal Harm:
These chairs are bulky and unwieldy. Incorrect lifting or handling can lead to back strain, sprains, or worse. Having the proper equipment and sufficient manpower is essential to ensuring everyone’s safety.
Keeping Your Dental Chair Functioning Properly:
Bumping the chair around excessively can interfere with its delicate internal mechanisms. When a sensor or motor is damaged, the chair will malfunction once installed. Shifting it carefully ensures everything is operating as it should.
What Preparations are Needed Before Moving a Dental Chair?
You need to have a clear plan before you even consider lifting. Proper preparation is really vital to a smooth move. It saves a lot of trouble if you take the time now.
Initial Assessment and Planning:
First things first, check out the route. Measure those doorways, hallways, and elevators. Spot any stairs or tricky corners you’ll need to get through. Then, map out where the chair’s goning to sit and figure out how you’ll move it there.
Disassembling the Dental Chair:
This section’s really crucial. You need to disconnect the chair from all its attachments. Begin by switching off the mains power. Then, disconnect the water, air, and vacuum lines. Just ensure everything’s completely clear from the wall and floor.
Locking Down the Moving Parts:
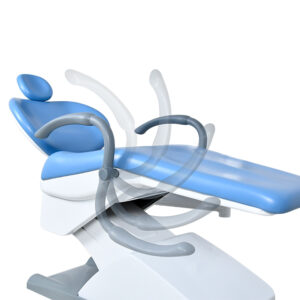
The chair’s got a bunch of moving bits, like the headrest, armrests, and footrest. Just use some tape or straps to keep them from flopping around and getting messed up while you’re moving them.
Equipment and People You Need for Moving a Dental Chair
Don’t even think about moving a dental chair by yourself. You really need at least two people for that, and honestly, more hands make it way easier. Plus, having the right tools makes everything a lot safer and simpler.
Specialized Moving Equipment:
You will require a sturdy dolly or hand truck to relocate the chair. A furniture dolly with a flat bottom is perfect. Utilize moving blankets and straps to safeguard the chair and tie it to the dolly.
The Right Number of People:
You require a minimum of two strong individuals for a typical dental chair. If you have stairs or sharp corners, you should invite three or four people. One can be used to guide the chair, while others offer the lifting strength.
Roles and Responsibilities:
Determine roles beforehand. Someone can be the “lead” who gives out directions. Others should be in charge of lifting, guiding, and looking out for hazards. Good communication helps avoid accidents.
How to Move a Dental Chair Safely:6 Steps
This is the core of the process. Follow these steps carefully to ensure a smooth and safe move.
Step 1: Lower and Secure the Chair
Start by lowering the chair to its lowest possible position. This brings its center of gravity down and makes it more stable. Lock all moving dental chair components like the armrests and footrest using the power controls, then reinforce with tape or moving straps.
Step 2: Disconnect and Wrap
Double-check that all connections—power, water, air—are disconnected. Wrap the entire chair in moving blankets. Use heavy-duty packing tape to secure the blankets. Pay special attention to the base and the upholstery.
Step 3: Place on Dolly
This is the most critical part. Get the dolly ready. With at least two people, carefully lift the chair onto the dolly. It’s best to have one person on each side of the chair’s base. Once it’s on the dolly, secure it with straps so it can’t shift or slide off.ff
Step 4: Transport Carefully
Move the dolly slowly. The person guiding the dolly should watch the path ahead. The other person should walk beside the chair, watching for door frames and corners. Don’t rush. Take your time, especially on uneven floors.
Step 5: Navigate Obstacles
When going through doorways or around corners, communicate clearly. You may need to tilt the chair slightly or lift it over a small bump. The person guiding the chair should give clear instructions: “Lift up,” “Move left,” “Stop.”
Step 6: Unload and Inspect
Once you’re at the new location, carefully unload the chair from the dolly. Place it in its new spot. Before connecting anything, do a full inspection. Check the base, the electronics, and all dental chair parts for any signs of damage. Moving a dental chair safely requires a methodical approach, from lowering and securing the chair to carefully transporting and inspecting it. Following these steps helps to protect both the equipment’s sensitive dental chair components and the individuals performing the move.
How Can You Avoid Damage During the Process of Moving Dental Chairs?
A move can be hard on a dental chair. The following are some of the most important tips to help avoid damage and prevent the necessity of a dental chair repair.
Handling of Delicate Dental Chair Components:
The headrest, backrest, and foot controls are especially sensitive. Never apply any pressure on them. Lift the chair by the main body and frame at all times.
Avoiding Typical Errors:
The biggest errors are attempting to lift too much by yourself, failing to strap the chair securely to the dolly, and hurrying the procedure. Move slowly and obtain assistance. Before you plug everything back in after moving the dental chair, give everything a good inspection.
Check for Loose Wires, Dents, or Scratches:
Ensure that everything feels secure and tight. If you notice anything out of place, it is best to have a professional inspect the dental chair for any repairs.
Frequently Asked Questions (FAQ):About Moving a Dental Chair
Q1. Can a Single Person Move a Dental Chair?
It’s not recommended to move a dental chair by yourself. These chairs can weigh hundreds of pounds and have a complicated shape, making them very difficult to balance. Attempting to do it alone puts you at high risk for serious back or muscle injuries. It could also lead to dropping the chair, which would likely cause significant damage to delicate dental chair components. Always use at least two people and the right equipment to ensure safety.
Q2. What Are the Most Fragile Parts of a Dental Chair To Watch Out For?
The most sensitive dental chair parts are the ones that are easily bumped or bent. This includes the headrest, the armrests, and the various tubing and wiring that run to the handpieces and controls. The chair’s base and the dental chair components underneath are also very vulnerable. It’s crucial to protect these areas with plenty of padding and to avoid dragging the chair.
Q3. Do I Need a Professional for a Short-Distance Move?
For a short move within the same building or even the same room, you might not need a professional moving company. However, if the move involves stairs, ramps, or a complex path, hiring professionals who are experienced in moving heavy, sensitive equipment is a wise investment. They have the proper tools and training to prevent injuries and avoid the need for a costly dental chair repair.
Q4. How Do I Prepare the Hydraulic System for a Move?
Most modern dental chairs have a self-contained hydraulic system. For a move, the main thing is to lower the chair to its lowest position. This relieves pressure on the hydraulics and brings the center of gravity down. You should never disconnect the hydraulic lines yourself, as this can be dangerous and could lead to major dental chair repair issues.
Move Your Dental Chair Safely
Moving a dental chair can be a big job, but with the right preparation, it doesn’t have to be difficult. Protect your valuable equipment and avoid injury by following a clear plan. By taking the time to prepare and execute each step carefully, you can ensure a safe and efficient move. Don’t risk costly dental chair repair—do it right the first time.
About the Author


