Diagnosing & Solving Oil in Your Dental Air Supply

The Critical Importance of Pure Air in Modern Dentistry
The air that powers your dental handpieces, air-water syringes, and other equipment is a direct-contact medical gas. Its purity is not just a matter of performance; it is a fundamental pillar of patient safety and regulatory compliance. Contaminated air, especially with oil, can introduce pathogens into a patient’s mouth, compromise the bond strength of restorative materials, and cause premature failure of expensive dental equipment. This is why global standards are so stringent. For instance, quality management systems for medical devices are governed by standards like ISO 13485:2016, which ensures that manufacturers follow strict processes to produce safe and effective equipment. In the United States, the FDA’s Quality System Regulation outlined in 21 CFR Part 820 mandates similar controls over manufacturing and maintenance. For equipment sold in Europe, achieving a CE Marking is essential, signifying conformity with health, safety, and environmental protection standards.
Beyond regulations, the practical consequences are severe. Oil aerosols can coat the internal turbines of a high-speed handpiece, causing them to seize and fail. This not only leads to costly repairs but also creates operational downtime that no busy clinic can afford. Furthermore, oil contamination can ruin adhesive dental procedures, leading to failed restorations and patient dissatisfaction. Ensuring your air supply is clean, dry, and oil-free is one of the most critical investments you can make in your practice.
Debunking a Common Myth: Is It Really a Failed Filter?
A common call to a service technician involves oil appearing in the air lines. The immediate assumption is often a failed filter. However, experienced technicians know this is frequently a misdiagnosis. While a filter can fail, the root cause often lies upstream with the compressor itself or with blocked drainage systems. Blaming the filter without a proper diagnosis can lead to recurring problems and wasted expense.
I’ve seen clinics replace their entire filter bank, only to have the oil contamination reappear within weeks. The real culprit was a worn-out compressor piston ring allowing lubricant to “blow-by” into the air stream. In another case, a simple blocked condensate drain caused a backup of emulsified oil and water, which was then forced downstream past the filters. Before you replace any parts, a systematic approach to diagnosis is essential.
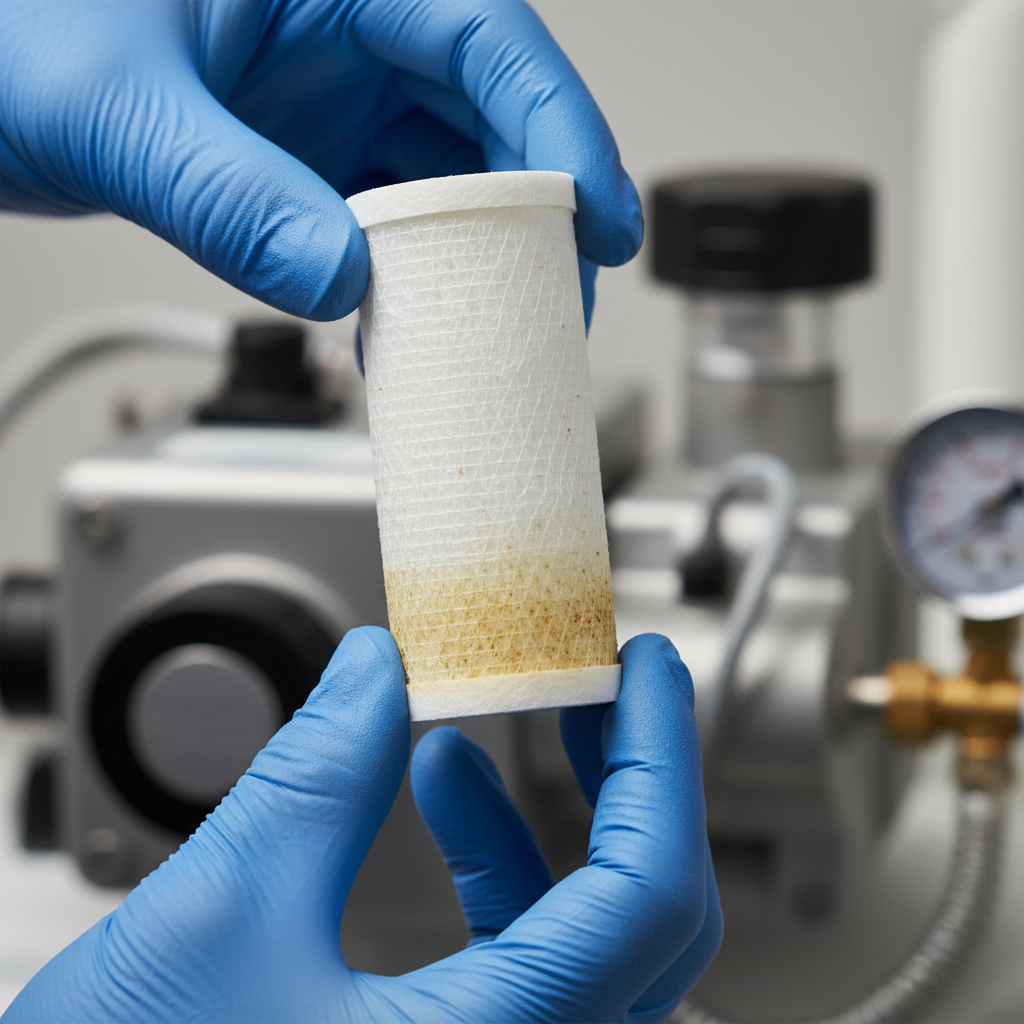
A Step-by-Step Diagnostic Checklist
To accurately identify the source of oil, follow this field-tested procedure. This structured approach saves time and ensures you address the actual problem, not just the symptom.
| Step | Action | What to Look For | Implication |
|---|---|---|---|
| 1 | Sample Air at the Operatory | Oily residue or a noticeable odor from an air-water syringe. | Confirms contamination is reaching the point of use. |
| 2 | Inspect the Compressor Separator | A milky, brown, or metallic sheen in the oil/water mixture. | This indicates emulsified oil, often a sign of internal compressor wear. |
| 3 | Verify Condensate Trap Operation | Ensure automatic traps are draining properly during and after compressor cycles. | A blocked or failed trap is a primary cause of oil and water carryover. |
| 4 | Check Differential Pressure Gauge | A pressure drop of ~10–20% across the filter bank compared to its baseline. | Indicates a clogged filter element that needs proactive replacement. |
By following this checklist, you can move from guesswork to a data-driven conclusion. If steps 2 or 3 reveal an issue, the problem lies with the compressor or drainage system, and no amount of filter replacement will solve it permanently.
The Ultimate Solution: Staged Filtration and Air Drying
Protecting your dental practice from contamination requires a multi-stage defense system. A single filter is not enough. An effective system design uses a series of filters and a dryer to systematically remove particles, water, oil aerosols, and vapors. Think of it as a layered security system for your air supply.
The Three Stages of Dental Air Filtration
A properly engineered system ensures that each component is protected by the one before it, maximizing efficiency and lifespan.
| Stage | Component | Function | Why It’s Critical |
|---|---|---|---|
| 1 | Particulate / Coalescing Pre-Filter | Captures solid particles (dust, rust) and coalesces larger oil/water droplets. | Protects the more sensitive downstream filters from being overwhelmed by bulk contaminants. |
| 2 | High-Efficiency Coalescing Filter | Removes fine oil and water aerosols down to the sub-micron level. | This is the primary defense against the damaging aerosols that ruin handpieces and contaminate bonding surfaces. |
| 3 | Activated Carbon / Oil Vapor Adsorber | Adsorbs oil vapor and hydrocarbons, eliminating taste and odor. | This final polishing stage ensures the air is truly pure and suitable for direct patient contact. |

The Critical Role of the Air Dryer
An air dryer is not an optional accessory; it is a core component of the system. Wet air is a breeding ground for bacteria and dramatically increases the risk of oil carryover. A refrigerated or desiccant dryer works to lower the pressure dew point of the compressed air. This is the temperature at which water vapor will condense into liquid. Targeting a consistent, low dew point ensures that no liquid water can form in your air lines, regardless of the temperature in the clinic. A key maintenance task is to regularly verify the condensate drains on the dryer and air receiver tank. If these drains become blocked, they create a reservoir of contaminated liquid that will inevitably be pushed into your operatory.
Proactive Maintenance and Long-Term Strategy
Effective air system management is proactive, not reactive. Waiting for oil to appear at the handpiece means the damage is already done. The best practice is to monitor your system and perform maintenance based on performance indicators.
When to Replace Filters
Do not wait for a scheduled date. The most reliable indicator for filter replacement is differential pressure. As a filter element captures contaminants, it becomes more restrictive to airflow, causing a pressure drop between its inlet and outlet. Technicians recommend keeping spare filter elements on hand and replacing them when this pressure drop increases by 10-20% from its clean state. This is especially important after seasons of heavy use, such as summer, when higher humidity places a greater load on the entire system.
The Oil-Free Advantage
For clinics seeking the highest level of assurance and reduced maintenance, migrating to an oil-free (or lubricant-free) compressor is the definitive solution. These compressors are designed with materials and tolerances that do not require oil lubrication in the compression chamber. By removing oil from the equation entirely, you eliminate the most common and damaging form of contamination. This simplifies your filtration needs, removes a major failure mode, and makes quality assurance and certification far more straightforward. While the initial investment may be higher, the long-term benefits of reduced maintenance, absolute air purity, and total peace of mind are often worth the cost.
Key Takeaways
Protecting your patients and equipment from oil contamination is a foundational responsibility. The key is to move beyond reactive fixes and adopt a systematic approach.
- Diagnose Before You Act: Don’t assume a failed filter. Use a methodical process to check the compressor, condensate traps, and point-of-use air to find the true source of the problem.
- Implement a Layered Defense: A robust system relies on multi-stage filtration (particulate, coalescing, and activated carbon) combined with an efficient air dryer to remove contaminants sequentially.
- Be Proactive with Maintenance: Monitor differential pressure gauges and replace filter elements proactively. Regularly check all condensate drains to ensure they are clear.
- Consider the Long-Term Solution: For the ultimate in safety and reliability, upgrading to an oil-free compressor eliminates the root cause of oil contamination.
By embracing these principles, you can ensure your practice operates on a foundation of pure, clean, and dry air, safeguarding your patients, your equipment, and your reputation.
Disclaimer: This article is for informational purposes only and does not constitute professional technical or medical advice. Always consult with a qualified technician for equipment servicing and a certified professional for compliance and safety guidance. Adherence to local regulations and manufacturer specifications is mandatory for all dental equipment.
References
About the Author


