Quick Guide to Dental Chair Emergency Stop: Location, Usage, Training

As a dental clinician, a crucial part of your job is ensuring patient safety. Knowing the emergency stop on your dental chair unit is a non-negotiable skill. This small, often-overlooked button is a vital safety net, designed to prevent patient injury and protect your equipment from damage. Its exact location may vary, but it’s always placed for quick access. This guide will cover its purpose, how to find it, and how to use it effectively.
Why Is the Emergency Stop Button Crucial for Dental Chair Safety?
An emergency stop isn’t just another control; it’s a critical safety feature. Its sole purpose is to immediately and completely cut power to all moving parts of the dental chair unit. Hitting it instantly stops all motion—up, down, or tilt. This is the ultimate failsafe in a crisis.

The Purpose of the Emergency Stop
It’s a hard kill switch that overrides all other controls. Unlike a standard stop button, which might only pause a specific function, the emergency stop initiates a total shutdown of all movement until you manually reset it.
Situations Requiring an Immediate Stop
Use this button during high-pressure, unplanned events such as a medical situation, a child approaching a moving component, or a mechanical malfunction. You have to respond immediately.
Injury and Damage Prevention
The emergency stop brings all movement to a stop to avert patient harm and expensive dental chair repairs. It’s a straightforward but vital safety mechanism.
How Can You Locate the Emergency Stop on Various Dental Chair Models?
Though the position may vary among manufacturers, the emergency stop is consistently made easy to locate. Familiarizing yourself with where to look on your particular dental chair parts is the initial step to readiness.
Common Locations on Different Dental Chair Components
The button is nearly always red and simple to notice. It may be on the base of the chair, on the side by the foot, or on the control panel. Some chairs include several emergency stops for added protection.
Foot Control and Control Panel
Most chairs have controls in the foot, with the emergency stop usually on the side for easy reach. Some models place it on the main panel as a big red button.
Emergency Stop on the Doctor’s Side
The button is always within a clinician’s easy reach, typically near the armrest or the main control panel. Make it a habit to do a quick visual check before starting any procedure.
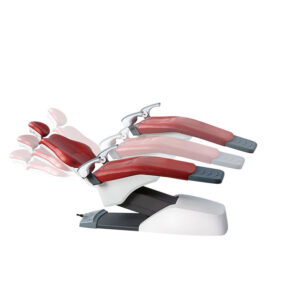
How Does the Emergency Stop Relate to Dental Chair Positions and Movements?
The emergency stop overrides every other function, regardless of any preset commands.
Overriding Dental Chair Positions:
Any programmed chair positions are overridden by the emergency stop, allowing you to take instant manual control. For instance:
- In the supine position, where most oral procedures take place, the emergency stop near the clinician’s side ensures quick access.
- Semi-reclined position, when patients can move and get near moving parts, engaging the stop becomes particularly crucial.
- In the Trendelenburg position, often linked with circulatory concerns, the stop allows you to adjust posture without delay.
Preventing Unanticipated Movements
The emergency stop is your ultimate failsafe. It’s the only certain method for stopping a dental chair unit that begins to move unexpectedly due to a mechanical or electrical malfunction. In such a critical moment, this single button gives you immediate, total control over the equipment to prevent patient injury.
Releasing the Emergency Stop
Once the emergency is over, releasing the emergency stop is a simple, deliberate action. The most common methods are twisting the button clockwise or pulling it outwards. This action resets the system, restores power, and allows you to resume normal dental chair positions and functions.
How To Operate The Emergency Stop On A Dental Chair Unit
Proficiency in the emergency stop button is necessary for clinicians. It must be second nature, not delayed. Use the following procedure for activation and resetting.
Step 1: Immediate Activation
- Find the button. Your feet and hands will naturally reach for the red emergency stop button, which is typically located on the foot control, chair base, or primary control panel.
- Press hard. In an emergency, do not tap lightly. Strike the button with a firm blow to eliminate all power to the dental chair unit, halting all movement immediately.
Step 2: Evaluate the Situation
- Give priority to the patient. Once the chair is stopped, take care of the patient first and evaluate their condition.
- Assess the equipment. Spend a few seconds looking for any apparent damage or reason for the emergency, e.g., something stuck in the mechanism of the chair.
Step 3: Reset the Unit
- Release the button. The emergency stop is not a simple on/off switch. To reset the system, you must manually release the button. This is typically done by twisting it clockwise or pulling it outwards. You’ll feel a click or a pop as it disengages.
- Confirm the reset. Once you let go of the button, power will be returned to the chair. Try a small function, such as a slight upward or downward motion, to ensure the system is working before resuming normal procedures.
Important Tip for Clinicians: Incorporate a monthly drill with your team. Practice locating and activating the emergency stop on each dental chair unit in your clinic. This will build muscle memory and ensure a quick, effective response during a real emergency.
How Should Clinicians Train for Emergency Stop Use?
Preparedness is crucial. Knowing the button’s location isn’t enough; you need a usage plan.
Staff Onboarding:
New staff need to be introduced to the location and operation of the emergency stop on each dental chair unit.
Regular Simulation Drills and Practice:
Conduct regular drills with your team. Practicing emergency scenarios makes the action second nature, ensuring a quick, confident response in a real crisis.
Routine Functional Testing of Dental Chair Components:
As part of your clinic’s routine, test the emergency stop on each chair. This simple action confirms it’s working correctly and ready for use, preventing the need for an emergency dental chair repair.
Frequently Asked Questions (FAQ)
Q1. Can the Emergency Stop Be Accidentally Activated?
It’s unlikely. Manufacturers design the button to require a deliberate, firm press, making accidental activation difficult.
Q2. Is There a Universal Symbol for the Emergency Stop Button?
Yes, it’s almost always a red button, often large and circular, with a prominent “Stop” label. This universal design helps clinicians identify it quickly on any dental chair components.
Q3. Does Every Dental Chair Have an Emergency Stop?
Yes, all modern dental chairs are required to have this feature as a standard safety measure. If a chair lacks one, it’s likely an older model that may not meet current safety standards.
Q4. Can a Damaged Emergency Stop Button Be Repaired?
Yes, a competent technician can replace or fix a broken emergency stop button. Never operate a chair with a malfunctioning emergency stop because of safety hazards.
Key Takeaways
The emergency stop on your dental chair unit is more than just a button; it’s a vital part of your clinical toolkit. By understanding its purpose, knowing its location, and practicing its use, you can ensure a safer environment for both your patients and yourself. Make it a standard part of your routine to check its function. Your preparedness is the first line of defense against the unexpected. Stay safe, and stay prepared.
About the Author


