Troubleshooting Moisture in Your Dental Air Lines

The Critical Risks of Moisture in Your Dental Air
Finding moisture in your dental air lines is more than an inconvenience; it’s a critical failure that compromises patient safety, damages expensive equipment, and undermines the quality of your clinical work. Clean, dry air is not a luxury—it is a fundamental requirement for modern dentistry. The presence of water, oil, or particulate matter creates a direct pathway for microbial contamination, putting patients at risk of infection. This is a significant compliance concern, as quality management systems for medical devices are designed to prevent such failures. For example, standards like ISO 13485:2016 mandate robust processes to ensure device safety and efficacy, and a contaminated air system is a clear deviation from this principle.
Beyond the immediate infection control hazard, moisture rapidly degrades high-value dental equipment. The delicate turbines and bearings inside high-speed handpieces can corrode and seize when exposed to water aerosol. Solenoid valves in delivery units can fail, and sensitive electronic components can short-circuit. The cumulative cost of these repairs and replacements far exceeds the investment in a properly maintained air drying system. Furthermore, moisture can interfere with the chemical bond of restorative materials, leading to premature failure of fillings and crowns, which damages your clinic’s reputation.
Anatomy of a Dental Dry Air System
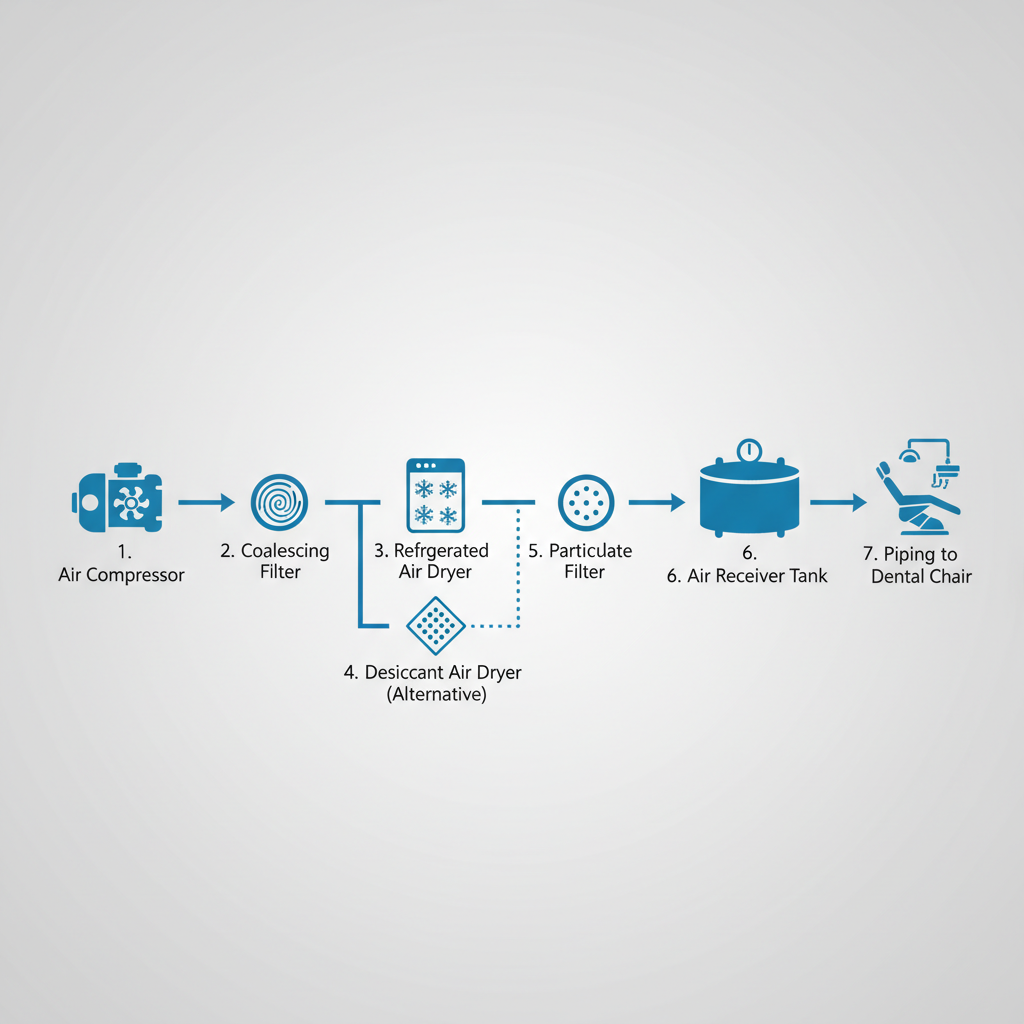
To effectively troubleshoot moisture, you must first understand the components working together to produce clean, dry air. A typical system is a multi-stage process where each part plays a specific role. A failure in any single component can compromise the entire chain.
- Air Compressor: The heart of the system. It draws in ambient air and pressurizes it. Critically, dental-grade compressors must be oil-free to prevent hydrocarbon contamination from entering the air stream.
- Coalescing Filter: Located immediately after the compressor, this filter’s job is to remove water and oil aerosols. It forces tiny droplets to merge (coalesce) into larger drops that can be drained away. This is the first line of defense against bulk moisture.
-
Air Dryer: This is the most critical component for removing water vapor. There are two main types:
- Refrigerated Dryers: These act like an air conditioner, chilling the compressed air to a specific temperature (the dew point). As the air cools, water vapor condenses into liquid and is removed by an automatic drain. They are effective for most general dentistry applications.
- Desiccant Dryers: These use a bed of hygroscopic material (like activated alumina or molecular sieves) to adsorb water vapor directly from the air stream. They can achieve much lower dew points than refrigerated dryers, providing exceptionally dry air required for certain sensitive procedures and in humid climates. The desiccant material requires periodic regeneration or replacement.
- Particulate Filter: Positioned after the dryer, this filter removes any remaining fine particles, such as desiccant dust, before the air enters the piping to the operatories.
- Air Receiver Tank: This tank stores the compressed air, allowing the compressor to run in cycles rather than continuously. It also helps to cool the air further, causing more condensation that should be drained.
- Distribution Piping & Drains: The network of pipes that carries air to the dental chairs. It must be properly sloped and equipped with drains at low points to remove any residual condensate.
A Technician’s Guide to Systematic Troubleshooting
When moisture appears at the handpiece, a reactive, trial-and-error approach is inefficient. A systematic process, moving from the point of use back to the source, is the key to a fast and accurate diagnosis. These steps are based on field-proven diagnostics used by experienced technicians.
Step 1: Rapid Diagnostic Checks
Before disassembling components, perform these quick tests to isolate the problem area. This diagnostic sequence can often identify the root cause in minutes.
| Diagnostic Test | Procedure | What It Tells You |
|---|---|---|
| Dew Point Measurement | Use a handheld hygrometer to measure the dew point of the air coming directly out of the dryer. Then, test it again at the point of use (e.g., the dental chair). | A low dew point at the dryer but a high dew point at the chair points to a problem in the piping, like condensate trapped in low points. A high dew point directly at the dryer indicates the dryer itself is failing. |
| Filter Pressure Drop | Check the differential pressure gauge across the coalescing filter while the compressor is running. | A significant pressure drop (typically >5-7 PSI) indicates the filter element is saturated with water or oil and is clogged. It is no longer effectively removing aerosols and may be collapsing internally. |
| Compressor Load Cycle | Force the compressor to run for a short, high-demand cycle by bleeding air from the receiver tank. Watch the automatic drains on the filters and dryer. | This test can reproduce moisture carryover that only occurs during peak flow. If drains activate and release a large amount of water, the system is generating moisture; if they don’t, the dryer may be overwhelmed or failing. |
Step 2: Identifying Common Culprits and Solutions
Once your diagnostics point to a specific area, you can address the most common failures.
Common Misconception Debunked: A frequent myth is that seeing a little water is a minor issue that can be ignored until the next service interval. In reality, by the time moisture is visible at the handpiece, the air system has been failing for some time. According to regulations like the FDA’s Quality System Regulation (21 CFR Part 820), equipment must be properly maintained to ensure it performs as intended. Visible moisture is a clear sign that the process is out of control, and microbial contamination and equipment damage may have already started.
-
Culprit: Saturated Air Dryer
- Symptom: The dew point reading directly after the dryer is high, and moisture is present in the entire system.
- Cause: In a desiccant dryer, the beads have adsorbed all the moisture they can hold. In a refrigerated dryer, the cooling system is malfunctioning or overwhelmed by high ambient temperatures.
- Solution: Service the dryer. Replace the desiccant material or have the refrigerated unit serviced by a qualified technician. The service interval should be based on the manufacturer’s recommended operating hours, not just calendar months.
-
Culprit: Undersized Components
- Symptom: Moisture appears during periods of high demand, such as when multiple operatories are in use simultaneously.
- Cause: The air dryer or filters are not rated for the peak airflow (CFM) your compressor can produce. The system is simply pushing air through faster than the components can treat it.
- Solution: This requires a system redesign. Calculate your clinic’s peak air demand and install a dryer and filtration system sized to handle that load with a 20-25% buffer.
-
Culprit: Installation Flaws
- Symptom: Dew point is low at the dryer, but moisture is still found at the chair. This is often worse in the morning.
- Cause: Condensate is collecting in the distribution piping. This is commonly caused by sections of pipe that don’t have the proper downward slope (at least a 1-2% grade) toward a drain leg.
- Solution: Inspect the entire piping run. Correct any sections that are level or sloped the wrong way. Install automatic drains at all low points and at the bottom of vertical risers.
Proactive Maintenance for a Dry Air Guarantee
Troubleshooting is reactive; proactive maintenance prevents the problem from ever occurring. Adopting a strict maintenance schedule is the most effective way to ensure compliance and protect your equipment. This is a core principle of global quality standards like the EU Medical Device Regulation, which emphasizes lifecycle management and post-market surveillance.
Recommended Maintenance Cadence
This schedule provides a baseline for a robust preventive maintenance program. Adjust it based on your system’s operating hours and your specific climate.
| Frequency | Task | Purpose |
|---|---|---|
| Daily | Visually inspect automatic drains. | Manually trigger the drains to ensure they are not clogged and are successfully ejecting condensate. |
| Monthly | Check differential pressure gauges on coalescing filters. | Identifies a saturated filter element before it fails and allows moisture to pass downstream. |
| Quarterly | Test the dew point at the dryer outlet. | Confirms the dryer is performing to specification and provides an early warning of degradation. |
| As Per Mfg. Specs | Service dryer and replace filter elements. | This is typically based on operating hours. Following this schedule is critical for preventing desiccant saturation or mechanical failure. |
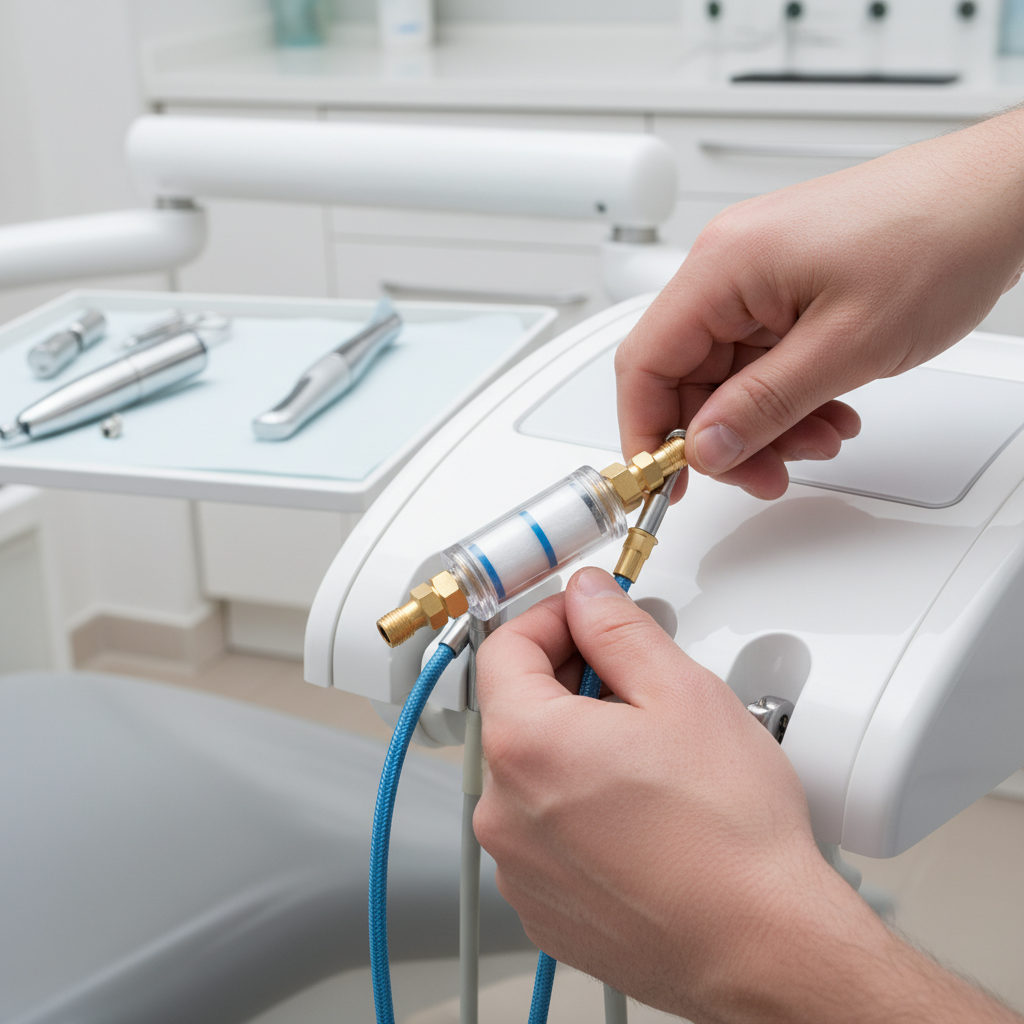
Emergency Mitigation: What to Do Right Now
If you discover significant moisture and cannot afford any downtime, there is an immediate containment strategy. While you arrange for a permanent repair, you can install a compact inline coalescing filter followed by a point-of-use desiccant cartridge directly on the air line feeding the affected dental chair. This provides a final barrier, capturing moisture just before it enters the handpiece. This is strictly a temporary fix, as it does not address the root cause, but it can keep an operatory functional while a permanent solution is implemented.
Key Takeaways for a Reliable Practice
Maintaining a dry dental air system is not just a technical task; it’s a cornerstone of patient safety, equipment longevity, and clinical excellence. The difference between a reliable practice and one plagued by constant repairs often comes down to the approach to compressed air.
- Be Proactive, Not Reactive: Don’t wait for moisture to appear. Implement a rigorous maintenance schedule based on daily checks and service intervals measured in operating hours.
- Diagnose Systematically: When problems arise, use a structured diagnostic approach. Measure dew point and pressure differentials to pinpoint the failure instead of guessing.
- Design for Success: Ensure your system is properly designed from the start, with correctly sized components and piping that is sloped to promote drainage. Staging filtration (coalescing → dryer → particulate) is a proven method for high-purity air.
By treating your compressed air system with the same level of care as your clinical instruments, you build a more resilient, efficient, and trustworthy practice.
Frequently Asked Questions (FAQ)
How often should I replace my desiccant beads?
This depends entirely on the manufacturer’s specifications and your clinic’s runtime, not a fixed calendar date. A busy clinic might need to replace desiccant annually, while a smaller practice might go longer. The best practice is to monitor performance with a hygrometer and track operating hours.
What is the ideal dew point for a dental air system?
For a system with a refrigerated dryer, a pressure dew point of 35-40°F (2-4°C) is a common target. For desiccant dryers, a dew point of -40°F (-40°C) or lower is achievable and provides an extra margin of safety against moisture.
Can I use a standard hardware store compressor for my dental clinic?
Absolutely not. Industrial or consumer-grade compressors are typically oil-lubricated and lack the multi-stage filtration and drying necessary for a healthcare environment. Using one introduces oil, water, and particulate matter into the air lines, which is a serious risk to patients and will quickly destroy dental handpieces.
Disclaimer: This article is for informational purposes only and does not constitute professional medical or technical advice. Always consult with a qualified dental service technician for diagnosis and repair of your specific equipment. Adherence to local regulations and manufacturer guidelines is essential for safe operation.
About the Author


