Small Clinic Layouts: Maximize Your Operatory Space

The Foundation: Planning Around the Dental Chair
Every efficient operatory design begins not with the walls, but with the dental chair. It is the functional heart of the room, and all other elements must support the work that happens there. Thinking of the layout as chair-centric is the first step toward a space that works for you, not against you.
Sizing Up Your Core Component
Before you place a single cabinet or decide where a door will swing, you must account for the chair’s total footprint, especially when fully reclined. I’ve seen many clinics make the mistake of planning around the chair’s upright size, only to find the room becomes unusable once a patient is laid back. A typical dental chair requires a footprint of 1.8 to 2.0 meters in length and 0.6 to 0.8 meters in width. This is your non-negotiable starting block.
Consider this the “static” space. The next, more crucial step is to map out the “dynamic” space—the area required for you, your assistant, and your equipment to move fluidly throughout a procedure.
The Critical “Zone of Operation”
Clearance is not empty space; it is active space. Failing to allocate enough clearance is a direct cause of daily frustration and physical strain. Based on years of refining clinic layouts, here are the essential clearance zones to build into your floor plan:
- Operator’s Zone (0.9–1.2 meters): This is the most critical area, typically on the side of the chair. You need this much room to move your stool freely, access instruments without twisting your torso, and shift position for better visibility. Skimping here is a recipe for chronic back and neck pain.
- Assistant’s Zone (0.6–0.9 meters): The assistant needs adequate space for their own stool, for passing instruments, and for operating suction and other equipment.
- Rear Access Zone (0.6–0.9 meters): The area behind the patient’s head is vital for accessing rear delivery units, moving equipment like sterilizers, or simply having a path to walk around the chair without disrupting the procedure.
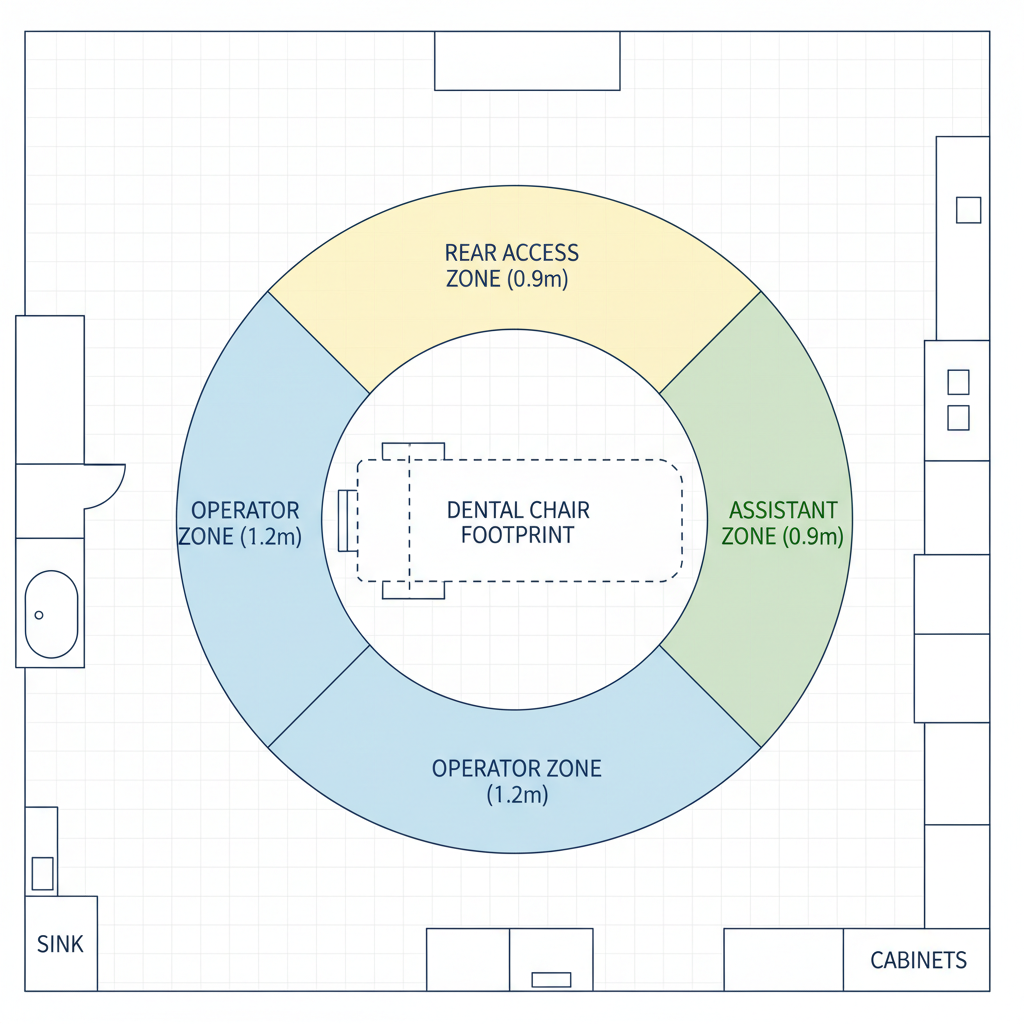
Mapping these zones on your floor plan from day one prevents the common problem of creating a room that looks good on paper but fails in practice.
Optimizing Workflow and Ergonomics
A well-designed layout directly translates to a more efficient and ergonomic workflow. The goal is to minimize unnecessary movements, reduce physical strain, and create a seamless flow from one task to the next. This is achieved by carefully positioning your equipment and supplies in relation to the primary work area.
The Ergonomic Reach Radius
Think about the items you interact with dozens of times per hour. Your delivery tray, with its handpieces and syringes, is chief among them. A critical ergonomic mistake is placing this tray too far away, forcing a slight but repetitive lean or twist. Over a career, these micro-movements contribute to significant musculoskeletal issues, a well-documented problem according to research available through resources like PubMed.
For optimal ergonomics, the delivery tray should be positioned within a 45 to 60-centimeter reach radius. Furthermore, angling it approximately 30 to 45 degrees toward your dominant hand allows for a natural, straight-wristed pickup of instruments. This small adjustment was an “aha!” moment for me; it eliminated the shoulder fatigue I used to feel at the end of the day.
Debunking a Common Myth: More Operatory Storage is Better
A pervasive myth in clinic design is that maximizing cabinetry within the operatory will make you more efficient. The thinking goes that having everything within arm’s reach saves time. In reality, the opposite is often true.
Overstuffing an operatory with storage creates physical and visual clutter. It shrinks your essential clearance zones, making the room feel cramped and hindering movement. It also presents an infection control challenge, as more surfaces collect dust and aerosols. The real solution is to distinguish between “active” and “bulk” supplies. Your operatory should only house the active supplies needed for the next few procedures. Bulk items—extra composite materials, boxes of gloves, or sterilization pouches—belong in a dedicated central storage or sterilization area. This approach keeps the operatory lean, clean, and focused on the task at hand.
Smart Equipment and Utility Planning
With the core layout established, the next layer of planning involves selecting the right equipment and, just as importantly, planning for the utilities that power it. These decisions are foundational to the long-term functionality and serviceability of your clinic.
Choosing a Space-Saving Dental Chair
In a compact setting, not all dental chairs are created equal. Look for models specifically designed for smaller footprints. Key features include:
- A smaller, more streamlined base: This can free up valuable floor space around the chair, making it easier for you and your assistant to maneuver.
- Integrated delivery systems: Chairs that have the delivery unit mounted directly to the chair eliminate the need for a separate cart, which can be a major space-saver.
- Flexible mounting options: Wall-mounted lights and monitors, rather than floor-standing or pole-mounted versions, keep the floor clear and open up the room.
Beyond size, always verify that the equipment meets stringent regulatory standards. For clinics in Europe, this means ensuring products carry the CE Marking, which certifies they comply with health, safety, and environmental protection standards. Furthermore, look for manufacturers who adhere to quality management systems like ISO 13485:2016. These certifications are not just paperwork; they are your assurance of the device’s safety, reliability, and manufacturing quality.
The Unseen Necessities: Utilities and Maintenance
One of the most costly mistakes I’ve seen is failing to plan for utility access. Your dental chair and other equipment rely on a network of air lines, water lines, suction tubes, and electrical conduits. These lines need to be accessible for maintenance and repairs. Boxing them into a wall without an access panel can turn a simple fix into a disruptive and expensive construction project.
Plan for service access from the beginning. This can be achieved with removable panels in cabinetry or by designing a small service corridor behind the operatories. Equally important is the entryway. Ensure your operatory door has a minimum width of 80 to 90 centimeters. A narrow doorway can make it incredibly difficult to bring in or remove large equipment and can be a barrier to patients with mobility challenges.
A Practical Checklist for Your Operatory Layout
To bring these concepts together, here is a structured checklist to guide your planning process. Use this as a step-by-step framework to ensure you cover all critical variables.
| Phase | Task | Key Consideration |
|---|---|---|
| 1. Measurement & Planning | Measure Total Room Dimensions | Record the length, width, and ceiling height of the empty room. |
| Confirm Chair Footprint | Get the exact length/width of your chosen chair when fully reclined. | |
| Map Clearance Zones | On a floor plan, draw the chair and the 0.9-1.2m operator, 0.6-0.9m assistant, and 0.6-0.9m rear zones. | |
| Verify Door & Hallway Width | Ensure doorways are at least 80cm wide to allow for equipment and accessibility. | |
| 2. Workflow & Equipment | Position Delivery System | Place the tray within a 45-60cm ergonomic reach radius of the primary operator position. |
| Plan for Vertical Space | Utilize wall mounts for monitors, lights, and even glove dispensers to free up floor area. | |
| Designate Central Storage | Plan a separate, easily accessible area for bulk supplies and sterilization to declutter the operatory. | |
| 3. Utilities & Compliance | Map Utility Lines | Document the paths for air, water, suction, and electrical, ensuring clear maintenance access points. |
| Check Regulatory Compliance | Verify that all major equipment complies with necessary regulations, such as the EU Medical Device Regulation (MDR). |
Key Takeaways
Designing an efficient small dental operatory is a solvable challenge. Success hinges on embracing a chair-centric design philosophy and prioritizing movement and workflow over static storage. By starting with the chair’s footprint, enforcing strict clearance zones, and making intelligent choices about equipment and utility access, you can create a space that feels larger and works harder.
A well-planned operatory is more than just a room; it’s a tool that enhances your ergonomic health, improves your team’s efficiency, and contributes to a calm and professional patient experience. It is a foundational investment in the long-term success and sustainability of your practice.
Frequently Asked Questions (FAQ)
What is the absolute minimum room size for a functional operatory?
While there are always exceptions, a common and practical minimum is around 8-9 square meters (e.g., 2.7m x 3m). However, achieving functionality in a space this small requires meticulous planning, the use of compact equipment, and a commitment to keeping in-room storage to an absolute minimum.
Should I choose an over-the-patient or a rear-delivery system for a small space?
Both have their merits in a compact layout. Over-the-patient systems can feel more integrated and save the floor space a cart would occupy. However, rear-delivery systems can improve ergonomics by keeping instruments out of the patient’s direct line of sight and allowing for a more organized transfer of instruments. The best choice often comes down to your personal workflow and ergonomic preferences.
How important are regulatory certifications like CE and ISO?
They are critically important. These certifications are a primary indicator of a product’s safety, quality, and reliability. For you as a practitioner, they provide assurance that the equipment has undergone rigorous testing and is built to a professional standard. For your business, they ensure you are compliant with national and international regulations, protecting you from legal and safety issues. They are a fundamental component of trustworthy equipment.
Disclaimer: This article is for informational purposes only and does not constitute professional architectural or medical advice. Clinic design should be undertaken in consultation with qualified professionals and in accordance with local building codes and healthcare regulations.
About the Author


