Integrating New Instruments With Your Dental Chair System

The Foundation: Pre-Purchase Compatibility Assessment
Upgrading your dental instruments can significantly enhance clinical efficiency and patient outcomes. However, the excitement of a new tool can quickly turn into frustration if it doesn’t integrate with your existing dental chair. I’ve seen clinics invest in high-performance handpieces only to have them sit in a drawer due to an overlooked connector or pressure mismatch. A thorough pre-purchase assessment is the single most effective way to prevent this, saving you from costly downtime and return hassles. This step is a cornerstone of maintaining a reliable practice, a factor that directly impacts your bottom line as explored in The Financial Impact of Dental Chair Reliability & Downtime.
Before you add any new instrument to your cart, you must verify its compatibility with your delivery unit. We use a compatibility matrix for every new piece of equipment—a practice that has eliminated virtually all integration surprises.
Your Pre-Purchase Compatibility Checklist
Use this table as a guide to ensure your prospective instrument will function correctly with your current setup. It’s a framework that forces you to confirm the critical connection points between the instrument and the chair.
| Compatibility Point | Key Considerations | Why It Matters |
|---|---|---|
| Drive Type | Is it pneumatic (air-driven) or electric? | The power source and control system are fundamentally different. An electric handpiece cannot connect to a standard air line. |
| Coupling/Connector | What specific type is it (e.g., Midwest 4-hole, ISO/INTRAmatic E-type, brand-specific quick-connects)? | This is the most common point of failure. Couplings dictate the physical and utility (air, water, light) connection. |
| Tubing & Fittings | What is the inner diameter (ID) of the handpiece tubing? Do the waterline fittings match? | Mismatched tubing can restrict airflow or water, leading to poor performance. Incorrect fittings will cause leaks. |
| Control Interface | How is the instrument operated? (e.g., foot pedal rheostat, chair touchpad, separate console) | Your chair’s control system must be able to communicate with the new instrument to manage speed, torque, and other functions. |
| Ancillary Services | Does the instrument require fiber optics, suction, or specific cooling? | Ensure your delivery unit has the necessary ports and capacity to provide these services. |
| Anti-Retraction | Does the handpiece or the dental unit have an anti-retraction valve? | This is a critical infection control feature to prevent backflow of oral fluids into the waterlines, a requirement outlined by bodies like the FDA and essential for meeting EU MDR standards for patient safety. |
Debunking a Common Misconception: The “Universal” Connector Myth
A frequent pitfall is relying on the term “universal.” While some connectors like the ISO-E type are widely adopted, “universal” rarely covers all aspects of integration. A connector might fit physically, but the pin assignments for electricity or fiber optics can differ. Always verify the exact make and model compatibility with the instrument manufacturer. Assuming universality without confirmation is a recipe for failure.
Step-by-Step Installation and Calibration
Once you have a compatible instrument, proper installation and calibration are essential for performance and safety. A rushed setup can lead to subpar clinical results or even damage the new device. My approach is methodical, focusing on precision at each stage.
Step 1: Physical Installation and Hose Routing
Begin by connecting the instrument to the correct tubing on your delivery unit. When routing the hose, ensure there are no sharp bends or kinks that could restrict air or water flow. The hose should be long enough to allow for a full range of motion without creating tension on the connector, which can cause premature wear and leaks. Secure the instrument in its holder and confirm it sits securely without drooping.
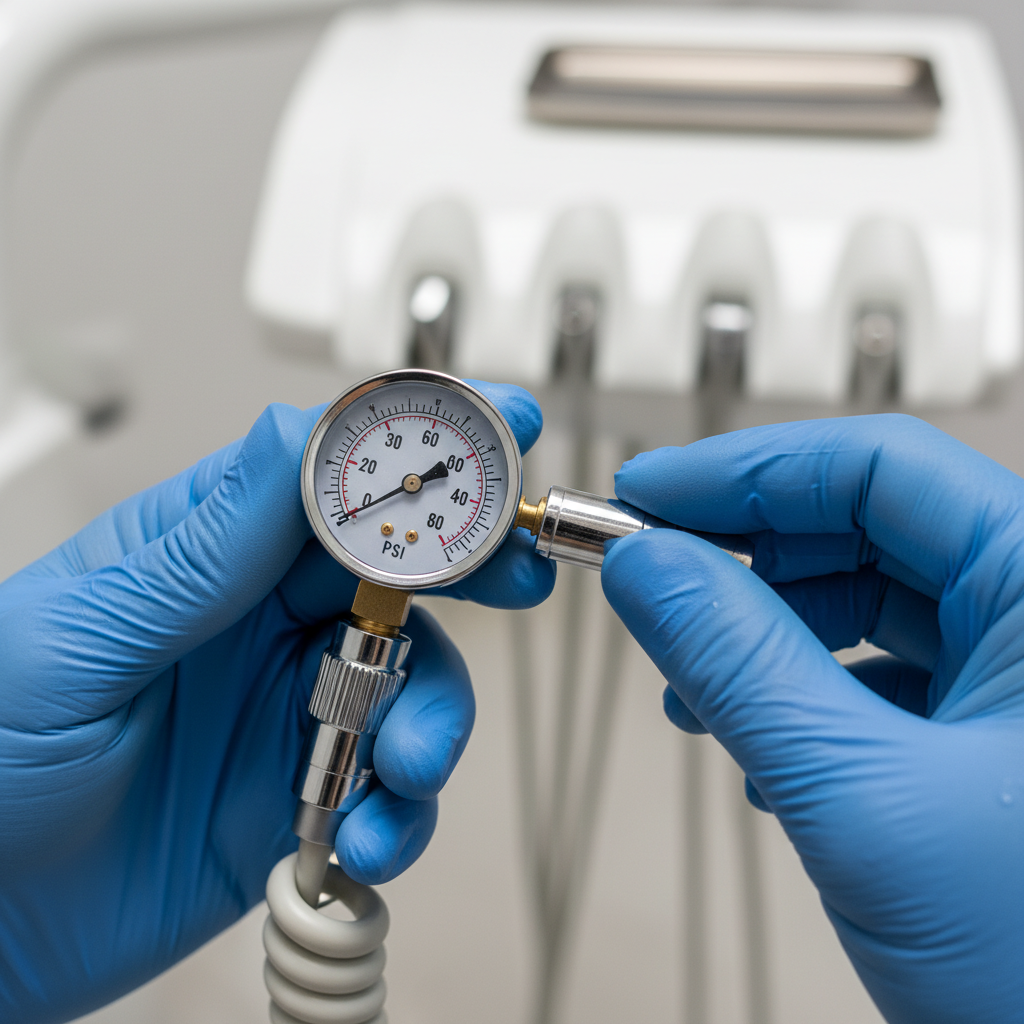
Step 2: Calibrating Pressure, Flow, and Speed
This is where technical precision becomes paramount. Never assume the default settings on your dental unit are correct for the new instrument. Always refer to the manufacturer’s specifications.
- For Pneumatic Handpieces: Use a pressure gauge to verify the dynamic (drive) air pressure at the handpiece connector. Don’t rely on the master gauge at the junction box, as pressure can drop along the length of the tubing. A typical usable range is between 25–45 psi, but your handpiece manufacturer will provide the optimal pressure for torque and longevity. Adjust the drive air pressure from your dental unit accordingly.
- For Electric Handpieces: The calibration process involves the electronic control unit. Ensure the wiring is correctly isolated to prevent interference with other instruments. Check that the speed and torque controls on your chair’s interface correctly adjust the handpiece’s output. Run the motor through its full speed range to ensure smooth operation without hesitation.
Step 3: The 10-Minute Operational Test
Before using the instrument on a patient, I always perform a 10-minute operational run under a representative load. This could involve using it on a model or simply running it continuously in the open air. During this test, feel for any unusual heat buildup, excessive vibration, or control latency. These are early warning signs of an underlying issue, such as insufficient lubrication, incorrect pressure, or a faulty motor, that is better discovered in the workshop than mid-procedure.
Optimizing Workflow and Ergonomics
Proper integration goes beyond technical compatibility; it must also enhance your clinical workflow and ergonomic health. The placement of a new instrument can significantly impact your posture and efficiency throughout the day. The goal is to minimize unnecessary movements and physical strain.
I always start by analyzing the primary work zone. When seated, your most frequently used instruments—your scaler, high-speed, and low-speed handpieces—should be positioned within your primary work zone, an area easily reachable with just your forearm, minimizing lateral twisting or over-extension of the shoulder. This principle is a core tenet of clinical ergonomics, which is crucial for all practitioners, especially those treating patients with special needs who may require longer procedures.
After installing a new instrument, perform a simulated procedure. Sit in your typical working posture and go through the motions of a common treatment, such as a crown preparation or a hygiene appointment. Does accessing the new instrument feel natural? Can you return it to its holder without looking? If you feel any awkward reaching or twisting, adjust the position of the delivery head or the instrument holder. Even a small adjustment of a few inches can make a substantial difference in reducing end-of-day fatigue.
Maintenance and Long-Term Reliability
Integrating a new instrument is an investment, and protecting that investment requires a proactive maintenance strategy. Following a consistent maintenance schedule is a key component of a robust quality management system, as outlined in standards like ISO 13485:2016 – Quality Management Systems. Proper care not only extends the life of the instrument but also ensures it performs reliably, meeting the quality system regulations detailed by authorities such as the FDA in 21 CFR Part 820.
Proactive Maintenance Checklist
To ensure the longevity and performance of your new instruments, implement this simple but effective maintenance checklist:
- Perform a Leak Test: Before the first use, and periodically thereafter, check all connections for air and water leaks. A simple soap-and-water solution can help identify minute air leaks at the connectors.
- Follow the Lubrication Schedule: Every handpiece has a specific lubrication requirement. Adhere strictly to the manufacturer’s guidelines for when and how to lubricate to prevent bearing failure.
- Stock Spare Parts: Keep a matched set of spare O-rings, gaskets, and quick-connects for your new instruments. These are inexpensive parts that can fail unexpectedly, and having them on hand can turn a day of downtime into a 5-minute fix.
- Document Everything: Keep a log of the instrument’s serial number, purchase date, and maintenance history. This documentation is invaluable for warranty claims and for ordering the correct spare parts years down the line.
By following these cost-effective integration strategies, you ensure that every new piece of technology you introduce contributes positively to your practice’s efficiency and standard of care.
Wrapping Up: Key Takeaways
Successfully integrating a new instrument into your dental chair system is not a matter of luck; it is a process of diligent planning and execution. By shifting your focus from a “plug and play” mindset to a systematic approach, you can avoid common pitfalls and ensure your investment enhances your practice from day one.
To ensure a seamless integration, remember these key principles:
- Verify Before You Buy: Use a detailed compatibility checklist to confirm that the new instrument will work with your existing delivery system.
- Calibrate with Precision: Always test and adjust pressure, flow, and speed settings according to the manufacturer’s specifications.
- Prioritize Ergonomics: Position instruments within your primary work zone and simulate procedures to optimize your workflow and reduce physical strain.
- Maintain Proactively: Follow a strict maintenance and documentation schedule to ensure long-term reliability and performance.
By adopting this framework, you can confidently upgrade your clinical toolkit, improve efficiency, and continue providing excellent patient care.
Disclaimer: This article is for informational purposes only and does not constitute professional medical or technical advice. Always consult the equipment manufacturer’s official documentation and a qualified technician for installation and maintenance. Adherence to local and international regulatory standards is the responsibility of the operator and clinic owner.
References
About the Author


