Hands-Free Chair Controls for Better Clinic Hygiene

The Unseen Risk: Why High-Touch Surfaces on Your Dental Chair Matter
In any dental practice, maintaining a sterile environment is paramount. While instruments are meticulously sterilized and surfaces are regularly disinfected, high-touch points on the dental chair itself can become critical vectors for cross-contamination. Every manual adjustment of the backrest, headrest, or chair height with a gloved hand presents an opportunity for pathogens to transfer from one surface to another. Minimizing contact with these surfaces is a cornerstone of modern infection control.
This is where hands-free dental chair controls become essential. Technologies like multi-function foot pedals and programmable presets are not just about convenience; they are fundamental tools for enhancing clinical hygiene, protecting practitioners and patients, and improving workflow efficiency. This guide explores the practical benefits, operational best practices, and key technical considerations for implementing hands-free controls to create a safer and more effective clinical environment.
Breaking the Chain of Transmission with Hands-Free Operation
The core principle of infection control is to break the chain of transmission. In a dental setting, practitioners’ hands, even when gloved, are a primary vehicle for moving microorganisms between surfaces. Hands-free controls directly address this challenge by removing the need to touch the chair during procedures.
This approach aligns with the risk-management principles outlined in international standards like ISO 13485:2016 – Quality Management Systems, which governs medical device manufacturing. While the standard doesn’t explicitly mandate foot pedals, it requires manufacturers to design equipment that mitigates foreseeable risks, including contamination. Similarly, regulatory bodies like the FDA emphasize robust quality systems to ensure device safety and effectiveness. By designing out the need for manual contact, hands-free controls provide an elegant and effective solution to a persistent contamination risk, protecting both the patient in the chair and the clinical team.
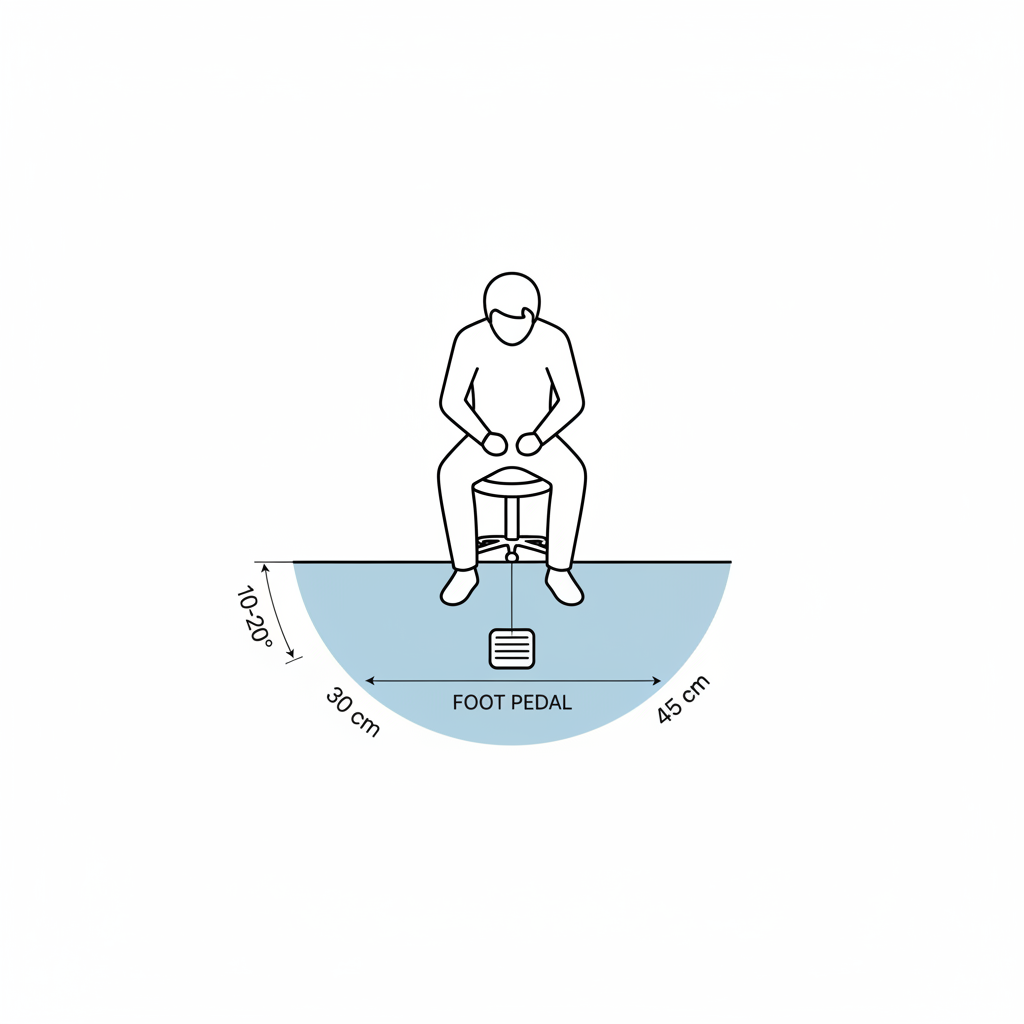
Mastering the Foot Pedal for Ergonomic and Hygienic Control
A well-designed foot control is the cornerstone of a hands-free system. However, its effectiveness depends on proper setup, technical design, and maintenance. Simply having a pedal is not enough; it must be used correctly and be built to withstand the rigors of a clinical environment.
Pro Tip: Optimal Placement for Comfort and Control
I’ve seen many clinicians develop poor posture and even repetitive strain injuries from awkwardly placed foot controls. The key is to position the pedal where your foot can rest and actuate it naturally without twisting your hip or back. Based on field observations and ergonomic best practices, the ideal placement is:
- Distance: Position the pedal approximately 30–45 cm from the base of the dental chair.
- Angle: Place it slightly lateral (10–20°) from your body’s midline.
This setup allows you to use a natural foot-roll motion to activate the controls, avoiding the awkward leg extensions and hip rotation that lead to fatigue and long-term strain. It’s a small adjustment that makes a significant difference in comfort over a long day of procedures.
Technical Deep Dive: Actuation, Debounce, and Durability
Not all foot pedals are created equal. For the fast-paced workflow of a dental clinic, a mechanical pedal with low travel distance and clear, tactile feedback provides the most reliable performance. A crucial but often overlooked feature is “debounce logic.” This is a programmed delay, typically between 100–300 milliseconds, that prevents a single quick tap from being accidentally registered as a double actuation. This small detail prevents jerky or unintended chair movements, ensuring smooth and precise adjustments.
Furthermore, the pedal’s construction is critical for both longevity and hygiene. The enclosure should be sealed to prevent fluid ingress, which can cause electrical shorts and harbor bacteria. Look for a minimum rating of IP44 (splash-resistant), with IP54 (splash-proof from all directions) being the preferred standard for enhanced durability and safety.
Common Misconception: Any Pedal Can Be Cleaned Effectively
A frequent mistake is selecting controls with materials that are difficult to disinfect. Pedals with seams, fabric surfaces, or porous coatings can trap bioburden and are incompatible with the aggressive chemical disinfectants used in clinics. The best practice is to choose pedals with smooth, non-porous external surfaces made from materials validated to withstand frequent wiping with hospital-grade disinfectants. This aligns with the stringent requirements for medical device materials and cleanability outlined in regulations like the EU Medical Device Regulation (MDR).
Programmable Presets: Automating Workflow and Hygiene
Beyond foot controls, programmable chair presets are another powerful tool for reducing manual adjustments. By storing preferred chair positions for common procedures, you can move the chair to the correct configuration with a single command, eliminating multiple manual touches.
Best Practices for Preset Configuration
To get the most out of this feature, a systematic approach is needed. In my experience observing multi-clinic installations, the practices that drive the highest adoption and efficiency are surprisingly simple.
Here is a quick checklist for effective preset management:
- Limit the Options: Establish 3–5 core presets per operator. Too many options become confusing and counterproductive.
- Use Clear Labels: Label each preset by its specific procedure (e.g., “Exam,” “Restorative,” “Surgical”). This avoids ambiguity and reprogramming errors.
- Provide Hands-On Training: A brief, 10–15 minute hands-on training session is remarkably effective. Focus on proper foot positioning, how to use the presets, and the correct cleaning protocol. This small time investment dramatically cuts user errors and boosts adoption.
- Schedule Regular Reviews: Workflows evolve. Briefly review presets with the team quarterly to ensure they still meet their needs.
Maintenance and Lifecycle Considerations
Hands-free controls are essential equipment, and their reliability is critical for clinic operations. A proactive maintenance strategy prevents downtime and extends the life of the components.
A Proactive Approach to Reliability
Field service logs consistently show that clinics keeping a small inventory of spare parts experience markedly fewer downtime incidents. I recommend that every practice store at least one or two replacement foot switches and a spare control module on-site. The ability to swap out a faulty component immediately can turn a multi-day operational halt into a minor ten-minute inconvenience.
Structured Maintenance Checklist
Integrating checks into your clinic’s regular maintenance schedule ensures long-term reliability. A simple schedule provides a clear framework for your team.
| Frequency | Task | Purpose |
|---|---|---|
| Daily | Wipe down the foot pedal and controls with an approved disinfectant. | Prevents cross-contamination and material degradation. |
| Monthly | Perform a functional check of all pedal buttons and presets. | Ensures all controls are responsive and accurate. |
| Annually | Inspect the pedal enclosure, seals, and cabling for signs of wear, cracking, or damage. | Prevents fluid ingress and identifies potential electrical faults before they occur. |
Smart Installation and Retrofitting
Proper installation is the foundation of reliability. Low-voltage control cables are sensitive to electrical interference. As required by quality system regulations like the FDA’s 21 CFR Part 820, which mandate proper design and process controls, these cables should be routed in separate conduits from suction lines and high-current power lines. Additionally, including 20–30 cm of “service loop” (extra slack in the cable) and using quick-disconnects makes future replacements or servicing significantly faster and easier.
Wrapping Up: Key Takeaways for a Safer Clinic
Integrating hands-free controls into your dental practice is a critical step toward elevating your infection control standards and improving operational efficiency. These systems are not a luxury but a foundational component of a modern, safety-conscious clinic.
By focusing on three key areas, you can maximize their benefit:
- Ergonomics and Proper Use: Correctly positioning foot controls prevents operator fatigue and ensures precise, intuitive operation.
- Smart Technology Choices: Opting for durable, well-sealed components with features like debounce logic and programmable presets reduces errors and streamlines workflows.
- Proactive Maintenance: A simple maintenance schedule and a small inventory of spare parts can virtually eliminate downtime related to chair controls.
By adopting these practices, you break a critical link in the chain of cross-contamination, protect your clinical team, and create a more efficient and reliable working environment.
Disclaimer: This article is for informational purposes only and does not constitute professional medical or safety advice. Dental clinics should always adhere to local, state, and federal regulations regarding infection control and medical device use. Consult with equipment manufacturers and qualified technicians for specific guidance on your dental chair and control systems.
References
About the Author


