Ergonomic Operatory Layouts to Reduce Staff Fatigue

The Hidden Costs of Poor Ergonomics
Practitioner burnout is a real and growing concern in the dental industry. While long hours and patient demands contribute, a significant and often underestimated factor is the physical strain caused by a poorly designed workspace. This article details how to integrate your dental chair and cabinetry to create an ergonomic work triangle, a setup that minimizes repetitive stress, reduces daily fatigue, and ultimately improves career longevity. The goal is to make your environment work for you, eliminating the hundreds of tiny, inefficient micro-movements—a slight twist to reach an instrument, a forward lean to get a better view—that compound into chronic pain and exhaustion.
The Foundation of Ergonomics: Operator Posture
Before you can optimize your reach for instruments, you must first stabilize your own body. Many clinicians make the mistake of adjusting the patient or equipment first, forcing themselves into an awkward posture. Always start with your own chair and position.
Anchoring Your Position
A neutral, balanced posture is the anchor for all your movements. Start by seating yourself with your feet flat on the floor. Your thighs should be roughly parallel to the ground.
I used to end my days with persistent lower back pain, and I blamed my stool for years. The real culprit was that I had it set slightly too high, causing my feet to barely touch the floor and putting my spine out of alignment. Ensuring your forearms are also parallel to the floor, with your elbows bent at a comfortable 90 to 110-degree angle, is the simple fix that makes a huge difference in preventing shoulder and upper back strain.
Achieving the Ideal Working Distance
Constant forward head posture is a primary cause of neck strain. The key is to maintain an oral-cavity-to-eye working distance of approximately 35–45 cm. You achieve this not by leaning in, but by adjusting the patient’s chair height and headrest. Bring the patient to you, allowing your neck to remain in a neutral, upright position. This small adjustment was a game-changer for me, eliminating the neck strain that used to build up by mid-afternoon.
Debunking a Common Misconception
A frequent myth is that investing in a top-of-the-line dental chair will automatically solve all ergonomic issues. In reality, an expensive chair that isn’t correctly adjusted for the specific operator and integrated into the room’s workflow can still cause significant physical stress. The most advanced features are useless if they force you to twist or over-extend. True ergonomics comes from a holistic approach, where the chair, cabinetry, and operator posture work in harmony.
The Work Triangle: Mastering Your Reach Zones
To cut down on wasted motion, think of your workspace in terms of concentric zones radiating from your ideal seated position. Organizing your tools within these zones is fundamental to efficiency.
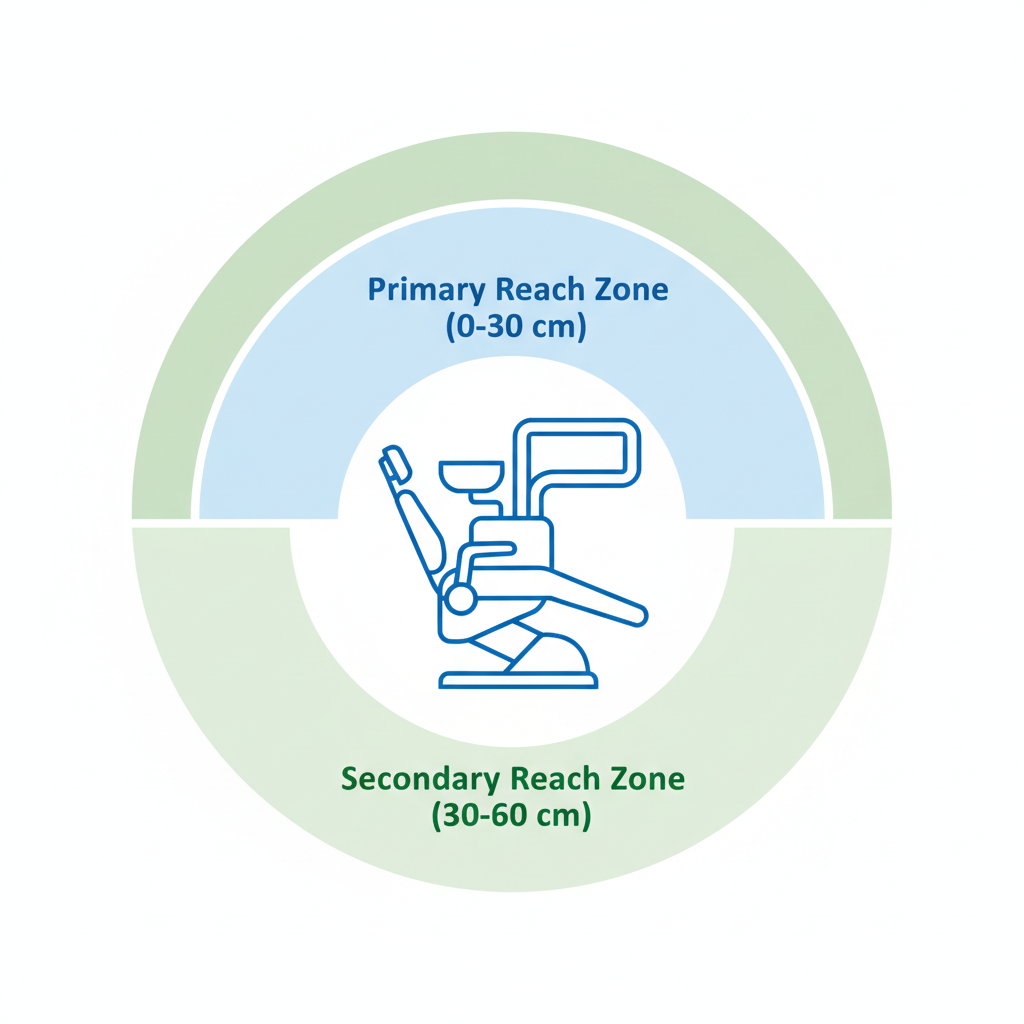
The Primary Reach Zone (0–30 cm)
This is the area you can comfortably access with a sweep of your forearm, without extending your elbow or leaning. This zone is reserved for your most frequently used items—probes, mirrors, scalers, and primary handpieces. Placing these within the 0–30 cm range eliminates the constant, fatiguing trunk-twisting that happens when they are placed just a few inches too far away.
The Secondary Reach Zone (30–60 cm)
This zone is accessible with a simple extension of your arm, requiring no leaning or twisting. It’s the perfect place for items used less frequently but still needed during procedures, such as curing lights, certain materials, or secondary instruments. A common mistake is cluttering the primary zone with secondary items, forcing operators to reach around them. Using mobile carts and well-positioned instrument trays for these secondary tools keeps the primary zone clear and functional.
Ergonomic Workstation Setup Checklist
Use this checklist to audit and optimize your current operatory layout. This process should be repeated annually or whenever new equipment is introduced.
| Step | Action Item | Check | Why It Matters |
|---|---|---|---|
| 1 | Establish Your Posture | ☐ | Sit with feet flat, thighs parallel to the floor, and back supported. This is your non-negotiable starting point. |
| 2 | Set Working Distance | ☐ | Adjust the patient chair so the oral cavity is 35-45 cm from your eyes without you leaning forward. |
| 3 | Map Primary Instruments | ☐ | Place your top 5 most-used instruments within the 0-30 cm primary reach zone. |
| 4 | Map Secondary Instruments | ☐ | Position less-used items in the 30-60 cm secondary zone, utilizing mobile carts for flexibility. |
| 5 | Check Cabinetry Access | ☐ | Ensure drawers and supplies can be accessed without twisting your torso. A drawer near the patient saves 2-4 seconds per retrieval. |
| 6 | Position Foot Controls | ☐ | Place foot pedals within 10-15 cm of your dominant foot’s natural resting position to avoid awkward leg extension. |
| 7 | Verify Clear Pathways | ☐ | Ensure a circulation path of at least 1.2 meters is maintained around the chair for safe movement and emergency access. |
Optimizing Cabinetry and Instrument Flow
The physical placement of fixed items like cabinetry and sterilizers has a surprisingly large impact on daily efficiency. Seconds lost per task quickly add up to minutes and hours over the course of a week.
The Compounding Cost of Poor Placement
Our analysis of clinic workflows consistently shows that inefficient layouts create significant time sinks. For instance, placing sterilizers in a separate room far from the operatories can add 30 to 90 seconds of travel and handling time to every single instrument cycle. Likewise, we found that positioning instrument drawers near the patient’s torso instead of behind the operator saves an average of 2–4 seconds per retrieval. While it sounds minor, this can add up to over 30 minutes of saved time in a busy day of procedures.
Smart Solutions for Different Spaces
Not every operatory has an ideal footprint. For smaller rooms, the key is to think vertically. Wall-mounted vertical storage and mobile carts are excellent solutions. They keep instruments and materials within the primary or secondary reach zones without cluttering the floor. This approach supports compliance with quality management systems like ISO 13485:2016, which require that medical device environments are designed to ensure both performance and user safety.
The Critical Role of Adjustability
In a clinic with multiple operators, one size never fits all. Countertops and instrument trays should either be adjustable or set within a tight 5–10 cm height range to accommodate staff of varying heights. Fixed-height surfaces often force shorter or taller individuals into compromised postures, leading to strain. This principle of accommodating user needs is a cornerstone of medical device regulations like the FDA’s 21 CFR Part 820, which mandate that equipment design prevents user error and ensures safe operation.
Clinic-Wide Workflow and Safety
An ergonomic operatory exists within the larger ecosystem of the clinic. Optimizing the flow of people and materials is essential for both efficiency and safety.
Sterilization and Supply Pathways
A well-designed clinic maps the entire lifecycle of an instrument—from use to sterilization to storage and back to the operatory. This pathway should be as short and direct as possible. Furthermore, maintaining a clear circulation path of at least 1.2 meters around the dental chair is not just for convenience; it is a critical safety measure for patient transfers and provides necessary access in case of a medical emergency. This aligns with broad regulatory frameworks, including the EU Medical Device Regulation (MDR), which scrutinizes the entire lifecycle and operational context of medical devices.
Monitoring for Fatigue
How do you know if your ergonomic adjustments are working? Monitor your staff for signs of fatigue. If clinicians report persistent discomfort or find themselves needing frequent micro-breaks after just 20–30 minutes of a routine procedure, it is a clear signal that the workstation needs reassessment. Tracking procedure duration and perceived exertion can provide valuable data to pinpoint remaining ergonomic issues.
Wrapping Up: Key Takeaways for a Healthier Practice
Building an ergonomic operatory is not a one-time task but an ongoing process of refinement. It is one of the most effective investments you can make in the long-term health of your staff and the efficiency of your practice. The core principles are simple but powerful:
- Posture First: Always begin by establishing a neutral, balanced seated posture for the operator.
- Honor the Zones: Organize all instruments and materials within the primary (0-30 cm) and secondary (30-60 cm) reach zones.
- Optimize the Flow: Design cabinetry and clinic pathways to minimize steps and save seconds on every task.
- Listen to Your Body: Use fatigue as a diagnostic tool to identify and correct ergonomic friction points.
By moving from a reactive to a proactive approach to ergonomics, you can create a safer, more comfortable, and more productive clinical environment for years to come.
Frequently Asked Questions (FAQ)
How often should I reassess my operatory ergonomics?
It is good practice to perform a full ergonomic assessment annually. You should also reassess whenever a new staff member joins the team, new equipment is introduced, or if a clinician reports recurring pain or fatigue.
What’s the most important first step for a small clinic on a budget?
Focus on process and placement before purchasing new equipment. Simply mapping your reach zones and repositioning existing instruments, trays, and mobile carts can produce dramatic improvements with zero capital investment.
Are anti-fatigue mats worth the investment?
For roles that require a mix of sitting and standing, yes. An anti-fatigue mat was a real game-changer for me. It significantly reduces the strain on the back and legs, easily doubling the amount of time one can stand comfortably during a procedure.
Disclaimer: This article is for informational purposes only and does not constitute professional medical advice. The ergonomic principles discussed are intended as guidelines for reducing occupational risks in a dental setting. Individuals with pre-existing medical conditions or chronic pain should consult with a qualified physician or physical therapist to address their specific needs.
References
About the Author


