Ergonomics of the Modern Digital Dental Operatory

The Ergonomic Imperative in the Digital Dental Age
The adoption of digital technology—from intraoral scanners to integrated patient management systems—is no longer a novelty in dentistry; it is the new standard. As clinics evolve, however, the physical layout of the operatory often lags, forcing practitioners to adapt to technology rather than the other way around. This mismatch can lead to a host of problems, including chronic musculoskeletal strain, reduced procedural efficiency, and ultimately, compromised patient care.
I have seen countless clinics invest in state-of-the-art equipment only to place it in a way that creates daily physical friction for the dental team. The solution is not to abandon technology but to master its integration. This article provides a definitive guide to the ergonomics of the modern digital dental operatory. We will move beyond product features to establish a practical, evidence-based framework for arranging your digital tools, dental chair, and workflow to protect your health, boost productivity, and enhance the quality of care.
The Core Foundation: Practitioner-First Positioning
Before we even touch a monitor or a scanner, we must establish a stable, neutral posture for the practitioner. I often see a critical mistake where the equipment dictates the operator’s position, forcing them into awkward postures. The correct approach is always to start with your body, then bring the environment to you.
Establishing Your Neutral Posture
A neutral posture is the cornerstone of a long and healthy career in dentistry. It begins with your chair. Sit with your feet flat on the floor, thighs roughly parallel to the ground, and your back supported. This is your anchor.
From this position, every other piece of equipment should be brought into your immediate sphere of control. A common pitfall is adjusting the patient’s chair height first, which can force you to hunch or reach. Always start with your own neutral posture, then adjust the patient and equipment to suit you. This simple sequence shift is one of the most impactful changes a clinician can make.
Essential Chair Adjustability
While advanced features are appealing, true ergonomic value lies in fundamental adjustability. For a dental chair to be effective, it must support a wide range of scenarios. Based on extensive field observations, the most effective chairs provide:
- Seat Height Range: Approximately 45–60 cm to accommodate different operator heights and procedural requirements.
- Backrest Angle: An adjustable range of 100–110° is optimal for most treatments, providing lumbar support without forcing the practitioner to lean forward excessively.
- Headrest Flexibility: The ability to adjust the headrest by at least ±15° is crucial for positioning the patient’s head correctly for access to different quadrants.
Focusing on these core mechanics ensures the chair can adapt to nearly any situation, a principle that supports both practitioner health and long-term value. For more on this, see our guide on how chair durability impacts your clinic’s financial health.
Integrating Digital Tools: The “Tool Arc” and Reach Zones
With a neutral posture established, the next step is to arrange your instruments and digital tools in a way that minimizes physical strain. The key is to reduce unnecessary reaching, twisting, and repetitive motions.
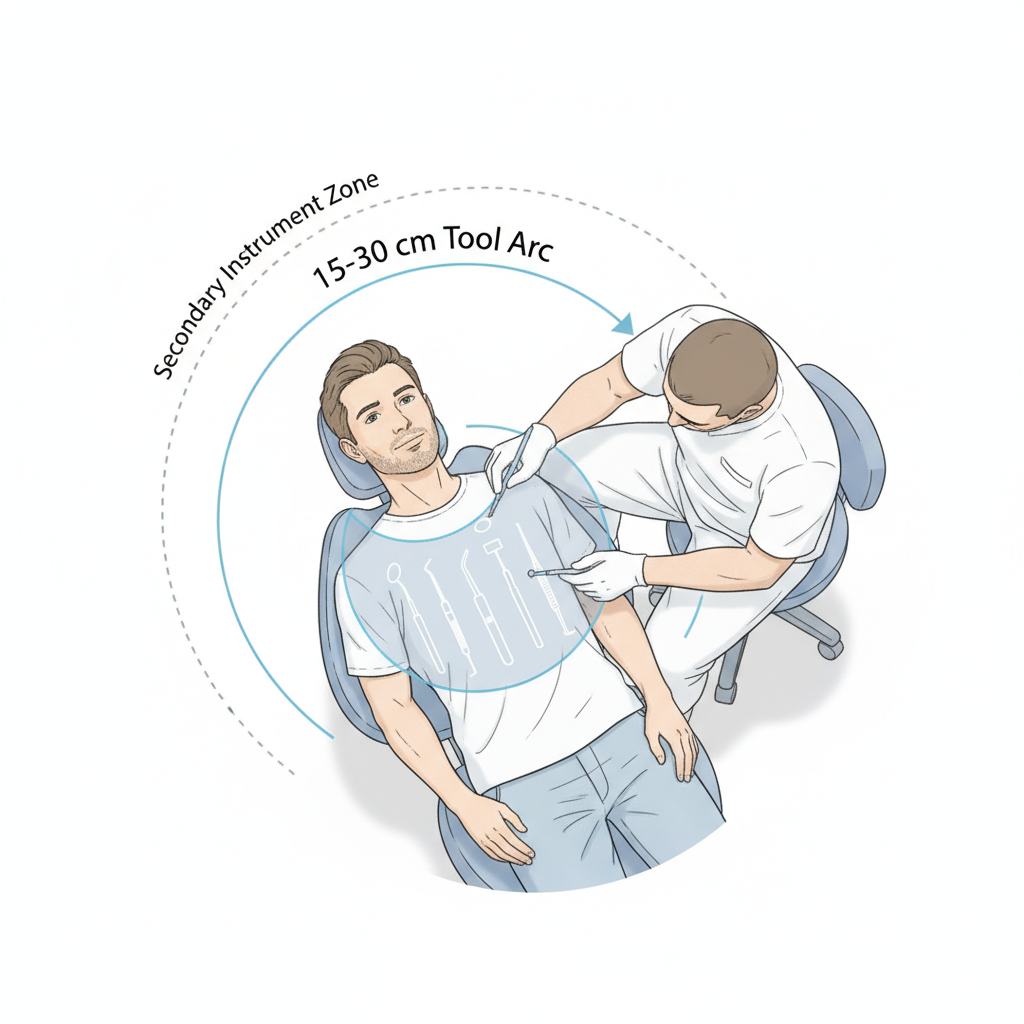
The “Tool Arc”: Your Zone of Control
I apply a principle I call the “Tool Arc.” The most frequently used instruments—your scaler, handpiece, and suction—should be placed within a 15–30 cm radial zone from your dominant hand’s natural resting position. This arc is your primary zone of control. Placing tools here eliminates the need to reach or look away from the oral cavity, improving both efficiency and focus.
Instrument trays should be positioned approximately 15–25 cm above your knee level. This height prevents shoulder elevation, a common cause of neck and shoulder pain. If you find yourself raising your shoulder to grab an instrument, your tray is too high.
Strategic Placement of Intraoral Scanners
Intraoral scanners are a major source of ergonomic strain when poorly positioned. The cradle is often mounted behind the operator, forcing a full torso twist to retrieve and return it. This repetitive motion is a direct path to lower back pain.
For right-handed users, the scanner should be stored on the right side in a “ready position” approximately 30–40 cm away. This placement ensures you can grasp the scanner with a simple arm extension, keeping torso rotation under 20 degrees. This small change dramatically reduces the cumulative strain from dozens of scans performed daily.
Visual Ergonomics: Mastering Monitor and Display Placement
Digital displays are now central to the operatory, used for everything from viewing radiographs to sharing treatment plans. However, they are also a primary cause of “tech neck” and eye strain when not positioned correctly.

The Eye-Level Rule for Monitors
The most critical rule for visual ergonomics is proper monitor height and distance. A mistake I consistently observe is mounting monitors too high, forcing the neck into extension. This posture creates significant strain on the cervical spine.
Follow these three simple rules for optimal monitor placement:
- Viewing Distance: The screen should be 50–70 cm away from your eyes—roughly an arm’s length.
- Screen Height: The top of the screen should be at or slightly below your horizontal eye level. This encourages a slight downward gaze, keeping your neck flexion under a comfortable 15 degrees.
- Use Articulating Mounts: A short, articulated monitor arm is one of the best investments for digital ergonomics. It allows for quick, repeatable positioning that can be easily adjusted between users or procedures.
Adhering to these guidelines is essential for preventing the kind of chronic neck and shoulder pain that can shorten a dental career. The research provided by institutions like the National Institute of Dental and Craniofacial Research (NIDCR) consistently highlights the importance of mitigating work-related musculoskeletal disorders in dentistry.
Debunking a Common Myth: More Screens are Always Better
A common misconception is that a multi-monitor setup automatically boosts productivity. In reality, an improperly placed secondary monitor can introduce more ergonomic problems by forcing constant head-turning. Unless your workflow absolutely requires simultaneous information streams, a single, correctly positioned primary monitor is often the more ergonomic choice. If a second screen is needed, position it immediately adjacent to the primary one and at the same height.
Building a Sustainable Ergonomic Workflow
Ergonomics is not a one-time setup; it is a continuous process of refinement and discipline. Creating a sustainable workflow involves establishing clear protocols, using practical aids, and committing to regular, small adjustments.
Checklist for an Ergonomic Operatory Setup
Use this checklist to systematically configure a new operatory or audit an existing one. Perform the steps in order to ensure a practitioner-first arrangement.
- [ ] Set Practitioner Stool: Adjust your seat height so your feet are flat on the floor and your thighs are parallel to it. Ensure your back is supported.
- [ ] Position the Patient: Adjust the patient chair height and backrest so you can work from your neutral posture without leaning or reaching.
- [ ] Arrange the “Tool Arc”: Place your most-used instruments within the 15-30 cm radial arc of your dominant hand.
- [ ] Position Instrument Tray: Set the tray height 15-25 cm above your knees.
- [ ] Place the Scanner: Position the intraoral scanner cradle on your dominant side, about 30-40 cm away.
- [ ] Adjust the Monitor: Set the monitor distance (50-70 cm) and height (top of screen at or below eye level).
- [ ] Manage Cables: Use color-coded ties or sleeves to route all cables away from walkways and work zones. This reduces both trip hazards and visual clutter.
Ergonomic Fixes for Common Ailments
Even in a well-designed operatory, bad habits can lead to discomfort. Here is a table to help you troubleshoot common physical complaints.
| Problem | Common Cause | Recommended Solution |
|---|---|---|
| Persistent Neck & Shoulder Strain | Monitor is too high, or you are elevating your shoulder to reach instruments. | Lower the monitor so the top of the screen is at or below eye level. Lower the instrument tray to 15-25 cm above your knees. |
| Lower Back Pain or Twisting Sensation | Scanner cradle is mounted behind you, or the chair backrest provides poor support. | Move the scanner to your dominant side to minimize torso rotation. Adjust the chair backrest to a 100-110° angle to support your lumbar spine. |
| Eye Strain or Headaches | The monitor is too close or too far, or there is significant screen glare. | Adjust the monitor to an arm’s length distance (50-70 cm). Reposition it to avoid glare from overhead lights or windows. |
| Trip Hazards & Workflow Interruptions | Loose cables from scanners, monitors, and handpieces create a messy and unsafe environment. | Invest 30 minutes to bundle and route cables properly. Use color-coded ties to quickly identify each component. |
The Power of Microbreaks
One of the most effective, yet often overlooked, ergonomic strategies is the microbreak. I advise clinicians to pause every 20–30 minutes for just 30–60 seconds. During this time, perform simple neck and shoulder rolls or stand up and stretch. This practice breaks the cycle of static muscle loading and dramatically reduces end-of-day fatigue.
Compliance and Durability in a Digital World
An ergonomic design is also an indicator of quality and regulatory compliance. Manufacturers who prioritize usability are often the same ones who adhere to the highest international standards. When evaluating equipment, look for certifications like ISO 13485:2016, which governs quality management systems for medical devices. For equipment sold in Europe, CE Marking and compliance with the EU Medical Device Regulation (EU MDR) are non-negotiable, as they ensure the device meets stringent safety and performance requirements.
For clinics in any market, especially those with resource constraints, prioritizing modularity is key. Opting for equipment with modular mounts and easily replaceable consumables, like handpiece hoses and scanner tips, is a financially sound strategy. I always recommend that clinics document the specific spare-part SKUs for their critical equipment. This simple step can significantly reduce downtime and is a core component of cost-effective dental chair integration strategies.
Key Takeaways for the Modern Clinic
Transforming your operatory into an ergonomic powerhouse does not require a complete overhaul. It requires a shift in mindset—from adapting to your tools to making your tools adapt to you.
The core principles are simple but powerful:
- Start with You: Always establish your own neutral posture first.
- Respect the “Tool Arc”: Keep your primary instruments within immediate reach.
- Position for Sight: Place monitors at eye level to protect your neck.
- Build Good Habits: A disciplined workflow with regular microbreaks is more valuable than any single piece of equipment.
By implementing these strategies, you are not just improving your comfort; you are building a more efficient, sustainable, and healthy practice for years to come.
Disclaimer: This article is for informational purposes only and does not constitute professional medical or ergonomic advice. The recommendations provided are based on general ergonomic principles and industry best practices. Individuals, especially those with pre-existing medical conditions, should consult with a qualified healthcare provider or a certified ergonomics professional to address their specific needs.
References
About the Author


