Skip to content
 Desiccant vs. Refrigerated Air Dryers for Clinics

Why Clean, Dry Air is Non-Negotiable in a Dental Clinic
Think of compressed air as the fourth utility in your clinic, alongside water, gas, and electricity. It powers handpieces, dries surfaces for bonding procedures, and operates pneumatic controls. But if that air is contaminated with moisture, oil, or particulates, it can become a significant liability. Contaminated air can lead to premature failure of expensive equipment, compromise the integrity of restorative work, and introduce health risks for patients.
Moisture in air lines creates a breeding ground for microorganisms. This is a direct challenge to maintaining a sterile environment and upholding the quality management standards expected for medical facilities. As outlined in the ISO 13485:2016 standard for medical device quality management, process control is paramount. Ensuring your compressed air is pure is a foundational step in that process.
Debunking a Common Misconception: “My Compressor Has a Filter”
A frequent and costly mistake is assuming that the standard filter on a compressor is sufficient to protect your clinic. While these filters are effective at capturing solid particles like dust or rust, they are completely ineffective against water in its vapor form (humidity). The air heats up during compression and cools as it travels through the storage tank and lines. As it cools, this water vapor condenses into liquid water—the primary culprit behind corrosion and contamination. Only a dedicated air dryer can remove this moisture vapor before it has a chance to turn into destructive liquid water.
Refrigerated Air Dryers: The Workhorse for Most Clinics
Refrigerated air dryers are the most common type found in dental clinics, and for good reason. They offer a reliable and cost-effective solution for achieving the air quality needed for most routine dental procedures.
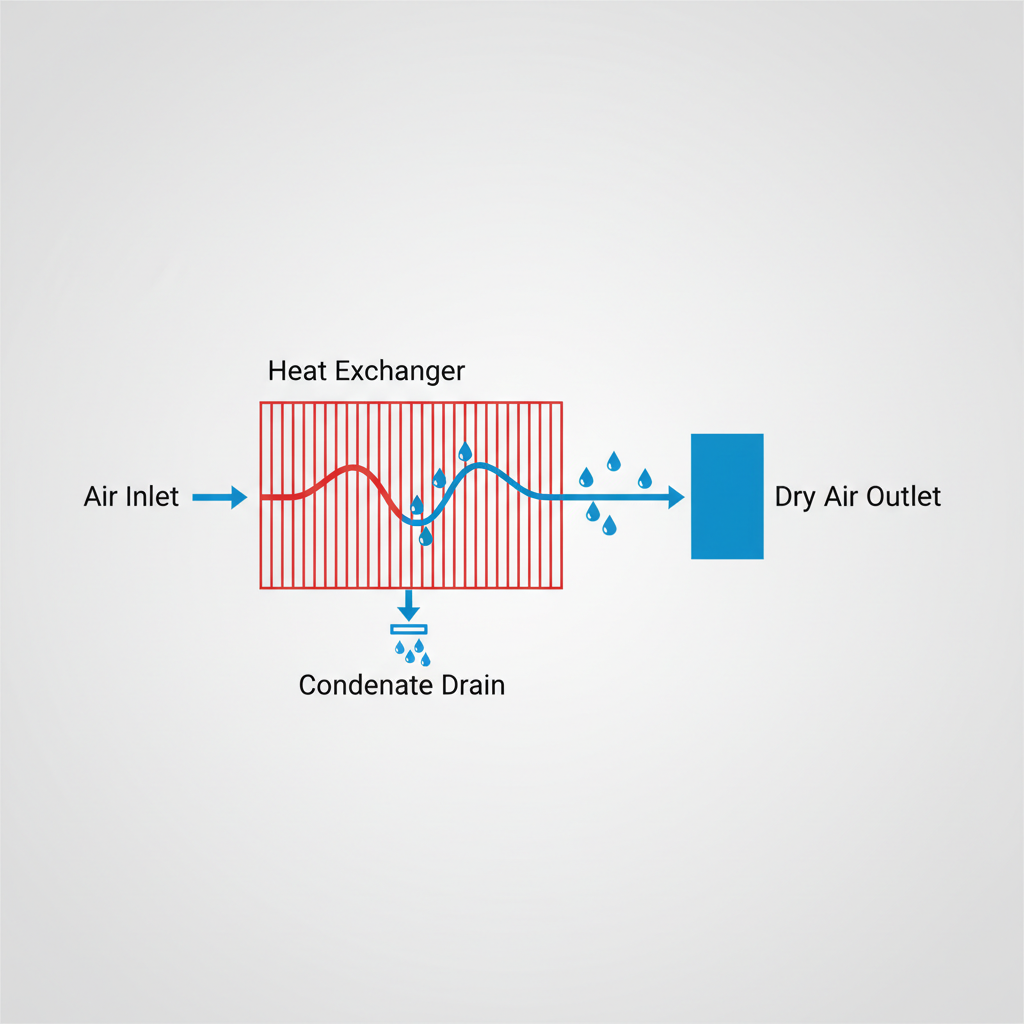
How They Work
The principle is simple and effective, much like a cold glass of water gathering condensation on a humid day. A refrigerated dryer chills the incoming compressed air, forcing a large portion of the entrained water vapor to condense into liquid. This liquid is then collected and automatically drained away. The result is air that is dry enough to prevent liquid water from forming downstream in your pipes and equipment.
Performance and Limitations
Typically, a refrigerated dryer delivers a pressure dew point (PDP) in the range of +3°C to +10°C (37°F to 50°F). The dew point is the temperature at which water vapor will condense into liquid. As long as the ambient temperature in your clinic and piping never drops below this dew point, the air will remain free of liquid water.
This level of performance is perfectly adequate for the majority of clinics operating in moderate climates. However, their primary limitation emerges in very high-humidity environments or in installations where air lines run through hot areas. If the compressed air is not cooled sufficiently, these dryers can be overwhelmed, allowing moisture to pass through.
Total Cost of Ownership (TCO)
For most small to medium-sized clinics with intermittent air demand, a refrigerated dryer presents the best total cost of ownership. They have a lower upfront purchase price, consume less energy compared to desiccant models, and feature a simpler design that requires less maintenance. This combination of affordability and reliability makes them the default choice for many practices.
Desiccant Air Dryers: The Specialist for Demanding Conditions
When air purity requirements are absolute or environmental conditions are extreme, a desiccant air dryer is the superior choice. These systems are engineered to achieve an exceptionally low dew point, ensuring no condensation can occur under almost any condition.
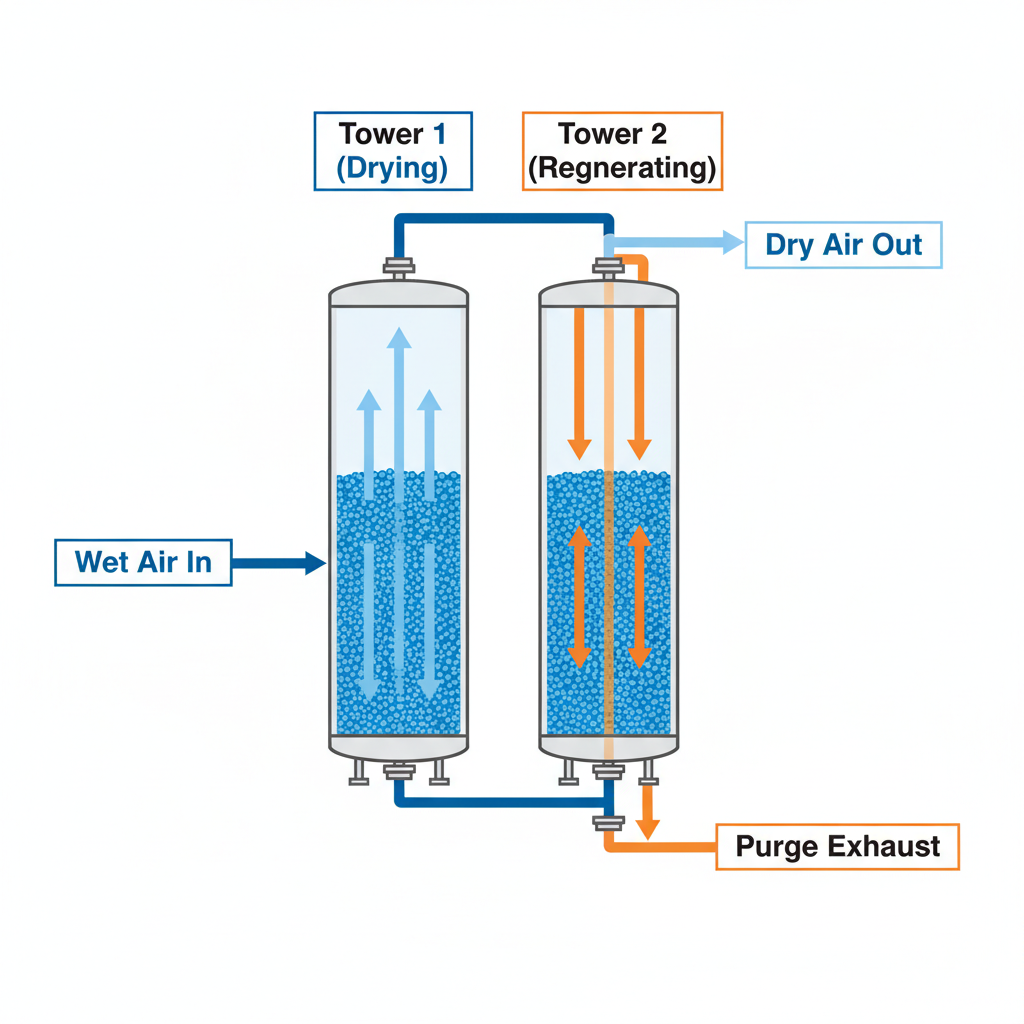
How They Work
Desiccant dryers use a special adsorbent material, similar to the silica gel packets found in electronics packaging, to strip water vapor from the air. Most models use a twin-tower design. While one tower is actively drying the compressed air, the other tower is “regenerated.” In a standard heatless model, a small portion of the already-dried air (called “purge air”) is expanded and sent back through the saturated tower, carrying the collected moisture away and venting it to the atmosphere. The system then cycles, providing a continuous, uninterrupted flow of extremely dry air.
Unmatched Performance for Critical Applications
The key advantage of a desiccant dryer is its ability to reliably reach a very low pressure dew point, often at or below -40°C (-40°F). This level of dryness is essential in several scenarios:
- Humid Climates: In regions with high ambient humidity, a refrigerated dryer may not be able to remove enough moisture, making a desiccant dryer a necessity.
- Sensitive Equipment: Advanced pneumatic controls and certain CAD/CAM milling units require exceptionally dry air to function without fail.
- Regulatory Rigor: For clinics producing or maintaining medical devices that will be sold in highly regulated markets, such as the European Union, adhering to the stringent EU Medical Device Regulation (MDR) is crucial. A desiccant dryer helps guarantee the air quality required for these exacting manufacturing and operational standards.
Understanding the Costs
This superior performance comes at a cost. Desiccant dryers have a higher initial purchase price and higher operating costs. The purge air used for regeneration is effectively wasted compressed air, which adds to energy consumption. For heavy, continuous-duty applications, heated or blower-purge desiccant dryers are available, which reduce energy loss but add to the system’s complexity and initial cost.
Head-to-Head Comparison: Choosing the Right Dryer
Making the right choice depends on a clear-eyed assessment of your clinic’s specific needs. The table below breaks down the key differences to guide your decision.
| Feature | Refrigerated Air Dryer | Desiccant Air Dryer |
|---|---|---|
| Dew Point Performance | +3°C to +10°C PDP | -40°C to -70°C PDP |
| Upfront Cost | Lower | Higher |
| Operating Cost | Lower (less energy use) | Higher (purge air loss) |
| Maintenance | Simpler (fewer moving parts) | More complex (desiccant, valves) |
| Best For | Moderate climates, general practice | Humid climates, critical applications |
| Air Quality | Good (prevents liquid water) | Excellent (removes virtually all vapor) |
Practical Implementation: Common Mistakes and Best Practices
Selecting the right type of dryer is only half the battle. Proper installation and maintenance are critical for performance and longevity. Avoiding a few common mistakes can save you from costly repairs and downtime.
Sizing Your Dryer Correctly
A frequent error is to size the dryer based on the compressor motor’s horsepower or the nameplate flow rate. The correct method is to size it based on the compressor’s actual measured output, or Free Air Delivery (FAD), measured in CFM or L/min. As a rule of thumb, size the dryer to handle 20-30% more than the compressor’s FAD. This buffer ensures the dryer can handle peak demand and temperature fluctuations without being overwhelmed.
The Critical Role of Filtration
Proper filtration is essential for any compressed air system, a principle reinforced by quality system regulations like the FDA’s 21 CFR Part 820, which mandate strict process controls. For a dryer, filtration is not optional.
- A Mistake I Often See: A clinic invests in a high-quality desiccant dryer but omits the upstream coalescing filter. Oil aerosol from the compressor coats the desiccant beads, destroying their ability to adsorb water. This leads to complete system failure in a matter of months.
- The Fix: Always install a high-efficiency coalescing filter directly upstream of any dryer. This filter removes oil and water aerosols, protecting the dryer and extending its life. For sensitive point-of-use applications, a downstream particulate filter is also recommended to catch any potential desiccant dust.
Installation and Maintenance Checklist
- Install Filters First: Always place a coalescing filter before the dryer inlet and a particulate filter after the outlet.
- Position After the Tank: The dryer should always be installed after the air receiver (tank). This allows the air to cool and some water to drop out in the tank first, reducing the load on the dryer.
- Use Reliable Drains: Avoid cheap, plastic float drains on filters and tanks, as they are prone to sticking open or clogging shut. Invest in reliable electronic or pneumatic demand drains.
- Monitor Performance: Install a simple, color-changing moisture indicator at a point of use to get a quick visual confirmation that your air is dry.
- Schedule Maintenance: For desiccant dryers, expect to check or replace the desiccant media every 6 to 18 months, depending on the load and upstream filtration quality. Filter elements should be changed according to manufacturer recommendations or when the pressure drop indicator activates.
Wrapping Up: Key Takeaways for Clinic Decision-Makers
The choice between a refrigerated and a desiccant air dryer is a strategic one that impacts both your budget and your operational resilience. A refrigerated dryer is a pragmatic and cost-effective choice for most clinics in temperate climates, offering more than enough protection for general dentistry. A desiccant dryer is a specialist’s tool—an essential investment for clinics in high-humidity regions, those using highly sensitive pneumatic or milling equipment, or practices that must adhere to the strictest standards of air purity.
Ultimately, a properly specified air treatment system is not an expense; it is an investment in equipment longevity, treatment quality, and patient safety.
Frequently Asked Questions (FAQ)
Q1: Can I install an air dryer myself?
A: While it is physically possible, professional installation is highly recommended. An expert will ensure the dryer is correctly sized and integrated with the proper filtration, layout, and drainage to guarantee performance and reliability.
Q2: How often should I replace the filters in my system?
A: Pre-filter and post-filter elements are typically replaced every 6-12 months, but this depends heavily on usage hours and air quality. The best practice is to follow the manufacturer’s guidelines and replace elements when the built-in pressure drop indicator signals they are clogged.
Q3: My desiccant dryer makes a hissing sound every few minutes. Is it broken?
A: This is most likely the normal sound of the purge cycle. The “hiss” is the release of the expanded dry air that is used to regenerate the saturated desiccant tower. It’s a sign that the dryer is operating as designed.
Disclaimer: This article is for informational purposes only and does not constitute professional engineering or medical advice. Clinic owners should consult with qualified equipment specialists and adhere to all local and national regulatory standards for medical gas installation and maintenance.
About the Author