Key Steps for Planning an Operatory Renovation

Foundational Planning and Budgeting
Upgrading your dental operatory is more than a construction project; it’s a strategic investment in your practice’s future. A well-executed renovation can enhance workflow, improve patient and staff well-being, and accommodate new technologies. Success begins with a solid plan that aligns your vision with practical and financial realities.
Define Your Renovation Goals
Before contacting a contractor, define the core problems you need to solve. Are you struggling with an inefficient layout that causes staff to constantly bump into each other? Is outdated equipment limiting the procedures you can offer? Clearly identifying your “why” is the first step. Perhaps your goal is to improve ergonomics to reduce practitioner fatigue, a common issue that slowly chips away at career longevity. Or maybe it’s to create a more modern and calming environment for patients.
I once visited a clinic where the team was frustrated by constant bottlenecks around the sterilization area. The renovation wasn’t about getting fancier equipment, but about re-routing workflow. By simply changing the layout, they cut down instrument turnaround time significantly. This is the kind of practical goal that delivers a real return on investment.
Realistic Budgeting and Contingency
A common pitfall in any renovation is underestimating the total cost. The price of new equipment is just one part of the equation. A practical rule of thumb is to add a 30–40% contingency fund on top of your initial estimates. This buffer is not a luxury; it’s a necessity for covering the unforeseen issues that almost always arise.
These surprises often hide within the walls and floors. You might discover that the existing plumbing isn’t adequate for the new dental chair’s requirements, or that the electrical wiring needs a major upgrade to handle modern digital imaging systems. According to global industry analyses from sources like MarketsandMarkets, the trend towards integrated digital workflows is a primary driver of clinic upgrades, making utility planning more critical than ever.
Here’s a sample budget breakdown to guide your planning:
| Category | Estimated Percentage of Budget | Key Considerations |
|---|---|---|
| Dental Equipment | 40-50% | Dental chair, delivery system, lighting, suction, compressor. |
| Construction & Labor | 20-30% | Demolition, plumbing, electrical, flooring, cabinetry installation. |
| Cabinetry & Finishes | 10-15% | Custom or stock cabinetry, countertops, paint, fixtures. |
| Professional Fees | 5-10% | Designer, architect, equipment specialist consultation fees. |
| Contingency Fund | 30-40% of Total | Reserved for unexpected structural, plumbing, or electrical work. |
Mastering Operatory Layout and Workflow
The physical layout of your operatory is the foundation of your clinical efficiency. A design that prioritizes smooth workflow and ergonomic movement minimizes staff stress and maximizes productivity. The dental chair is the heart of this ecosystem, and its placement dictates the flow of the entire room.
Spatial Planning: A Game of Inches
Every inch counts in a dental operatory. Insufficient clearance creates frustrating bottlenecks, compromises ergonomic posture, and can even pose safety risks. Ground your layout in proven spatial heuristics to ensure a functional and comfortable environment for you and your assistant.
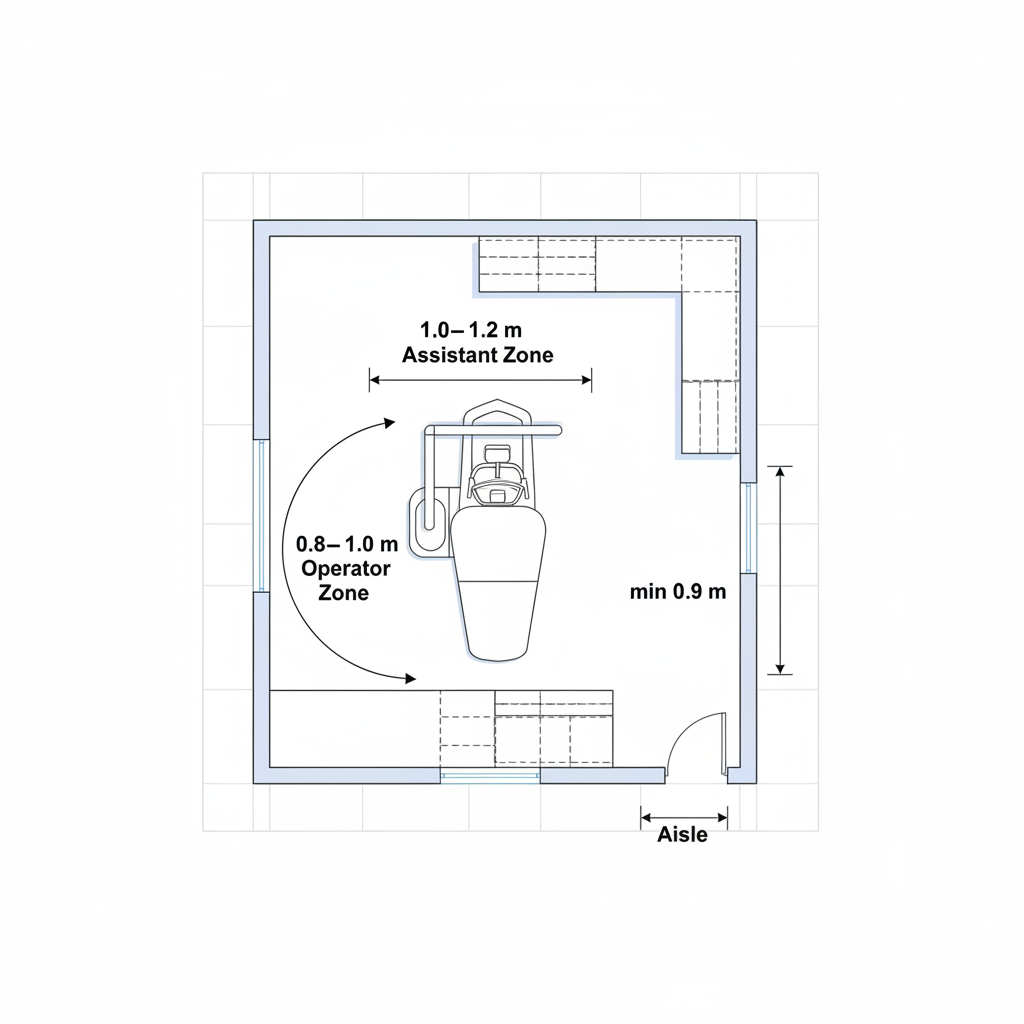
Operatory Clearance Checklist:
- Assistant’s Path (Rear): Allow 1.0–1.2 meters behind the patient chair. This gives your assistant ample room to circulate, access supplies, and assist without feeling constrained.
- Operator’s Zone: Ensure 0.8–1.0 meters on the operator’s side. This space is crucial for free movement of the stool and easy access to the patient and delivery system.
- Main Aisle: Maintain a minimum aisle clearance of 0.9 meters to ensure safe and easy entry and exit for both staff and patients, including those with mobility considerations.
- Service Access: This is a non-negotiable. Leave 30–50 cm of clear working space behind any built-in cabinetry that houses key utility connections or equipment. A lesson many learn the hard way is that inaccessible equipment turns a quick repair into a costly, multi-day teardown.
Debunking a Common Myth: More Equipment Does Not Equal More Efficiency
A prevalent misconception is that a “fully loaded” operatory, packed with every possible gadget within arm’s reach, is the most efficient. In reality, this often leads to a cluttered, chaotic workspace. Over-packing a room restricts movement, forces practitioners into awkward postures, and complicates routine cleaning and maintenance. True efficiency comes from a deliberate, minimalist design where tools and equipment are placed along a logical workflow, not just wherever they can fit.
The Chair: Your Operational Centerpiece
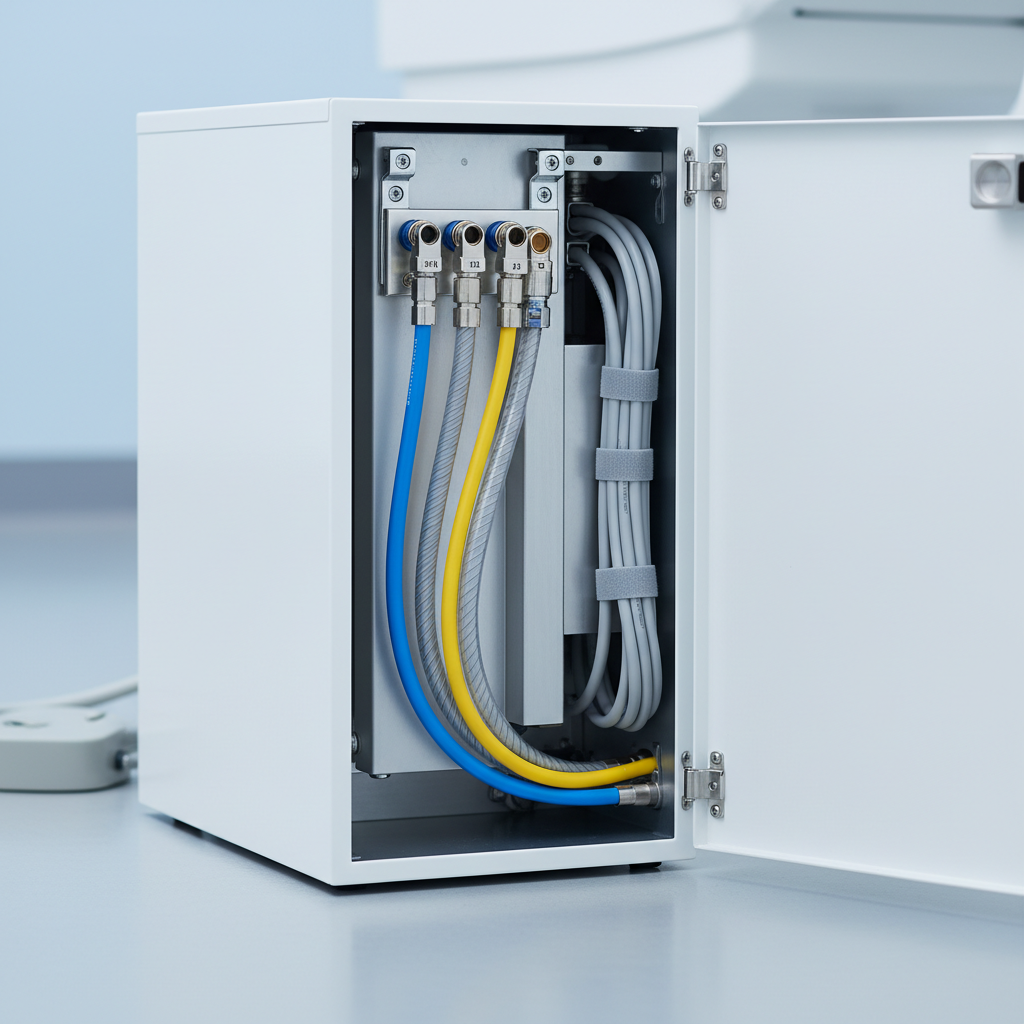
Always select your dental chair before finalizing your plumbing and electrical plans. The chair’s specific utility requirements—air, water, suction, and data lines—and its physical footprint are the fixed points around which everything else must be designed. For example, ensure you have 2–3 meters of flexible hose slack for all connections. This prevents strain on the fittings and allows for minor repositioning or servicing without having to disconnect the main lines.
From experience, routing all utility lines to a single, clearly marked service chase is a game-changer for maintenance. Instead of hunting for valves and connections behind different cabinets, your technician can access everything in one spot. This simple planning step can save you hours of downtime and service costs in the future.
Equipment Selection and Regulatory Compliance
Choosing the right equipment involves balancing performance, durability, and cost. Furthermore, ensuring all equipment complies with stringent regulatory standards is essential for patient safety and market access. For any practice, this means looking for equipment that meets established quality management benchmarks, such as those defined by ISO 13485:2016 – Quality Management Systems. This standard ensures that a manufacturer has a robust system in place to control the design, production, and distribution of medical devices.
Look Beyond the Sticker Price
The initial purchase price is only one component of an asset’s true cost. When evaluating equipment like a dental chair or compressor, consider the total cost of ownership. This includes:
- Maintenance Requirements: How often is preventative maintenance needed? Are service parts readily available and affordable?
- Durability: Is the equipment built to withstand the rigors of a busy practice? Look for sturdy construction and high-quality materials.
- Utility Consumption: How efficient are the compressor and vacuum systems in terms of energy and water usage?
A reliable, low-maintenance dental chair may have a slightly higher upfront cost but can save you thousands in downtime and repair fees over its lifespan. Similarly, a properly sized compressor and vacuum system—typically placed within a 5–10 meter range of the operatory to limit pressure loss—is a workhorse that, if chosen wisely, will perform reliably for years.
Navigating Safety and Compliance
Regulatory compliance is non-negotiable in the healthcare industry. Depending on your location, you must ensure your equipment carries the necessary certifications. For example, products sold in the European Union must have CE Marking, which signifies conformity with health, safety, and environmental protection standards. In the United States, manufacturers must adhere to the FDA’s Quality System Regulation, detailed in FDA 21 CFR Part 820.
For a clinic owner, these certifications are a mark of trust and reliability. They provide assurance that the equipment has been designed and manufactured under a controlled system that prioritizes safety and efficacy.
Installation and Handover Checklist
The final phase of your renovation is just as critical as the first. A smooth handover process ensures your new operatory is fully functional from day one and that your team is prepared to use it effectively.
Before you officially sign off on the project, conduct a comprehensive systems check. Do not assume everything works. Test every function methodically.
Pre-Handover Verification Checklist:
- Run All Utilities: Turn on the water, air, and suction. Check for stable pressure and listen for any audible leaks.
- Test Suction Performance: Use a suction gauge at each high-volume and low-volume port to confirm it meets the manufacturer’s specifications.
- Activate All Equipment: Run the dental chair through its full range of motion. Test the delivery unit, lights, and any integrated devices.
- Load Test Electrical Circuits: With all systems running, ensure you are not tripping any breakers. This is especially important if you have added new imaging equipment.
- Run an Infection-Control Cycle: If you have a new sterilizer or instrument washer, run a full cycle to ensure it functions correctly.
Finally, one of the most valuable things you can do is schedule a brief but mandatory staff training session with the equipment installer or supplier. A small tip from an expert on the day of installation can prevent weeks of frustration. Also, insist on a basic spare-parts kit, including common items like O-rings, gaskets, and filters. Having these on hand can prevent a minor issue from causing major downtime.
Key Takeaways
A successful operatory renovation hinges on diligent planning and a focus on practical, workflow-driven design. By defining clear goals, creating a realistic budget with a robust contingency, and meticulously planning your layout around ergonomic principles, you set the stage for a transformative project. Prioritize durable, compliant equipment and verify every detail before the final handover. This approach will not only yield a beautiful new space but also create a highly efficient and safe environment that will serve your practice, your staff, and your patients for years to come.
Frequently Asked Questions (FAQ)
How much contingency should I budget for an operatory renovation?
A common best practice is to set aside a contingency fund of 30-40% of your total estimated project cost. This helps cover unexpected expenses like essential plumbing or electrical upgrades that are often discovered after demolition begins.
What is the most common operatory layout mistake?
One of the most frequent and costly mistakes is failing to plan for service access. Not leaving at least 30-50 cm of clearance behind built-in cabinetry can make simple repairs incredibly difficult and expensive. Another common error is ignoring workflow clearances, leading to a cramped and inefficient workspace.
How far can my compressor and vacuum be from the operatory?
To avoid significant pressure or suction loss, it is advisable to place the compressor and vacuum systems within a 5 to 10-meter radius of the operatory. Using rigid piping for longer runs can also help maintain performance, but ensure there are accessible isolation valves for maintenance.
Disclaimer: This article is for informational purposes only and does not constitute professional architectural, financial, or legal advice. Regulations and best practices may vary by region. Always consult with qualified and licensed professionals, including contractors, equipment specialists, and regulatory experts, before undertaking any renovation project.
References
About the Author


