Skip to content
 A Guide to Maintaining Your Dental Operatory Lights

A Guide to Maintaining Your Dental Operatory Lights
Proper care extends the life and performance of your dental equipment. For a tool as critical as the operatory light, consistent performance is not just a matter of convenience—it is essential for diagnostic accuracy, clinical precision, and patient safety. An inconsistent or failing light can lead to eye strain, compromise the quality of restorative work, and create unexpected downtime. Follow these essential maintenance tips for your operatory lights to ensure consistent, high-quality illumination for years to come.
This guide provides a practical, experience-based framework for daily, weekly, and monthly maintenance. We will cover common mistakes to avoid, explain when to replace components, and show how a simple logging system can protect your investment and support regulatory compliance.
Understanding Your Operatory Light: The Core of Clinical Precision
Before diving into maintenance tasks, it’s important to understand what you are maintaining. Modern dental lights are sophisticated instruments. Their value lies not just in brightness, but in the quality and consistency of the light they produce.
Key Performance Metrics to Monitor
Three core metrics define the performance of a dental light:
- Luminance (Intensity): Measured in lux, this is the brightness of the light. While more intensity might seem better, the key is having a controllable range suitable for different procedures without causing discomfort to the patient or practitioner.
- Correlated Color Temperature (CCT): Measured in Kelvin (K), CCT describes the color appearance of the light, from warm (lower K) to cool (higher K). Most dental lights operate in the 4,000 K to 5,500 K range to simulate natural daylight, which is critical for accurate shade-matching in cosmetic and restorative dentistry.
- Color Rendering Index (CRI): This scale (0-100) measures how accurately a light source reveals the true colors of an object. A high CRI (typically above 90) is crucial in dentistry to ensure that tissues and restorative materials are viewed without color distortion.
A decline in any of these metrics can subtly degrade clinical work. For a deeper look at how technology impacts procedures, see our guide on Key Tech in Dental Chairs for Better Patient Care.
Anatomy of a Modern LED Operatory Light
Most modern lights use Light Emitting Diodes (LEDs) for their longevity and efficiency. Key components include:
- LED Emitters: The source of the light. They can degrade over thousands of hours, leading to dimming or shifts in color temperature.
- Lenses and Reflectors: These shape and focus the light beam into a clear, defined pattern on the oral cavity, minimizing stray light.
- Heat Sinks: LEDs generate heat that must be dissipated. The heat sink draws heat away from the emitters, and its effectiveness is vital to the light’s lifespan.
- Control Driver: This electronic component regulates the power delivered to the LEDs, controlling intensity and sometimes color temperature. It is a common point of failure.
Building a Proactive Maintenance Routine
A structured maintenance schedule is the most effective way to prevent failures. Based on extensive field experience, we recommend a three-tiered approach: daily, weekly, and monthly.
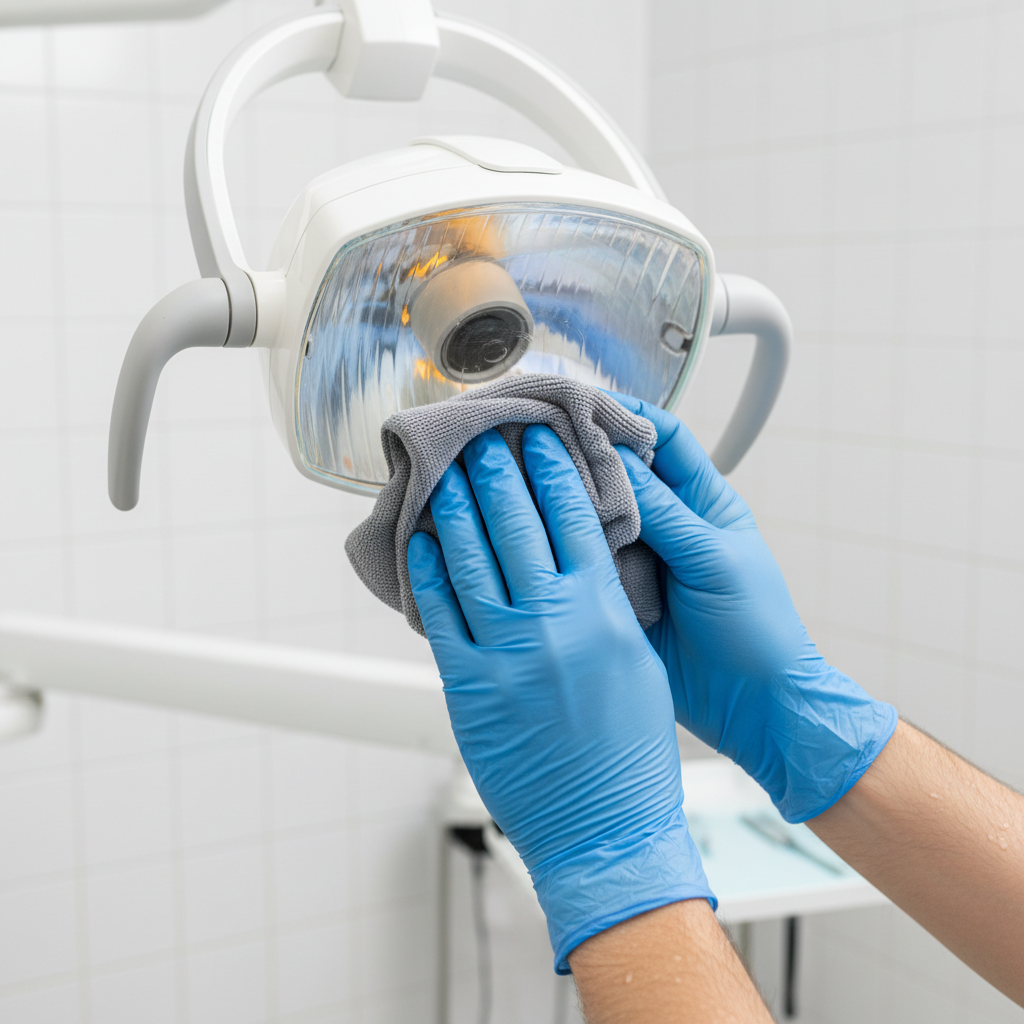
The Daily Checklist (5-Minute Reset)
Perform these quick checks at the beginning or end of each day.
- Clean the Lens and Shield: Use a soft, lint-free microfiber cloth with a mild, non-abrasive detergent or an approved optical cleaner. Gently wipe away any dust or spatter. Expert Warning: Never spray cleaning solutions directly onto the light head or into vents. Alcohol-based sprays can damage lens coatings and seep into electronics.
- Check Positioning: Ensure the light arm moves smoothly and holds its position firmly. The light should be centered on the oral field to create a shadow-free work area.
The Weekly Inspection (Visual & Mechanical)
Once a week, take a closer look at the physical integrity of the unit.
- Inspect Fasteners and Covers: Visually check for any loose screws, bolts, or protective covers on the light head and support arm.
- Examine Power Cords: Look for any signs of fraying, cracking, or damage to the power cord and its connection points.
- Wipe Down the Arm Assembly: Clean the support arms and joints to prevent dust buildup, which can interfere with smooth movement.
The Monthly Functional Audit
This monthly check helps you track performance degradation and plan for part replacements before they become urgent problems.
- Measure Lumen Output: Use a handheld digital light meter to measure the light’s intensity at a fixed distance. Record this value in a log. Over time, you will notice a gradual decline. Plan for replacement when the output falls to approximately 70–80% of its original specification.
- Assess Light Quality: Turn the light on and project the beam onto a neutral white surface. Look for any flickering, dark spots, or noticeable color shifts (e.g., a yellow or blue tint). A color shift is a clear indicator that the LEDs are nearing the end of their life.
Here is a sample schedule you can adapt for your clinic:
| Frequency | Task | Tools Needed | Purpose |
|---|---|---|---|
| Daily | Clean Lens & Shield | Microfiber Cloth, Mild Detergent | Ensure clear, unobstructed illumination. |
| Verify Arm Positioning | None | Confirm smooth and stable operation. | |
| Weekly | Inspect Fasteners & Covers | None (Visual Check) | Prevent mechanical failure from loose parts. |
| Examine Power Cord | None (Visual Check) | Ensure electrical safety. | |
| Monthly | Measure & Log Lumen Output | Handheld Light Meter, Logbook | Track performance degradation over time. |
| Check for Color Shifts/Flickering | Neutral White Surface | Identify end-of-life signs for LED emitters. |
Common Pitfalls and How to Avoid Them
Even with a routine, certain common mistakes can shorten the life of your equipment. Being aware of these “gotchas” is half the battle.
Myth Debunked: “Tighter is Better” for Arm Fasteners
A common misconception is that if a light arm starts to drift, the tension bolts should be tightened as much as possible. In reality, over-tightening is a frequent cause of damage. It creates uneven wear on the joints and internal mechanisms, making the arm difficult to position smoothly and leading to premature failure. Always adjust tension incrementally according to the manufacturer’s instructions to find the right balance between stability and ease of movement.
The Silent Killer: Overheating
The lifespan of an LED is directly tied to its operating temperature. The driver’s heat sink is designed to dissipate thermal energy, but it can’t do its job if it’s blocked. Ensure the vents on the light head are never obstructed by drapes, equipment, or dust buildup. A light that consistently runs hot will have a significantly shorter service life.
Pro Tip: Stock Critical Spares
Equipment failure can bring a dental operatory to a standstill. I have found that keeping a few key spare parts on hand is a small investment that pays huge dividends in uptime. For most LED lights, this means having at least one spare LED driver and one replacement lens cover or shield. These are often the first components to fail and are typically straightforward to replace, getting you back to work in minutes instead of days.
Advanced Maintenance and End-of-Life Planning
A well-maintained light can last for many years, but its components have a finite lifespan. Planning for this is a key part of managing a modern dental practice.
The Importance of a Maintenance Log
Keeping a simple log is one of the most effective tools for managing your equipment. It doesn’t need to be complicated; a simple spreadsheet or logbook will do.

For each operatory light, record:
- Date of service or inspection
- Estimated lamp hours (if available)
- Lumen output measurement
- Actions performed (e.g., “Cleaned lens,” “Replaced driver”)
- Parts ordered or replaced
This log provides invaluable data for warranty claims, helps you anticipate when a light is nearing the end of its life, and informs budgeting for new equipment. This documentation is also a key component of a robust quality management system, which is essential for practices adhering to international standards.
Aligning with Quality and Safety Standards
Proper equipment maintenance is not just good practice; it is a cornerstone of regulatory compliance. Standards bodies are in place to ensure medical devices are safe and effective. For example, the ISO 13485:2016 standard outlines requirements for a quality management system for medical devices. A documented maintenance program demonstrates a commitment to these principles.
In the United States, the FDA’s Quality System Regulation (21 CFR Part 820) mandates procedures for ensuring equipment is routinely calibrated, inspected, and maintained. Similarly, for equipment sold in the European Union, adherence to standards is necessary for CE Marking, which signifies conformity with health, safety, and environmental protection standards. A well-kept maintenance log serves as tangible proof of compliance. For more information, read our article on how dental chair design meets CE & ISO safety standards. Planning a new operatory or a renovation provides a perfect opportunity to build these protocols from the ground up, as detailed in our guide to operatory renovation.
Wrapping Up: Key Takeaways for Long-Term Reliability
Your dental operatory light is a workhorse. With consistent care, it will provide the clear, accurate illumination you need to perform your best work. The key to its longevity is not intensive, infrequent service, but simple, regular attention.
To maximize the life and performance of your light:
- Establish a Routine: Implement a schedule for daily, weekly, and monthly checks.
- Clean Correctly: Use the right materials and avoid practices that could damage sensitive components.
- Monitor Performance: Track light output and quality to proactively identify when components are nearing the end of their life.
- Avoid Common Mistakes: Do not over-tighten arms or allow the unit to overheat.
- Keep a Log: Documenting your actions supports compliance and helps you plan for the future.
By integrating these practices into your clinic’s workflow, you ensure that your operatory light remains a reliable asset, not a potential liability.
Disclaimer: This article is for informational purposes only and does not constitute professional service advice. Always consult your equipment’s official user manual and follow the manufacturer’s specific maintenance guidelines. For repairs or complex service, contact a qualified technician.
References
- ISO 13485:2016 – Medical devices — Quality management systems — Requirements for regulatory purposes. https://www.iso.org/standard/59752.html
- U.S. Food & Drug Administration. 21 CFR Part 820 – Quality System Regulation. https://www.fda.gov/regulatory-information/search-fda-guidance-documents/quality-system-regulation-medical-devices
- European Commission. CE Marking. https://ec.europa.eu/growth/single-market/ce-marking_en
About the Author