Understanding Light Patterns for Dental Procedures

The Difference a Light Beam Makes: Optimizing Illumination for Dental Procedures
Not all light beams are created equal. In the modern dental operatory, the overhead light is far more than a simple source of illumination; it is a configurable tool that directly impacts diagnostic accuracy, procedural efficiency, and clinician ergonomics. A poorly optimized light pattern can lead to eye strain, create frustrating shadows, and even compromise the quality of restorative work. Conversely, understanding how to manipulate the shape, size, and intensity of the light beam can transform your visibility.
This article explains the critical differences between various light patterns and details how selecting the right configuration for each procedure can significantly reduce shadowing, improve clarity, and minimize operator fatigue. We will move beyond simple brightness to explore the technical specifications that define a high-quality dental light and provide a practical framework for its daily use.
The Fundamentals of High-Fidelity Operatory Illumination
Before adjusting a light pattern, it is essential to understand the core metrics that define its quality. A light’s effectiveness is determined by a combination of intensity, color rendering, and pattern uniformity—all of which are governed by stringent quality management systems for medical devices.
Beyond Brightness: Key Metrics for Clinical Precision
Three key metrics determine the quality of a dental light source:
- Intensity (Measured in Lux): This is the measure of light’s brightness over a given area. While sufficient brightness is necessary, excessive intensity can cause glare and patient discomfort. The goal is to achieve clear visibility without forcing the clinician’s pupils to constrict, which can paradoxically reduce the ability to discern fine details.
- Color Temperature (Measured in Kelvin): For dental procedures, a neutral white light, typically between 4000 and 5500 K, is preferred. This range mimics natural daylight, reducing eye strain and allowing for accurate assessment of tissue color.
- Color Rendering Index (CRI): CRI measures a light’s ability to reveal the true colors of an object compared to a natural light source. For accurate shade matching of composites and crowns, a CRI of 90 or higher is the clinical standard. As supported by extensive research cataloged in resources like PubMed, high-CRI lighting is fundamental to achieving aesthetic results in restorative dentistry.
The Critical Importance of a Uniform Light Pattern
A defining feature of a superior operatory light is its ability to produce an even, uniform pattern free of “hotspots.” Hotspots are areas within the beam that are significantly brighter than others. When luminance variance across the occlusal surface exceeds 15%, it forces the clinician’s eyes to constantly readjust, leading to significant fatigue over the course of a workday. A smooth, consistent beam ensures that the entire working area is perfectly illuminated, from cusp tip to gingival margin.
Adherence to Quality and Safety Standards
The design and manufacture of dental lighting are subject to rigorous international standards. Compliance with regulations such as ISO 13485:2016 ensures that the device is produced under a comprehensive quality management system. This commitment to quality is essential for ensuring that the equipment performs reliably and safely. For a deeper understanding of how these regulations apply to operatory equipment, many clinics find value in exploring how dental chair design meets CE & ISO safety standards.
Matching the Light Pattern to the Procedure
Experienced clinicians treat operatory lighting as a dynamic tool, adjusting it based on the task at hand. The typical working distance for most procedures is between 30 and 45 cm from the light to the tooth. Within this window, the beam diameter should be tailored to the specific clinical need.
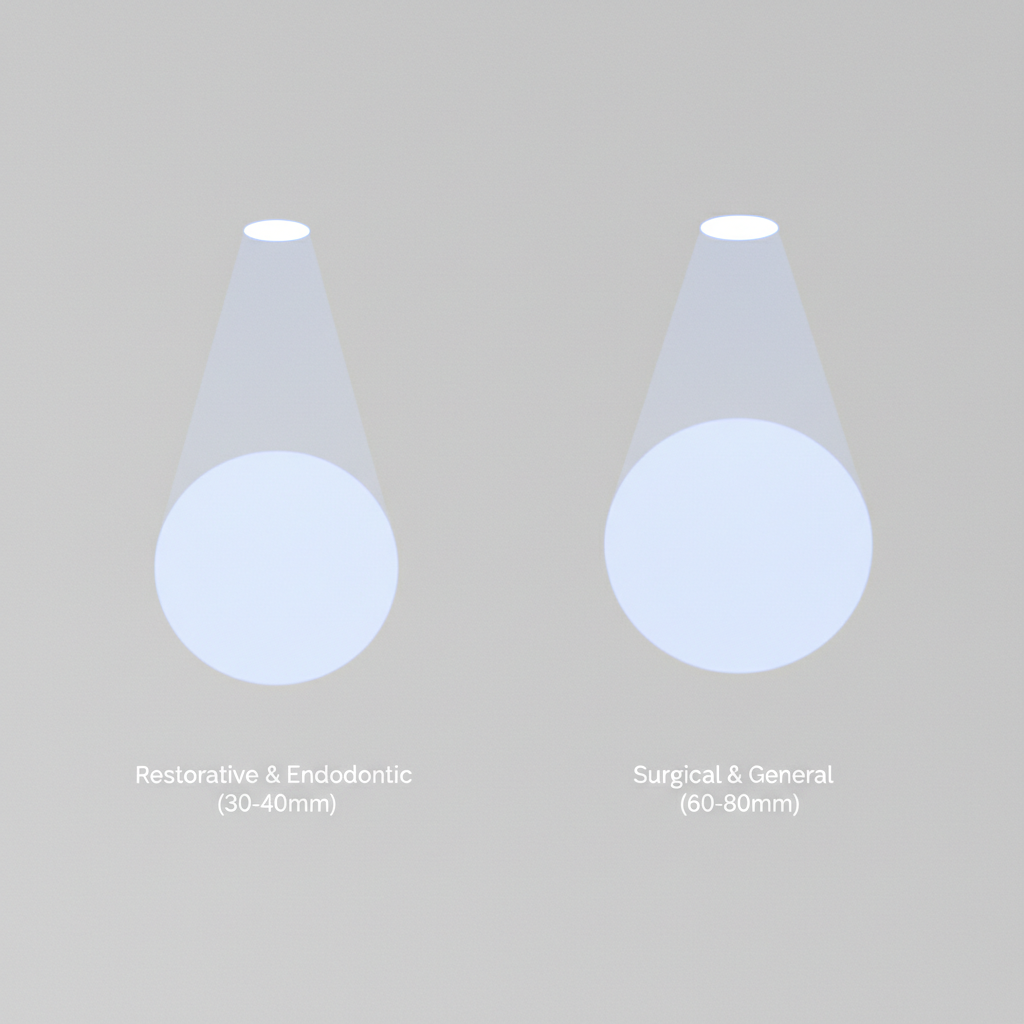
Precision Work: Restorative and Endodontics
For detailed restorative or endodontic work, a narrow, focused beam is optimal. A beam diameter of approximately 30–40 mm at the working distance concentrates high-intensity light directly into the cavity preparation. This approach has two distinct advantages:
- It provides maximum illumination at depth, revealing fine details like root canal orifices or subtle caries.
- It minimizes extraneous light, preventing glare in the patient’s eyes and reducing light spillage onto the surrounding tissues.
Broader Fields: Surgical and Full-Arch Procedures
In contrast, surgical, periodontal, or full-arch restorative procedures require a much wider field of view. For these applications, a broader beam of approximately 60–80 mm is more effective. This wider pattern illuminates the entire surgical site, including adjacent teeth and soft tissues, without needing constant repositioning. This ensures the clinician maintains a comprehensive view of the operative field, which is critical for efficiency and safety.
Configuration at a Glance: A Practical Comparison
To make these concepts more concrete, here is a table outlining recommended starting points for different procedure types.
| Feature | Restorative / Endodontic | Surgical / General Examination |
|---|---|---|
| Beam Diameter | Narrow (~30–40 mm) | Wide (~60–80 mm) |
| Intensity | High, focused intensity | Moderate, diffuse intensity |
| Primary Goal | Maximize visibility in a confined space | Illuminate the entire operative field |
| Common Use Case | Class II composite, root canal access | Implant placement, full-arch impressions |
Common Mistakes and How to Avoid Them
Even with high-quality equipment, improper use can negate its benefits. I have observed several common mistakes in operatory setup that are easily corrected.
Myth Debunked: “Brighter Is Always Better”
One of the most frequent misconceptions is that maximum brightness equals maximum visibility. In reality, setting the intensity too high creates harsh glare off the tooth surface, causing pupil constriction and making it harder to see subtle details. It also causes unnecessary discomfort for the patient. The correct approach is to use the lowest intensity setting that still provides clear and comfortable visualization of the entire field.
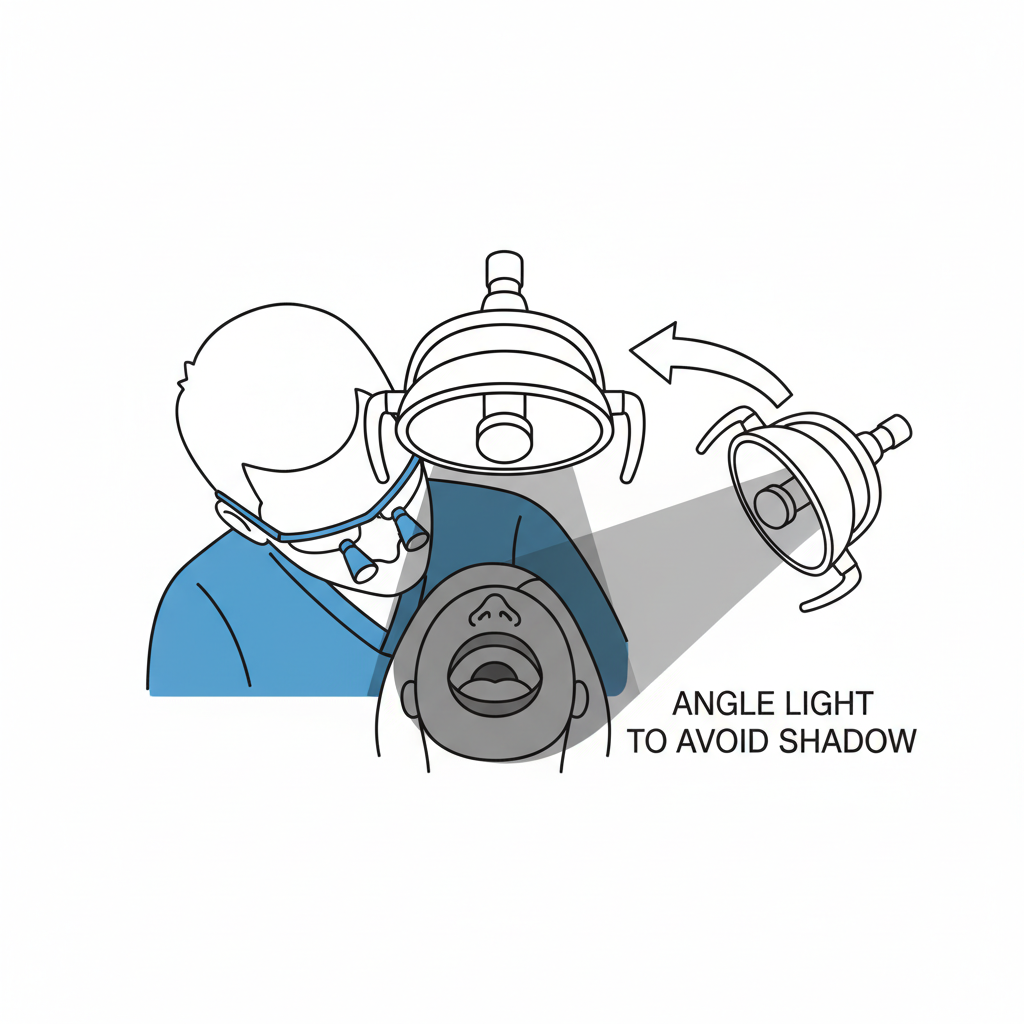
The Operator Shadow Problem
Another common error is centering the light beam perfectly on the tooth but failing to account for the operator’s head position. This often results in the clinician’s own head casting a shadow directly onto the working area. To prevent this, the light should be angled approximately 15–25 degrees from perpendicular. This slight angulation is usually enough to eliminate head shadows while also minimizing specular reflections from metallic instruments or restorations.
Pro Tips for Advanced Operatory Lighting Control
Mastering operatory lighting involves more than just avoiding mistakes; it involves proactively using the light to enhance your workflow.
Dynamic Adjustments and Maintenance Checklist
A seasoned clinician makes micro-adjustments to their lighting throughout a procedure. A practical heuristic I use is this: when transitioning from a single-tooth restoration to a broader task like a surgical extraction, I increase the beam diameter by approximately 1.5 to 2 times its initial size. This simple change instantly adapts the field of view to the new requirements.
Consistent performance also depends on proper maintenance. Reliable manufacturing processes, as outlined by regulations like the FDA’s 21 CFR Part 820, ensure a device is built to last, but routine upkeep is essential.
Here is a simple checklist for maintaining your operatory light:
- Monthly: Gently clean the diffuser lens with a soft, lint-free cloth and an approved cleaning solution to remove any residue or debris.
- Every 6-12 Months: Visually inspect the LED modules (with the light on) to check for uniform output. Any flickering or dimming may indicate a need for service.
- Post-Service: Use a simple lux meter or a smartphone app to perform a quick calibration check. This ensures the light intensity is consistent with its settings after any repairs or adjustments.
Key Takeaways
Optimizing your operatory lighting is one of the most impactful adjustments you can make to improve clinical outcomes and personal ergonomics. It is not a “set it and forget it” utility but a dynamic tool that should be adapted to every procedure. By moving beyond the simple metric of brightness and focusing on pattern size, uniformity, and color accuracy, you can create a visual environment that supports precision work, reduces physical strain, and enhances the quality of care you provide.
Frequently Asked Questions (FAQ)
What is the ideal color temperature for dental work?
The ideal range is between 4000 and 5500 Kelvin. This neutral white light spectrum is similar to natural daylight, which allows for accurate shade matching and reduces eye fatigue during long procedures.
How can I tell if my light pattern has hotspots?
Project the light onto a flat, neutral-colored surface from your typical working distance. A high-quality light will produce a perfectly even, uniform patch of light. If you see brighter or darker areas, you are seeing hotspots, which can contribute to eye strain. For a more technical assessment, a lux meter can be used to measure luminance at different points within the beam.
Is it really necessary to change light settings between procedures?
While you can use a single setting, it is not optimal. Tailoring the light pattern—using a narrow beam for restorative work and a wide beam for surgery—dramatically improves visibility for the specific task. This practice reduces the need to reposition the light, minimizes shadows, and ultimately makes procedures more efficient and less strenuous.
About the Author


