How to Train Your Team on Ergonomic Chair Features

Investing in an ergonomic dental chair is a significant step toward protecting your team’s health and boosting clinic productivity. However, the full value of that investment is only realized when every feature is used correctly. Without proper training, even the most advanced chair can lead to discomfort and strain. This guide provides a practical, step-by-step framework for training your dental team to master their ergonomic equipment, ensuring you maximize the health and efficiency benefits from day one.
The Foundation of Dental Ergonomics: Why Correct Posture Matters
Working in dentistry involves prolonged periods in static, often awkward positions, which carries a significant risk of musculoskeletal disorders (MSDs). These are not minor aches; they are career-threatening injuries that affect nerves, tendons, and muscles. Research published on PubMed consistently highlights the high prevalence of neck, shoulder, and back pain among dental professionals. The primary cause is predictable: sustained, non-neutral postures that create cumulative strain on the body.
Adopting correct ergonomic practices is not just about comfort—it is a core component of professional longevity and clinical precision. A properly adjusted chair reduces physical and mental fatigue, allowing operators to maintain focus and fine motor control throughout the day. Furthermore, a well-supported posture minimizes the micro-movements and readjustments that cause interruptions and extend procedure times. This foundation of stability and comfort is essential for delivering high-quality patient care efficiently and safely, a principle that aligns with the quality management systems outlined in standards like ISO 13485:2016.
Debunking a Common Misconception: Ergonomics is More Than Just Comfort
A pervasive myth in many practices is that ergonomics is a “comfort” feature—a luxury rather than a necessity. The reality is that ergonomic design directly impacts operational efficiency and financial outcomes. Operator fatigue leads to slower work, more errors, and an increased risk of injury-related absences. The costs associated with this can be substantial, a topic explored in depth in The Financial Impact of Dental Chair Reliability & Downtime. By treating ergonomic setup as a clinical priority, you are investing in your team’s health and the practice’s bottom line.
The Neutral Reference Position: A Step-by-Step Setup Guide
The key to effective ergonomics is starting every procedure from a consistent, neutral reference point. This prevents the chain reaction of poor adjustments that leads to strain. I have found that establishing a clear, repeatable sequence is the most effective way to train teams. Always adjust in this order to avoid having to re-adjust later.
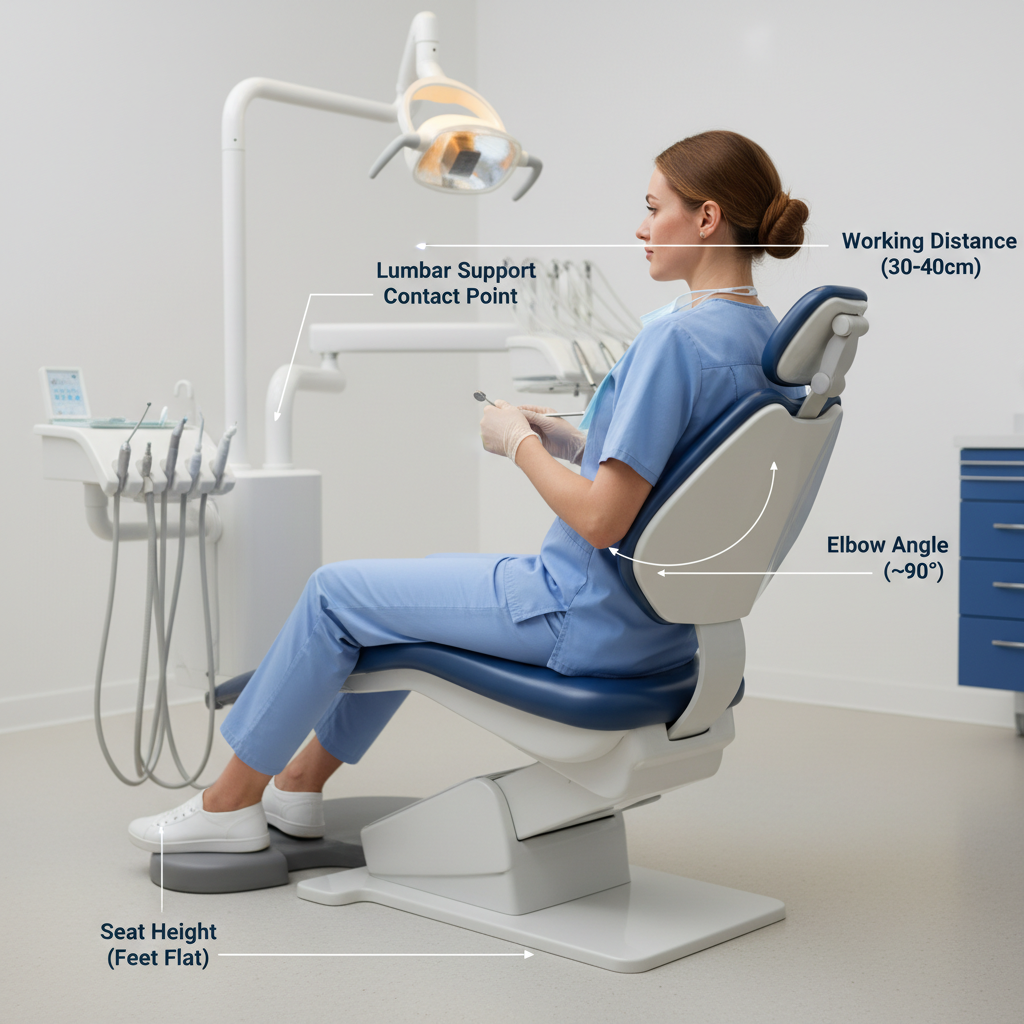
- Adjust the Operator’s Chair First: Before the patient is even seated, the operator must adjust their own stool. Start by setting the seat height so your feet are flat on the floor with your thighs roughly parallel to it. Your knees should be at a 90 to 100-degree angle. This creates a stable base for all subsequent adjustments.
- Position the Patient Chair: Once you are seated correctly, bring the patient chair to a height where the patient’s mouth is at the level of your elbows. This prevents you from having to hunch over or raise your shoulders.
- Set the Headrest: Adjust the patient headrest to position the oral cavity for optimal visibility. The goal is to achieve a clear line of sight without having to crane your neck. The ideal working distance between your eyes and the patient’s mouth is between 30 and 40 centimeters.
- Arrange Instruments: Position your instrument tray so that you can reach everything you need without extending your arms more than 40 centimeters. Repeatedly reaching further than this significantly increases the load on your lumbar spine.
- Position the Assistant’s Stool: The dental assistant’s stool should be positioned to allow for a clear view of the operating field while maintaining a similar ergonomic posture. Their eye level should be slightly higher than the operator’s for better visibility.
Expert Warning: Avoid Static Postures
One of the most common mistakes I see is practitioners “locking” themselves into a single position. An ergonomic chair is designed with articulations and pivots for a reason. Encourage your team to make small, periodic adjustments to their position and the patient’s chair throughout a procedure. This variation prevents the static muscle loading that is a primary contributor to fatigue and long-term strain.
A Structured Training Framework for Your Clinic
To ensure these principles are adopted consistently, a structured training program is essential. Ad-hoc instructions are rarely effective. I recommend breaking the training into focused, manageable modules that can be integrated into the regular clinic schedule without causing major disruption.
This approach emphasizes hands-on practice and immediate feedback, which are critical for building muscle memory. The goal is to make correct ergonomic setup an automatic habit for every member of the clinical team.
Sample Training Module Checklist
Use this checklist to create short, impactful training sessions. A 15-20 minute focused session is far more effective than a lengthy, theoretical presentation.
| Task | Description | Time Allotment | Verification |
|---|---|---|---|
| 1. Neutral Position Demo | Demonstrate the step-by-step sequence for achieving the neutral reference position. | 5 minutes | Team verbalizes steps back. |
| 2. Hands-On Practice | Team members pair up and guide each other through the setup process. | 10 minutes | Peer-to-peer feedback. |
| 3. Photo Verification | Take “before” and “after” photos of each operator’s posture to provide clear visual feedback. | 5 minutes | Review photos with individuals. |
| 4. 30-Day Follow-Up Audit | Briefly observe each team member at the start of a procedure to ensure habits are sticking. | 2-3 min per person | Provide corrective guidance on the spot. |
This structured format ensures that the principles are not just taught, but actively learned and reinforced. It transforms abstract knowledge into tangible, daily practice.
Proactive Maintenance for Longevity and Safety
An ergonomic chair is a piece of medical equipment that requires regular maintenance to function safely and effectively. Neglecting maintenance not only compromises the chair’s ergonomic benefits but can also lead to unexpected downtime and safety hazards. Integrating maintenance checks into your clinic’s operational schedule is vital for protecting your investment.
Your quality management protocols should include a section on equipment upkeep, as this is a core requirement of medical device regulations like the FDA’s Quality System Regulation. A simple monthly check can prevent most common issues.
Monthly Maintenance Checklist:
- Visual Inspection: Check for any loose fasteners, screws, or bolts, particularly around articulating joints and the base. Tighten as necessary.
- Upholstery Check: Inspect the upholstery for tears or cracks that could harbor contaminants or compromise patient comfort.
- Hydraulic/Electric Systems: Look for any signs of hydraulic fluid leaks around the base. Test all electric and hydraulic height and tilt adjustments to ensure they move smoothly and hold their position.
- Record and Prepare: Keep a log of all checks. Critically, identify the spare part SKUs and local supplier contact information for common wear-and-tear items (e.g., upholstery, hydraulic seals, control switches). Having this information on hand turns a multi-day downtime event into a quick replacement.
Regular maintenance ensures your equipment remains compliant, safe, and fully functional, directly supporting both the ROI of patient comfort and operator well-being.
Key Takeaways
Turning an ergonomic chair into a true asset for your practice requires more than just unboxing it. It requires a deliberate commitment to training and process.
- Start from Neutral: Always begin with the operator’s chair to establish a stable, ergonomic base before adjusting anything else.
- Train Systematically: Use short, hands-on training modules to build lasting habits. Demonstration, practice, and feedback are key.
- Correct Common Mistakes: Teach your team to avoid static postures, over-reaching for instruments, and focusing only on the patient’s position.
- Maintain Your Investment: Implement a simple monthly maintenance checklist to ensure safety, reliability, and longevity.
By implementing these strategies, you can transform your ergonomic chairs from simple pieces of furniture into powerful tools that enhance clinical performance, protect your team’s health, and deliver a greater return on your investment.
Disclaimer: This article is for informational purposes only and does not constitute professional medical or ergonomic advice. Dental professionals should consult with a qualified ergonomics specialist to address their specific needs, especially if they have pre-existing musculoskeletal conditions.
References
- ISO 13485:2016 – Quality Management Systems: https://www.iso.org/standard/59752.html
- FDA 21 CFR Part 820 – Quality System Regulation: https://www.fda.gov/regulatory-information/search-fda-guidance-documents/quality-system-regulation-medical-devices
- PubMed – Dental Technology Research: https://pubmed.ncbi.nlm.nih.gov/
About the Author


