Skip to content
 Dental Chair Upholstery: A Cleaning & Care Guide

The Foundation of Upholstery Care: Daily and Weekly Routines
Maintaining the integrity of your dental chair upholstery isn’t about occasional deep cleans; it’s about consistent, mindful routines. I’ve seen high-traffic clinics with chairs that look brand new after five years, while others show significant wear in just one. The difference always comes down to a structured, two-tier cleaning protocol.
The Two-Tier Cleaning Routine
A robust maintenance plan is built on two simple layers:
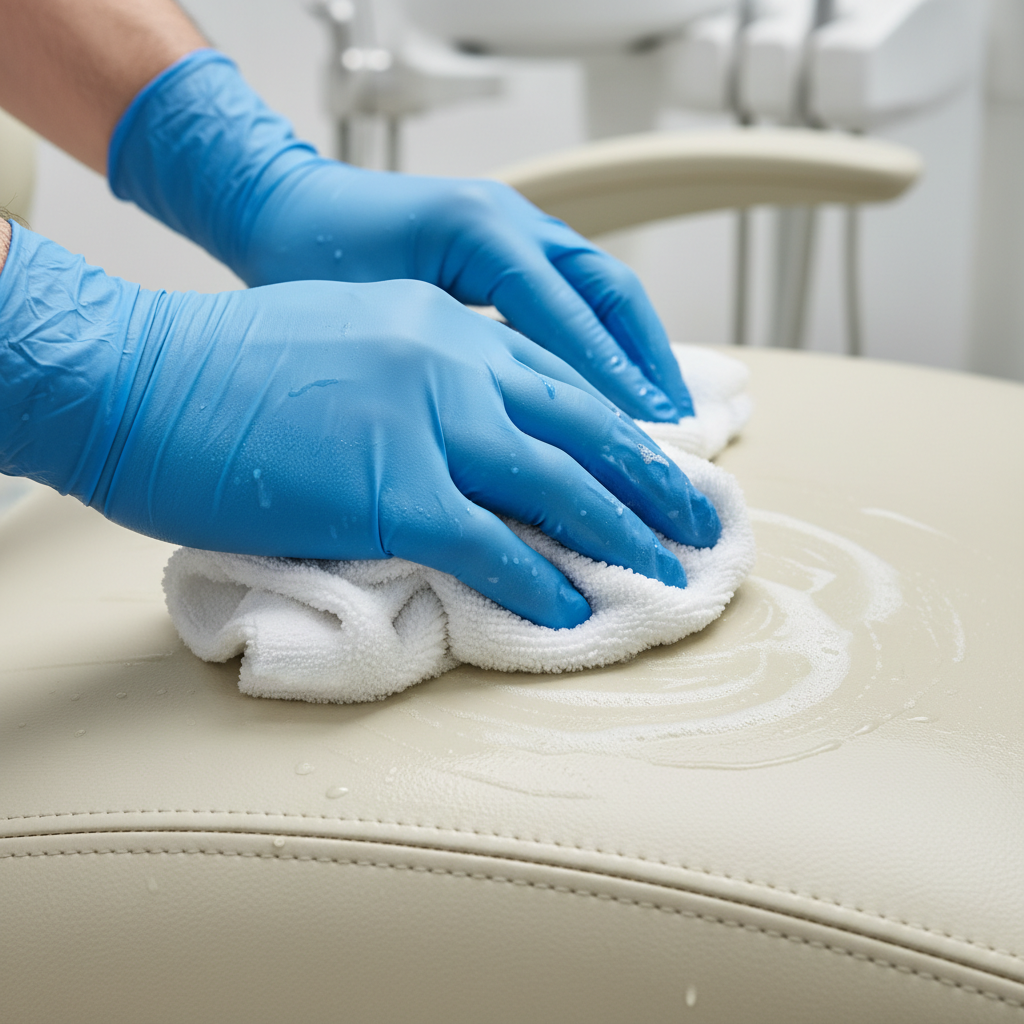
- Daily Quick Wipes: At the end of each day, perform a quick wipe-down of all vinyl surfaces. This removes dust, debris, and non-staining residues before they have a chance to set. This simple five-minute task is the single most effective action to prevent long-term material degradation.
- Weekly Deeper Cleans: Once a week, dedicate time to a more thorough cleaning. This involves using soft brushes to clean seams, folds, and around hardware, where bio-burden and contaminants can accumulate.
Consistency is key. Skipping the daily wipes allows small issues to compound, turning a simple cleaning task into a restoration project.
Choosing the Right Cleaning Agents
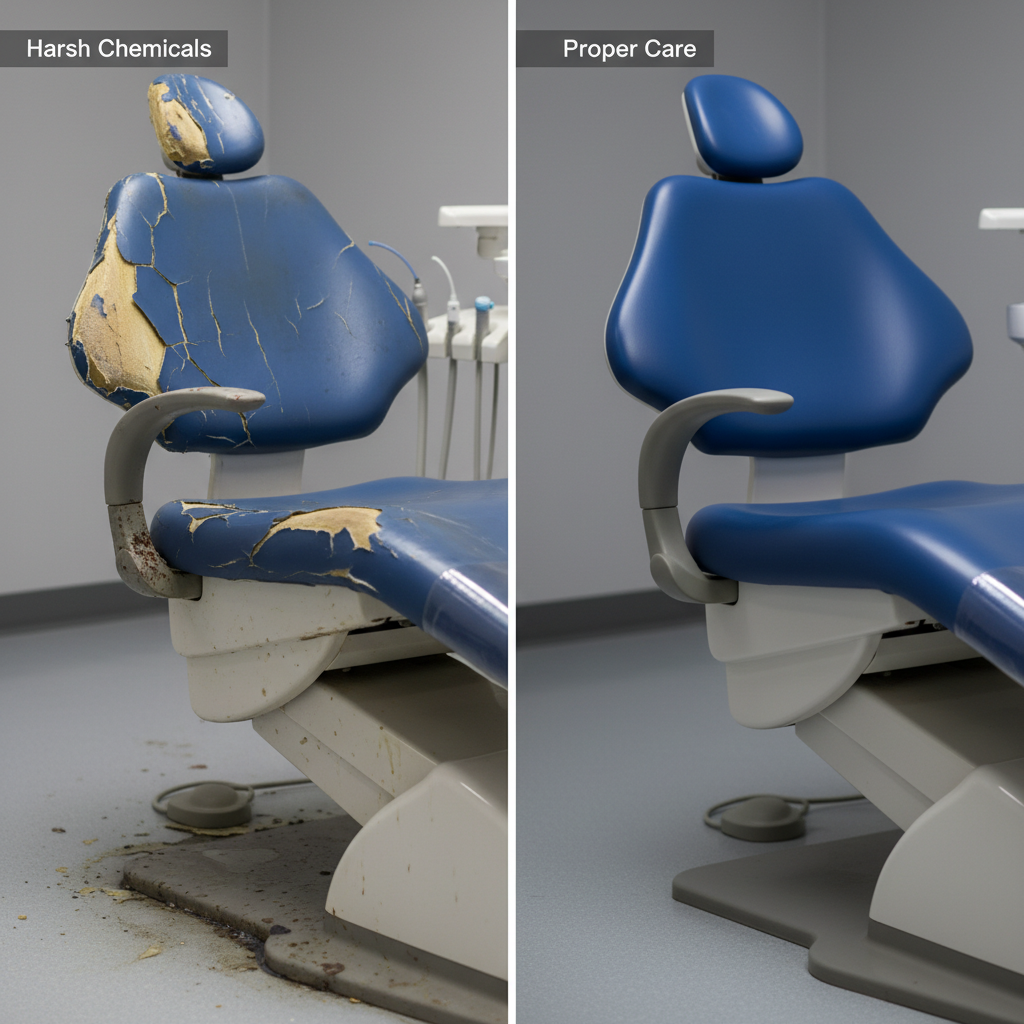
The most common mistake I see is assuming a stronger, harsher cleaner is better. This is the fastest way to destroy your upholstery and potentially void your warranty. For routine cleaning, always opt for a pH-neutral detergent. These cleaners are effective without stripping the protective topcoat of the vinyl.
A safe dilution is typically around 1-2%, which translates to 10-20 mL of detergent per liter of water. However, before applying any new cleaning agent to your entire chair, you must perform a spot test. Apply a small amount of the solution to an inconspicuous area—like the underside of the footrest—and leave it for 24 hours. Check for any discoloration, tackiness, or swelling. This simple test can save you from a catastrophic, chair-ruining mistake.
Essential Tools for the Job
Using the right tools is just as important as using the right chemicals. Aggressive tools can cause irreparable physical damage.
- Microfibre Cloths: These are superior to paper towels or cotton cloths. They lift and trap dirt effectively without leaving lint behind and are gentle on the surface.
- Soft-Bristled Brushes: A small, soft-bristled brush (like a detailer’s brush) is essential for cleaning seams, stitching, and textured surfaces where cloths can’t reach.
Never use abrasive scouring pads, steel wool, or stiff-bristled brushes. Likewise, avoid steam cleaners. While they are excellent for disinfection on some surfaces, the high heat can cause vinyl to shrink, warp, and delaminate from the foam underneath.
Disinfection Protocols: Balancing Safety and Longevity
In a clinical environment, cleaning for appearance is secondary to disinfecting for safety. However, these two goals can be at odds if not managed correctly. Effective disinfection must be achieved without compromising the upholstery’s lifespan. This requires adherence to standards and a deep understanding of how disinfectants work.
Clinical Standards and Compliance
Your cleaning and disinfection protocols are a core part of your clinic’s quality management system. Adherence to manufacturing guidelines is often implicitly linked to broader regulatory frameworks. For instance, manufacturers who comply with standards like ISO 13485:2016 have rigorous processes to validate cleaning methods, ensuring their equipment can be maintained safely and effectively. Similarly, products bearing a CE Marking have been assessed to meet high safety, health, and environmental protection requirements, which includes considerations for cleaning and sterilization.
Your first and most important resource is the chair manufacturer’s approved list of disinfectants. Using an unapproved agent is a significant risk and almost always voids the upholstery warranty.
The Science of Surface Disinfection
Effective disinfection hinges on a principle known as contact time—the duration a surface must remain visibly wet with disinfectant to kill pathogens. This is frequently misunderstood. A common mistake is to spray and immediately wipe a surface dry. This action may clean the surface, but it does not disinfect it.
Most clinically accepted disinfectants require a contact time of 1 to 3 minutes. Staff must be trained to apply the disinfectant and allow it to sit for the prescribed period before wiping it away. This ensures that you are meeting clinical standards for infection control.
Chemicals to Avoid at All Costs
Certain chemicals will actively destroy dental upholstery. Their use can lead to rapid aesthetic and functional failure. Be vigilant in keeping these away from your chairs:
- Solvents: Acetone, methyl ethyl ketone (MEK), and other strong solvents will dissolve the vinyl’s protective coating on contact.
- Undiluted Alcohols: While alcohol is a component of many approved disinfectants, using it in high concentrations or undiluted can dry out the material, making it brittle and prone to cracking.
- High-Alkaline or Acidic Cleaners: Cleaners outside the neutral pH range will break down the material’s chemical structure, leading to discoloration and delamination of seams.
Proactive Maintenance: Preventing Wear and Tear
Beyond cleaning and disinfecting, proactive measures can significantly extend the life of your upholstery by preventing damage before it happens.
Environmental and Physical Factors
- Sunlight: Direct, prolonged exposure to ultraviolet (UV) light is a primary cause of color fading and can accelerate the degradation of the vinyl and underlying foam. Position chairs away from windows with direct sun or use blinds to diffuse the light.
- Heat: Avoid placing chairs near radiators or other heat sources. Temperatures exceeding 50-60°C can soften the material and compromise the foam structure.
- Sharp Objects: Institute protocols to prevent damage from instruments, keys, or abrasive elements on patient clothing. A moment of carelessness can cause a puncture or tear that is difficult to repair perfectly.
Long-Term Planning
Even with perfect care, upholstery has a finite lifespan. Depending on patient volume, you should budget for professional reupholstery every 3 to 7 years. This restores the chair to as-new condition and is an opportunity to update colors.
For minor issues, keeping a vinyl repair kit on hand can address small tears or punctures before they worsen. It’s also wise to have spare parts like headrests or armrests, which often see the most wear, available for quick replacement.
Structuring Your Maintenance Program for Success
An effective program is documented, understood by all staff, and consistently executed. It transforms upholstery care from a reactive chore into a proactive asset management strategy.
Debunking a Common Myth: “Stronger Cleaner Means a Better Clean”
A pervasive myth in equipment maintenance is that using a more concentrated or powerful chemical will yield better results. In reality, this approach is counterproductive and dangerous for modern dental materials. Research into dental materials, often published in journals found on repositories like ScienceDirect, consistently shows that harsh chemicals accelerate the breakdown of polymer-based surfaces. Using more than the recommended dilution of a pH-neutral cleaner does not make it “more clean”; it simply leaves behind a residue that can make the surface tacky and actually attract more dirt, all while increasing the risk of chemical damage.
Upholstery Maintenance Checklist
To ensure consistency, implement a formal checklist for your staff. This removes ambiguity and creates accountability.
| Frequency | Task | Check | Notes |
|---|---|---|---|
| Daily | Perform end-of-day wipe-down with diluted pH-neutral solution. | ☐ | Focus on high-contact areas: headrest, armrests, seat. |
| Inspect for any fresh spills or stains and address immediately. | ☐ | ||
| Weekly | Perform a deep clean using a soft brush on all seams and folds. | ☐ | Check for debris around hardware and base mounts. |
| Apply manufacturer-approved disinfectant, respecting contact time. | ☐ | Ensure the entire surface remains wet for the required duration. | |
| Inspect the entire chair for signs of physical damage (cuts, tears). | ☐ | Note any issues in the maintenance log. | |
| Monthly | Check for environmental stress (e.g., new sun exposure patterns). | ☐ | Adjust chair position or window coverings as needed. |
| Review your stock of cleaning agents and repair kits. | ☐ | Reorder before you run out. | |
| Annually | Evaluate overall condition and budget for future reupholstery. | ☐ | A chair in a high-traffic operatory may need it in 3 years. |
Staff Training and Documentation
Your maintenance program is only as strong as the people implementing it. Train every team member on these procedures, explaining not just the “what” but the “why.” When they understand that using the wrong chemical can cause thousands of dollars in damage, they are more likely to adhere to the protocol.
Finally, document the specific cleaning and disinfection agents you use in a logbook. If you ever need to make a warranty claim, this documentation will be crucial to demonstrating that you have followed the manufacturer’s care instructions.
Wrapping Up: Key Takeaways for Upholstery Longevity
Properly caring for your dental chair upholstery is an investment in your clinic’s appearance, safety, and financial health. It protects your asset, ensures a professional patient experience, and upholds warranty conditions. By implementing a consistent two-tier cleaning routine, using only manufacturer-approved, pH-neutral chemicals, respecting disinfectant contact times, and training your staff on these protocols, you can dramatically extend the life of your chairs. Move beyond reactive cleaning and embrace a proactive maintenance strategy.
Frequently Asked Questions (FAQ)
Can I use common household cleaning wipes on my dental chair?
It is strongly advised not to. Most household wipes contain chemicals and fragrances that are not formulated or tested for medical-grade vinyl. They can cause discoloration, drying, and cracking over time, and their use will likely void your upholstery warranty. Stick to products on your manufacturer’s approved list.
How often should my chair be professionally serviced?
Professional servicing typically addresses the mechanical, electrical, and hydraulic systems of the chair and should be performed according to the manufacturer’s recommended schedule. Upholstery inspection and care, however, should be part of your clinic’s daily and weekly in-house maintenance routine.
What is the single biggest mistake clinics make with upholstery care?
The most common and costly mistake is using an unapproved cleaning or disinfecting agent. The chemical damage from a single application of a harsh solvent or alkaline cleaner can be irreversible, leading to immediate and expensive reupholstery needs.
Disclaimer: This article is for informational purposes only and does not constitute professional advice. Always consult your dental chair manufacturer’s specific cleaning and maintenance guidelines and warranty terms. For infection control protocols, adhere to local and national regulatory standards.
About the Author