A Guide to Your Dental Chair's Key Mechanical Systems

The Unseen Engine: Understanding Your Dental Chair’s Core Systems
A dental chair is the centerpiece of any treatment room, but its smooth, quiet operation relies on a complex interplay of mechanical, hydraulic, and pneumatic systems. For clinic managers and technicians, understanding these core components is the first step toward ensuring long-term reliability and minimizing costly downtime. A chair that fails mid-procedure not only disrupts the schedule but can also impact patient trust. The financial repercussions of such interruptions are significant, making preventative maintenance a critical investment. This guide breaks down the key mechanical systems of a typical dental chair, providing the practical knowledge needed for effective, in-house maintenance.
At its heart, a dental chair is a sophisticated piece of medical equipment. Its design and manufacturing are governed by stringent quality standards, such as ISO 13485:2016, which ensures that medical devices are produced and maintained to a high degree of safety and effectiveness. By performing routine checks, you not only extend the life of your equipment but also uphold these crucial quality benchmarks.
The Hydraulic Lift System: The Core of Chair Movement
The primary system responsible for the smooth, powerful motion of a dental chair is its hydraulic lift. This system uses an incompressible fluid, typically a specific type of oil, to transmit force from a pump to a lift cylinder, allowing the chair to be raised, lowered, and tilted with precision. Think of it as the muscle of the chair.
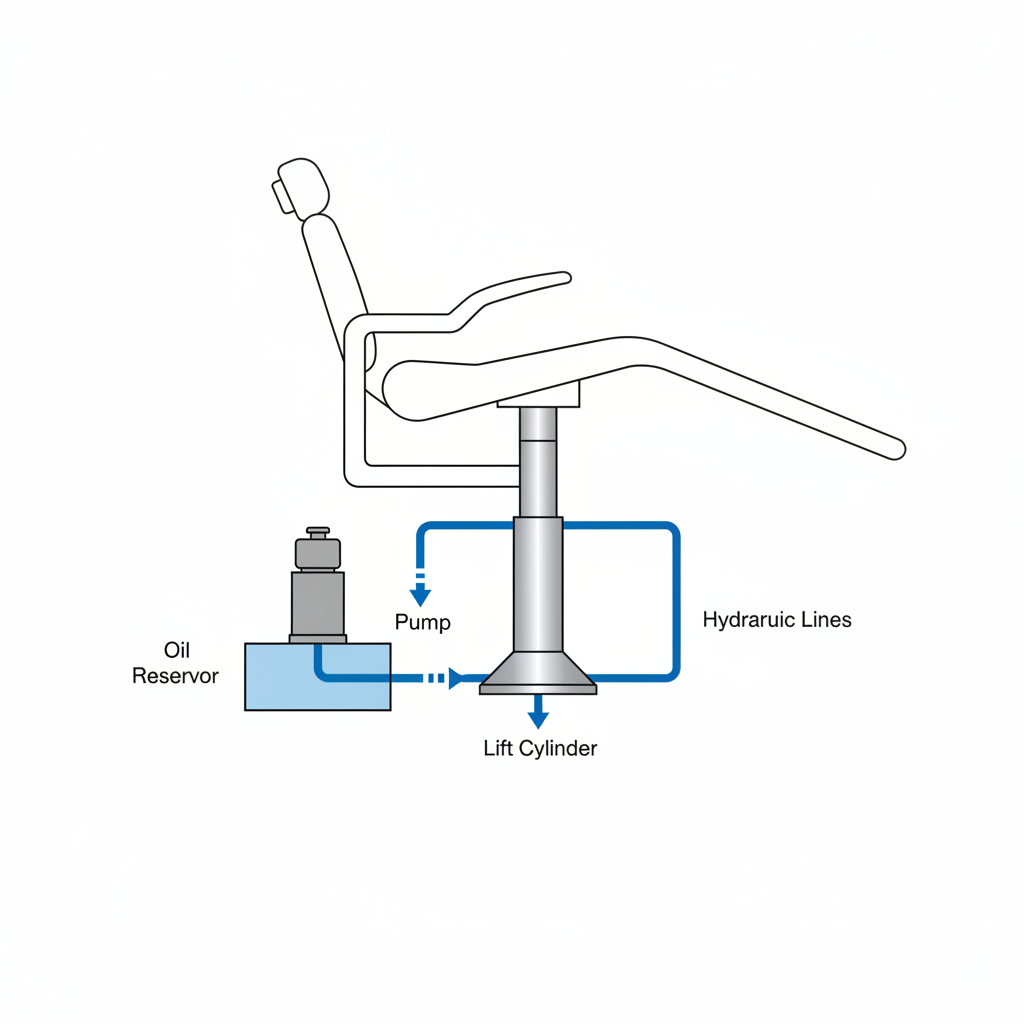
How It Works
When the operator presses a control (on the foot pedal or chair-side touchpad), an electric pump pressurizes the hydraulic oil. This pressure acts on a piston inside the main lift cylinder, causing the chair to move. A series of valves controls the direction and speed of the fluid, enabling the chair to hold its position securely or move smoothly to a new one. The quality and cleanliness of the hydraulic fluid are paramount; contaminated or incorrect fluid can degrade seals and cause system failure.
Common Issues & Maintenance Checks
From years of service experience, I can tell you that most hydraulic issues start small. Daily visual checks can catch between 70% and 80% of developing faults.
- Slow Leaks: Check the floor beneath the chair base and inspect all hydraulic lines and fittings for any signs of oil. A small leak is a clear warning sign that a seal or connection is failing.
- Jerky or Slow Motion: If the chair moves erratically, it often points to air in the hydraulic lines. This can happen over time and requires bleeding the system to restore smooth operation. It can also indicate an issue with an electrical encoder, which provides feedback on the chair’s position.
- Grinding Noises: A grinding sound from the base during operation is a serious red flag. It often signals a worn pump or gearbox, which requires immediate professional attention to prevent a complete system failure.
A Common Misconception Debunked: Many believe that any hydraulic oil will suffice in a pinch. This is a critical error. Using the wrong oil viscosity can lead to sluggish performance in cold conditions, or insufficient lubrication and overheating under heavy use. Always adhere to the manufacturer’s specifications. Research published in journals like ScienceDirect consistently shows that material integrity is heavily dependent on using manufacturer-specified consumables.
The Pneumatic System: Powering Ancillary Functions
While the hydraulic system handles the heavy lifting, the pneumatic system uses compressed air to operate many of the chair’s other critical functions, including handpieces, air/water syringes, and sometimes even braking systems for chair rotation.
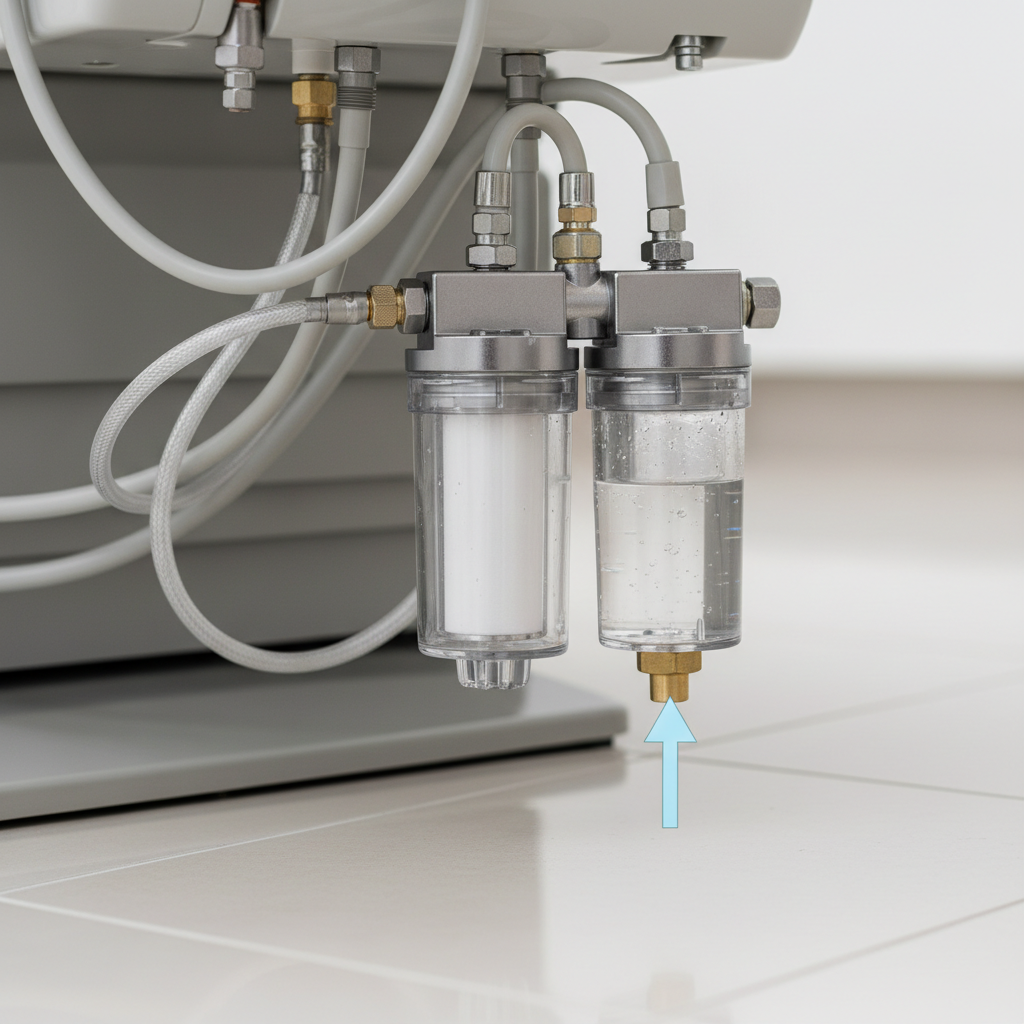
How It Works
Compressed air, supplied by a central clinic compressor, is routed through a series of filters, regulators, and valves within the chair. These components ensure the air is clean, dry, and delivered at the correct pressure—typically between 4 and 6 bar (60-90 PSI) for most dental applications. A steady hiss when the chair is idle is a tell-tale sign of an air leak, which wastes energy and puts extra strain on your compressor.
Maintenance Checklist
Intermittent problems with handpieces or other air-driven tools can often be traced back to the pneumatic supply. These simple checks are vital:
- Drain Air Traps Daily: Your clinic’s main compressor should have its tank drained daily to remove accumulated water. The chair itself often has smaller water traps or filters that also need to be checked and drained.
- Inspect Dryers and Filters Monthly: Clean or replace air filters according to the manufacturer’s schedule. Clogged filters restrict airflow, reducing performance and potentially allowing contaminants to reach sensitive instruments.
- Confirm Service Pressure: Use a pressure gauge to periodically check that the air pressure at the chair matches the recommended settings. Low pressure can cause tools to perform sluggishly.
Electrical and Control Systems: The Chair’s Nervous System
The electrical system is the brain of the operation, translating commands from the foot pedal and touchpads into action. This network includes the main circuit board, wiring harnesses, motors for specific functions (like backrest tilt), and encoders that track the position of moving parts.
Regulations such as the FDA 21 CFR Part 820 mandate strict quality control in the manufacturing of these components to ensure they are safe and function as intended. Maintenance practices should aim to preserve that integrity.
Safety and Reliability Checks
- Isolate Power First: Before inspecting any electrical component, always disconnect the chair from the main power supply.
- Check for Secure Connections: Vibrations can sometimes loosen electrical connectors. If a function becomes intermittent, a quick check of the relevant wiring harness can often solve the problem.
- Protect from Moisture: Ensure no liquids are spilled near control boards or electrical panels. Moisture can cause short circuits and permanent damage.
Mechanical Integrity and Adjustments
The chair’s physical frame, armrests, and headrest assembly provide the structural support. While robust, these components are subject to wear and require periodic inspection.
Torque and Tightening
A common mistake I see in the field is over-tightening fasteners. This can bend linkages, stress bearings, or strip threads, creating a more significant problem than a loose bolt. Always tighten incrementally. For clinics performing their own minor adjustments, a conservative approach is best.
| Component Type | Recommended Torque (Approximate) |
|---|---|
| Small Trim/Cover Fasteners | 5–10 Nm |
| Armrests & Bolted Linkages | 10–25 Nm |
| Major Structural Bolts | Refer to Service Manual |
Common Spare Parts
For clinics in remote areas, keeping a small stock of first-line spares can be a lifesaver. This prevents extended downtime while waiting for parts to arrive. Based on failure rates, the most common items needed are:
- Seal kits for hydraulic and pneumatic systems
- Headrest assemblies or locking mechanisms
- Upholstery fastening clips
Proactive Maintenance for Maximum Uptime
A structured maintenance schedule is the most effective strategy for ensuring your dental chair remains a reliable asset rather than a liability. Integrating these checks into your clinic’s routine can dramatically improve your practice’s efficiency and reduce the financial impact of downtime.
Maintenance Schedule
| Frequency | Task |
|---|---|
| Daily | Visually inspect for hydraulic leaks. Listen for unusual noises (hissing, grinding). Drain compressor and air traps. |
| Monthly | Inspect air filters. Check upholstery fastenings. Test all safety stop functions. |
| Semi-Annually | Perform a full systems check (fluids, filters, safety stops). Check and tighten mechanical fasteners as needed. |
| Every 2-4 Years | Replace high-wear items like hydraulic/pneumatic seals, depending on workload. |
Quick Troubleshooting Guide
| Symptom | Likely Cause |
|---|---|
| Steady Hissing Noise | Air leak in the pneumatic system. |
| Grinding or Whining | Worn gearbox or hydraulic pump. Requires immediate service. |
| Slow, Jerky Motion | Air in hydraulic lines or a potential electrical encoder fault. |
| Unresponsive Control | Loose electrical connection or failed switch/control board. |
Key Takeaways
Maximizing the lifespan and reliability of your dental chair does not require an extensive technical background. It begins with a foundational understanding of its core systems and a commitment to proactive maintenance. By integrating simple, consistent checks into your daily and monthly routines, you can identify and address small issues before they escalate into costly, practice-disrupting failures.
Always prioritize safety by de-energizing systems before inspection, use manufacturer-specified parts and fluids, and empower your team with the knowledge to be the first line of defense in equipment care. A well-maintained chair is a cornerstone of a productive, safe, and professional dental practice.
Disclaimer: This article is for informational purposes only and does not constitute professional technical advice. Always disconnect equipment from power and relieve stored pressure before performing any inspection or maintenance. For complex repairs or if you are unsure about a procedure, consult a qualified service technician. Adherence to manufacturer guidelines and safety protocols is essential.
References
About the Author


