Tech Integration and Infection Control in Chairs

The Unseen Challenge: Balancing Advanced Technology with Flawless Infection Control
Modern dental chairs are no longer just patient seating; they have evolved into sophisticated hubs of clinical technology. From integrated intraoral cameras and monitors to complex delivery systems, these advancements promise greater efficiency and improved patient care. However, with every new wire, tube, and electronic component, a critical question arises: how do we maintain stringent infection control standards?
The central challenge is that the very features designed to enhance functionality can inadvertently create new breeding grounds for contaminants. Seams, gaps, and cable entry points become potential reservoirs for bio-burden. As a practice owner or clinic manager, ensuring your equipment is not just technologically advanced but also defensible against cross-contamination is paramount for patient safety and regulatory compliance. This article explores the critical design considerations that allow technology and hygiene to coexist effectively, turning a potential conflict into a clinical advantage.
1. Upholstery and Surfaces: The First Line of Defense
The most visible aspect of a dental chair is also one of the most critical for infection control. The choice of upholstery and the construction of the chair’s surfaces can make the difference between a chair that is easy to sterilize and one that harbors hidden risks.
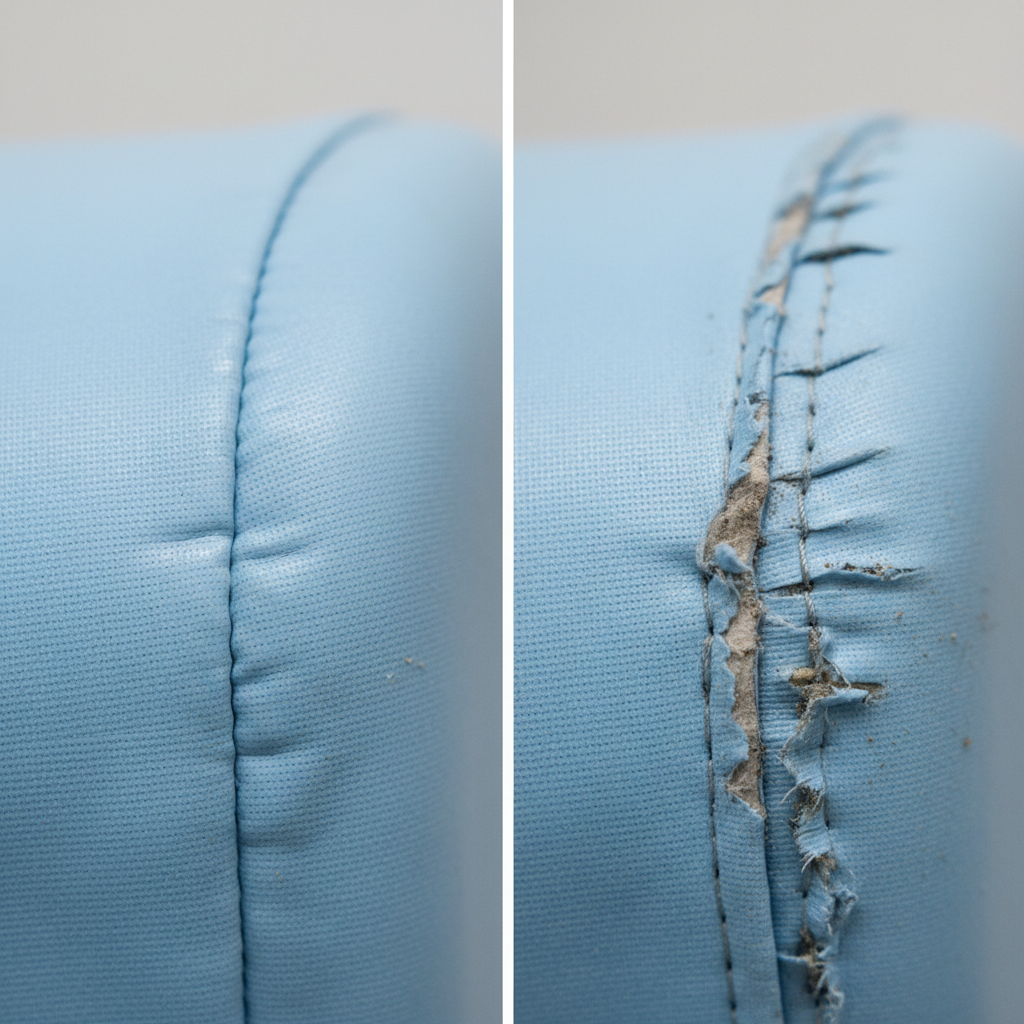
Debunking the Myth of Stitched Seams
A common mistake I often see in equipment specification is opting for traditional stitched upholstery for a supposed “premium” look. From an infection control standpoint, this is a significant error. Stitched seams, by their very nature, create thousands of tiny perforations where fluids, bacteria, and other contaminants can penetrate the foam core. These areas are impossible to clean effectively and degrade quickly when exposed to the chemical stress of hospital-grade disinfectants.
The superior approach, and one that aligns with modern medical device standards, is the use of welded or radio-frequency (RF) sealed seams. This method fuses the upholstery material together, creating a continuous, impervious surface that prevents any ingress. When evaluating a chair, always run your hand over the seams on clinical contact areas. They should feel smooth and integrated, not stitched or folded.
Material Science: Beyond the Surface
The material itself is just as important as the seams. The ideal upholstery is a medical-grade, low-porosity synthetic with a satin finish. Here’s why:
- Low Porosity: Prevents absorption of fluids and disinfectants.
- Satin Finish: A common misconception is that high-gloss finishes are easier to clean. In practice, high-gloss surfaces can mask the micro-abrasions and scratches that inevitably occur, which then become microscopic havens for bacteria. A satin finish reveals the true state of the surface and wears more evenly over time.
- Chemical Resistance: Materials must be validated against common hospital disinfectants, particularly quaternary ammonium compounds, which can cause cracking and degradation in lesser materials. This is a key consideration detailed in scientific literature found on platforms like ScienceDirect, which emphasizes material durability under clinical conditions.
2. The Hidden World: Integrated Cable and Tubing Management
What you can’t see can indeed hurt you. Some of the most challenging areas for infection control are the pathways for air lines, water tubing, and data cables. Poorly managed internals are a significant source of contamination risk.
Designing for Serviceability and Sterility
Experienced equipment designers know that all tubing and power cables should be routed internally through the chair back and base. This isn’t just for aesthetics; it eliminates dust-collecting, hard-to-clean external loops. However, this internal routing must be paired with easily accessible service panels. During routine maintenance or in case of a leak, a technician needs to access these pathways without dismantling the entire chair.
Furthermore, the placement of connections is critical. I’ve seen setups where quick-disconnects for instruments are located near the floor, making them difficult to access and clean. The correct approach is to place these connectors in an accessible area, often just under the instrument tray, allowing for easy exchange and disinfection between patients. This is a core principle in Cost-Effective Dental Chair Integration Strategies, where workflow efficiency and hygiene are directly linked.
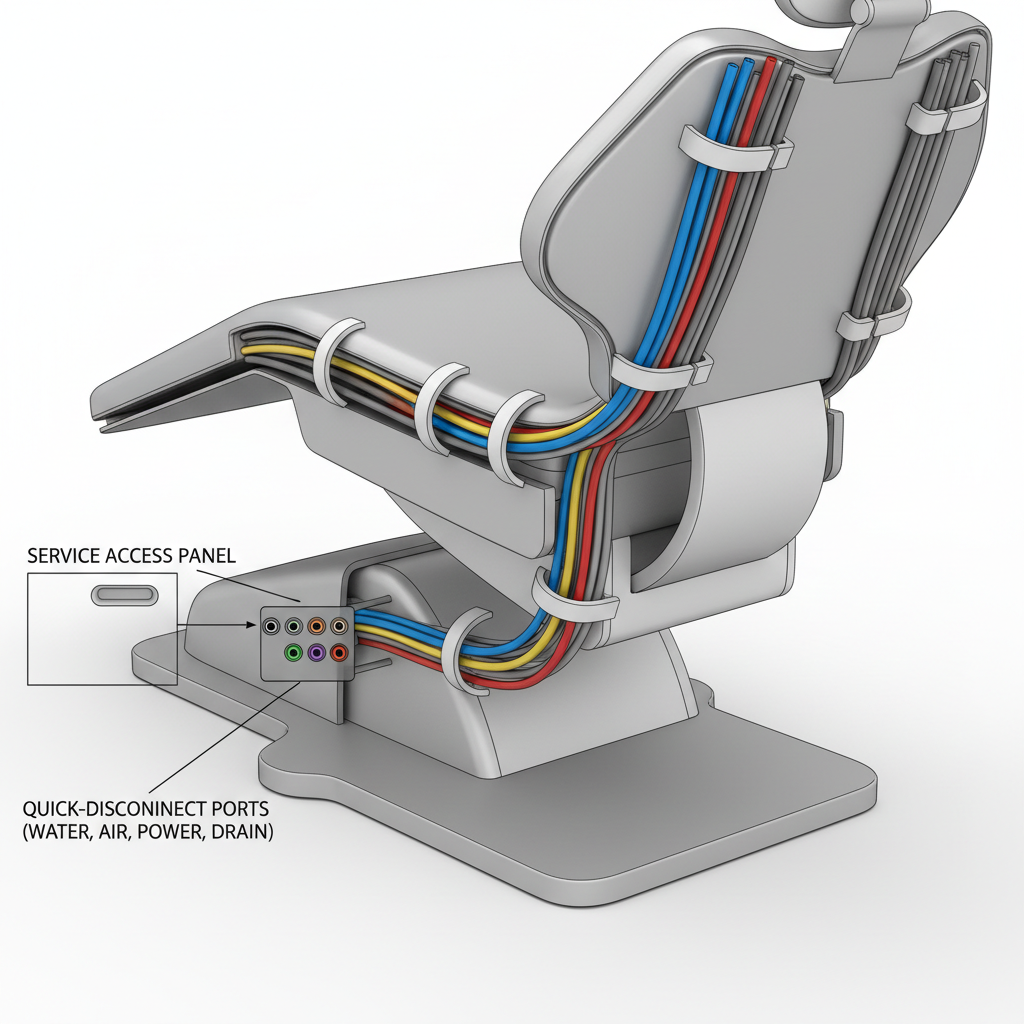
Preventing Kinks and Biofilm
A non-obvious but critical detail is maintaining a minimum bend radius for all tubing, typically around 20-30 mm. If a tube is bent too sharply, it can create a kink or a low-flow point. These areas are prime locations for biofilm—a slimy, resilient colony of bacteria—to develop inside the water lines. Proper internal routing guides prevent these kinks, ensuring consistent flow and making waterline flushing protocols more effective.
3. Electronics and Ergonomics: A Symbiotic Relationship
The integration of electronic components must be managed for both electrical safety and cleanability. Simultaneously, the chair’s ergonomic design must support the practitioner without creating unnecessary hygienic compromises.
Sealed Components and Heat Management
Any electronic components exposed to the clinical environment, such as footswitches or control panels, should be housed in enclosures with a high Ingress Protection (IP) rating. An IP rating, like IP67, indicates a component is sealed against dust and can withstand temporary immersion in water, making it safe for cleaning with liquid disinfectants.
However, sealing electronics creates a secondary problem: heat buildup. A well-designed chair balances this by incorporating passive ventilation channels away from clinical contact zones. This ensures sensitive electronics don’t overheat, which could lead to premature failure—a factor that has a real financial impact. The relationship between reliability and uptime is a crucial consideration, as explored in The Financial Impact of Dental Chair Reliability & Downtime.
Ergonomics for Health and Hygiene
Ergonomic design is not just about comfort; it’s also about creating a chair that is easy to work around and clean. Key ergonomic specifications, derived from extensive practitioner feedback, also support better infection control:
- Seat Height Adjustability: A range of approximately 420–520 mm accommodates different operator heights, reducing strain.
- Backrest Tilt: Options that support common operator postures mean less repositioning and fewer complex moving parts.
- Headrest Design: A headrest with a 70–100 mm travel range allows for precise patient positioning with minimal seams and crevices.
By adhering to these ergonomic principles, a chair can provide excellent support, as detailed in guides like Achieving Practitioner Ergonomics on a Clinic Budget, while presenting a smooth, easily cleanable profile.
4. Regulatory Compliance and Practical Maintenance
Adhering to robust design principles is the foundation, but proving it through certification and maintaining it through consistent protocols is what ensures long-term safety and trust. This is where international standards come into play.
The Role of ISO 13485 and CE Marking
For a dental chair to be sold in many parts of the world, especially Europe, it must comply with a host of regulations. The EU’s Medical Device Regulation (MDR) and the requirement for CE Marking are non-negotiable. These certifications are a testament that the chair has been designed and manufactured under a rigorous quality management system, such as ISO 13485:2016. This standard ensures that every aspect of the chair’s lifecycle, from design inputs about cleanability to manufacturing processes for welded seams, is controlled and validated.
A Practical Cleaning and Maintenance Schedule
Even the best-designed chair requires a disciplined maintenance protocol. Based on observations of high-performing clinics, a structured schedule is essential.
| Frequency | Task | Rationale |
|---|---|---|
| Daily | Wipe all clinical contact surfaces with an approved disinfectant. | Removes bio-burden from patient contact and aerosol exposure. |
| Weekly | Perform a deeper clean of the instrument tray and tubing pathways. | Addresses areas that may not be fully cleaned in a rapid daily wipe-down. |
| Annually | Inspect all tubing unions, gaskets, and quick-disconnects. | Proactively identifies wear and tear on seals before they fail, preventing leaks and internal contamination. |
This structured approach, combined with a well-designed chair, forms a robust system for infection control.
Key Takeaways
Integrating technology into a dental chair is not simply about adding features; it’s about a holistic design philosophy that places infection control at the core. The most effective and reliable chairs are those where seamless surfaces, intelligent internal routing, and validated materials work in concert. By prioritizing welded seams, medical-grade upholstery, and organized internal pathways, manufacturers can create a clinical hub that is both highly functional and easy to keep sterile. For the clinic, this translates to enhanced patient safety, assured regulatory compliance, and the confidence that your most-used piece of equipment is a partner, not a hindrance, in providing excellent care.
Disclaimer: This article is for informational purposes only and does not constitute professional medical or regulatory advice. Always consult with a qualified professional and refer to manufacturer guidelines and local regulations for specific infection control protocols and equipment selection.
References
About the Author


