Customizing Your Delivery System for Peak Efficiency

Introduction: Beyond the Factory Settings
A new dental delivery system arrives with factory settings designed to work for everyone, which often means they aren’t optimized for anyone. Many practitioners adapt their personal workflow to the machine, leading to inefficient movements, physical strain, and lost time. The key to unlocking peak performance lies not in the equipment’s price tag, but in its meticulous customization. A well-configured delivery system can reduce procedure time, minimize fatigue, and directly improve your clinic’s bottom line.
This article provides actionable, experience-based strategies for customizing your dental delivery system to perfectly match your unique workflow. We will move beyond generic advice and provide specific measurements and settings that can yield a 5–12% improvement in cycle time for routine procedures. By tailoring instrument placement, control responsiveness, and accessory integration, you can transform your equipment into a natural extension of your clinical technique.
1. Foundational Ergonomics: Strategic Instrument Placement
Every unnecessary reach, every moment spent untangling a tube, is a drain on efficiency and a contributor to long-term physical strain. The foundation of an efficient delivery system is placing everything you need exactly where you need it, just before you need it. This principle, often called “motion economy,” is critical in a field as precise as dentistry.
The Primary Operating Zone
I have observed countless clinicians crisscrossing their hands and over-extending their reach to grab primary instruments. This not only wastes seconds but also increases the risk of musculoskeletal stress. The solution is to organize your instruments based on frequency of use.
Your primary tools—the scaler, high-speed handpiece, and air/water syringe—should reside within a 50–70 cm forward-lateral radius from your seated operating position. This arc is your “Primary Operating Zone.” Placing instruments here minimizes handpath crossings and allows for a smooth, direct reach that becomes second nature. Secondary instruments, like a curing light or intraoral camera, should be positioned just beyond this primary arc.
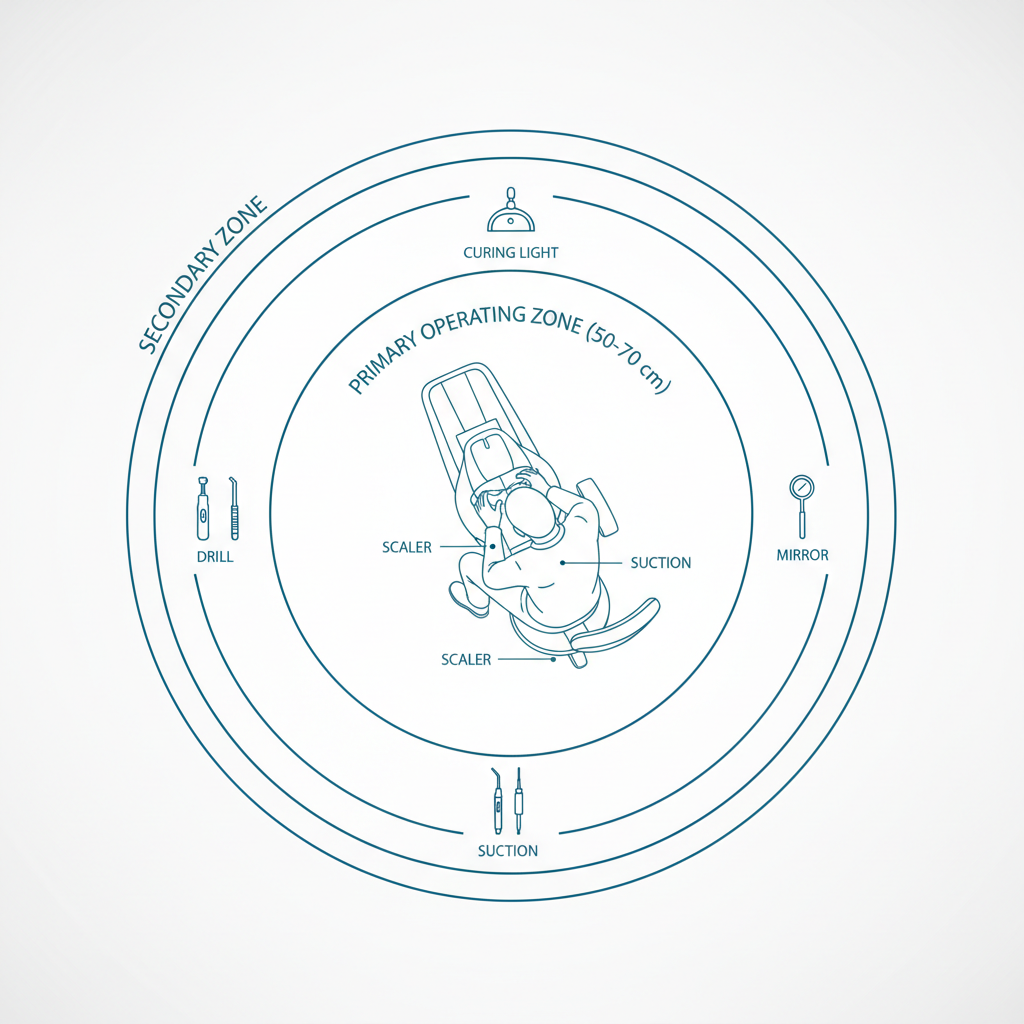
Pro Tip: Taming Instrument Tubing
A common mistake I see in many operatories is instrument tubing that is far too long. Excess length creates drag, causes the tubing to catch on the chair or patient, and introduces a subtle but persistent twisting force on the operator’s wrist. The fix is simple but transformative.
Trim your instrument tubing to allow for just 5–10 cm of slack between the delivery arm and the instrument tray when the instrument is in its holder. This provides enough freedom of movement to work comfortably in all quadrants of the mouth without creating drag or tangles. It’s a small adjustment that makes a significant difference in reducing wrist fatigue over the course of a day.
Optimizing Suction and Accessory Placement
Inefficient suction placement is another common time-waster. When the High-Volume Evacuator (HVE) or saliva ejector is placed too far posteriorly, the dental assistant must constantly retract and reposition, or the operator has to pause. By moving the HVE holder just 5–10 cm closer to the operative field, you can significantly cut retraction time and improve visibility. This simple shift supports better four-handed dentistry and a smoother workflow. For more insights on how ergonomics directly impacts practice efficiency, consider reviewing best practices in Ergonomics for Dentists Treating Special Needs Patients, as the principles of minimizing movement are universal.
2. Fine-Tuning Controls for Seamless Operation
Once your instruments are physically in the right place, the next step is to ensure they respond exactly as you expect. The interface between you and the machine—primarily the foot control—should feel intuitive, not obstructive. While manufacturers must adhere to strict quality management systems like ISO 13485:2016 to ensure device safety and performance, final clinical tuning is the practitioner’s responsibility.
Calibrating Foot Pedal Responsiveness
Many clinicians struggle with foot pedals that have a large “deadband”—a significant amount of travel before the instrument activates. This can lead to jerky, unanticipated bursts of power. Conversely, a pedal that is too sensitive can be just as problematic.
The goal is to set the responsiveness so that the first 10–15% of pedal travel initiates actuation. This provides immediate, tactile feedback without causing accidental activation. You should be able to feather the pedal for delicate work and receive a proportional response. Spend time in your chair’s service menu to adjust this setting; it’s a one-time setup that pays dividends in every single procedure.
Streamlining with Memory Presets
Modern dental chairs offer multiple memory presets for chair positioning, but more is not always better. I have found that limiting presets to two or three essential positions per operator is the most efficient approach. For example:
- Preset 1: Restorative. Your most common operating position.
- Preset 2: Hygiene. A slightly different position for hygiene procedures.
- Preset 3: Entry/Exit. A fully upright position for patient entry and exit.
Keeping the presets limited and clearly defined makes switching between them fast and eliminates the cognitive load of cycling through numerous unused settings. This focus on simplicity and speed is a core tenet of efficient cost-effective dental chair integration strategies.
3. Debunking a Common Myth: More Features Do Not Equal More Efficiency
A pervasive myth in the dental industry is that the most expensive, feature-laden delivery system will automatically make a practice more efficient. In reality, efficiency is not a feature you can buy; it’s a process you must build. An older, meticulously customized delivery system will always outperform a brand-new, top-of-the-line unit that is poorly configured for the user.
Compliance with regulations like the FDA’s 21 CFR Part 820 ensures that devices are built to a high standard, but it does not guarantee they will be efficient in your specific clinical context. The real return on investment comes from the time you invest in tailoring the equipment to your personal workflow.
4. A Systematic Approach to Customization
To effectively customize your delivery system, you need a clear, repeatable process. Follow these steps to audit your workflow and make targeted improvements.
Workflow Audit Checklist
- Map Your Movements: For a common procedure (e.g., a Class II composite), have a team member observe and note every time you reach for an instrument. Are your movements direct, or are they hesitant and looping?
- Identify Bottlenecks: Where do you pause? Is it to untangle a hose? To reach for a secondary instrument? To adjust the patient’s chair? Note these friction points.
- Adjust One Variable at a Time: Resist the urge to change everything at once. Start with the most significant bottleneck identified in your audit. For example, move your primary handpieces into the 50-70 cm optimal zone.
- Work and Evaluate: Use the new setup for a few days to build muscle memory and determine if the change was a true improvement.
- Measure the Impact: Once you are accustomed to the new setup, time the same procedure again. Even a reduction of a few seconds per instrument transfer adds up significantly. The cumulative effect of these small adjustments is what leads to a 5-12% gain in overall efficiency.
- Repeat the Process: Move to the next bottleneck on your list, such as foot pedal sensitivity or HVE placement, and repeat the adjust-evaluate-measure cycle.
5. Maintenance for Sustained Peak Performance
Your customization efforts will only last if the equipment is properly maintained. A well-maintained delivery system performs consistently, ensuring your ergonomic and efficiency gains don’t degrade over time. This consistent performance is a cornerstone of how chair durability impacts your clinic’s financial health.
Here is a simple, effective maintenance schedule based on common heuristics.
| Frequency | Task | Purpose |
|---|---|---|
| Daily | Pre/Post-Operation Check | Confirm instrument coupling is secure and air/water pressure is stable. Wipe down tubing. |
| Weekly | Visual Tubing Inspection | Check for early signs of cracking, kinking, or wear, especially near connectors. |
| Monthly | Clean & Purge Waterlines | Prevent biofilm buildup according to manufacturer and regulatory guidelines. |
| Quarterly | Check Swivels & Hinges | Lightly lubricate delivery arm joints and instrument swivels to ensure smooth movement. |
| Annually | Professional Calibration | Have a technician verify pressure, flow rates, and electrical safety as required by standards like the EU MDR. |
Key Takeaways
True clinical efficiency is not about having the most expensive equipment—it is about creating a seamless interface between the practitioner and the tools of their trade. By moving beyond factory defaults and investing time in deliberate customization, you can create a workspace that enhances precision, reduces physical strain, and delivers a measurable return on investment.
Start by establishing an ergonomic foundation with strategic instrument placement. Fine-tune your controls for immediate, predictable response. Finally, implement a systematic process of auditing and adjusting, supported by a consistent maintenance routine. These steps will transform your delivery system from a generic piece of equipment into a powerful tool for peak performance.
This article is for informational purposes only and does not constitute professional medical or ergonomic advice. Always consult with a qualified professional before making significant changes to your workspace, especially if you have pre-existing health conditions. Follow all manufacturer guidelines for equipment operation and maintenance.
References
About the Author


