Achieving Practitioner Ergonomics on a Clinic Budget

You don’t need the most expensive equipment to protect your health. For dental practitioners, the physical demands of the job can lead to chronic pain and musculoskeletal issues. This article explores how to find cost-effective dental chairs and implement setup strategies that deliver essential ergonomic support without breaking the bank, ensuring both career longevity and financial prudence.
The Real Cost of Poor Ergonomics
Working in a fixed, often awkward posture for prolonged periods puts enormous strain on the body. For dental professionals, this commonly translates into chronic back, neck, and shoulder pain. These are not just minor discomforts; they are symptoms of musculoskeletal disorders (MSDs), which are a leading cause of early retirement in the dental profession. Research published on PubMed consistently highlights the high prevalence of MSDs among dentists and hygienists, linking them directly to daily work postures.
The financial impact extends beyond personal health. For a clinic, a practitioner sidelined by injury means lost revenue, potential worker’s compensation claims, and decreased team morale. Investing in proper ergonomics isn’t a luxury—it’s a fundamental business strategy for ensuring the long-term productivity and well-being of your most valuable asset: your clinical team.
Myth: A Higher Price Tag Equals Better Ergonomics
A common misconception is that only the most expensive dental chairs can provide adequate ergonomic support. This often leads smaller clinics or new graduates to either overspend on premium models or, worse, resign themselves to inadequate equipment, believing proper ergonomics is out of reach.
The reality is that the ergonomic value of a chair is determined by its adjustability and how well it fits the user’s body, not by its brand name or price. A mid-range chair with the right set of adjustable features, when configured correctly, can often outperform a high-end chair that is poorly adjusted or lacks the specific customization a practitioner needs. The key is to identify the essential features that deliver the biggest ergonomic impact and to understand how to use them.
Core Ergonomic Features for Any Budget
When evaluating dental chairs, focus on the quality and range of adjustments. These four features are critical for establishing a neutral, supported posture. Prioritizing them allows you to maximize ergonomic benefits while respecting your budget.
| Feature | Ergonomic Purpose | What to Look For on a Budget |
|---|---|---|
| Seat Height & Tilt | Allows you to keep feet flat on the floor, maintaining a stable base and promoting good circulation. A slight forward tilt (5-10°) can help maintain the natural curve of the lower back. | Smooth, reliable gas lift mechanism. The height range should accommodate your body, typically allowing for a seat height of 420–520 mm. A tilt lock is essential. |
| Backrest Contouring & Angle | Supports the lumbar, thoracic, and cervical spine, reducing disc pressure. The ability to recline slightly helps open the hip angle to 100-110°, which reduces load on the lumbar spine. | A backrest that follows the natural S-curve of the spine. It should be adjustable and lockable at various angles to support both upright and forward-leaning postures. |
| Armrest Adjustability | Reduces strain on the shoulders and neck by supporting the weight of the arms. Shoulders should be relaxed, with elbows at an approximate 90-degree angle. | At a minimum, look for height-adjustable armrests. The ideal range should be within ±5 cm of your resting elbow height. Pivot and width adjustments are bonuses but not always essential. |
| Headrest Articulation | Provides support for the head and neck, especially during procedures requiring a forward-leaning posture. It helps prevent neck flexion and strain. | A dual-articulating headrest offers the most flexibility, allowing precise positioning to cradle the occiput without pushing the head forward. |
Compliance with quality management systems, such as ISO 13485:2016, often ensures that the manufacturing process behind these components is robust and reliable, even in more cost-effective models.
The Practitioner’s Ergonomic Setup: A Step-by-Step Guide
Owning an adjustable chair is only half the battle; knowing how to configure it for your body is what truly unlocks its ergonomic benefits. A poorly adjusted chair can be just as harmful as a non-adjustable one. Follow this checklist at the beginning of each day to create a neutral, sustainable posture.
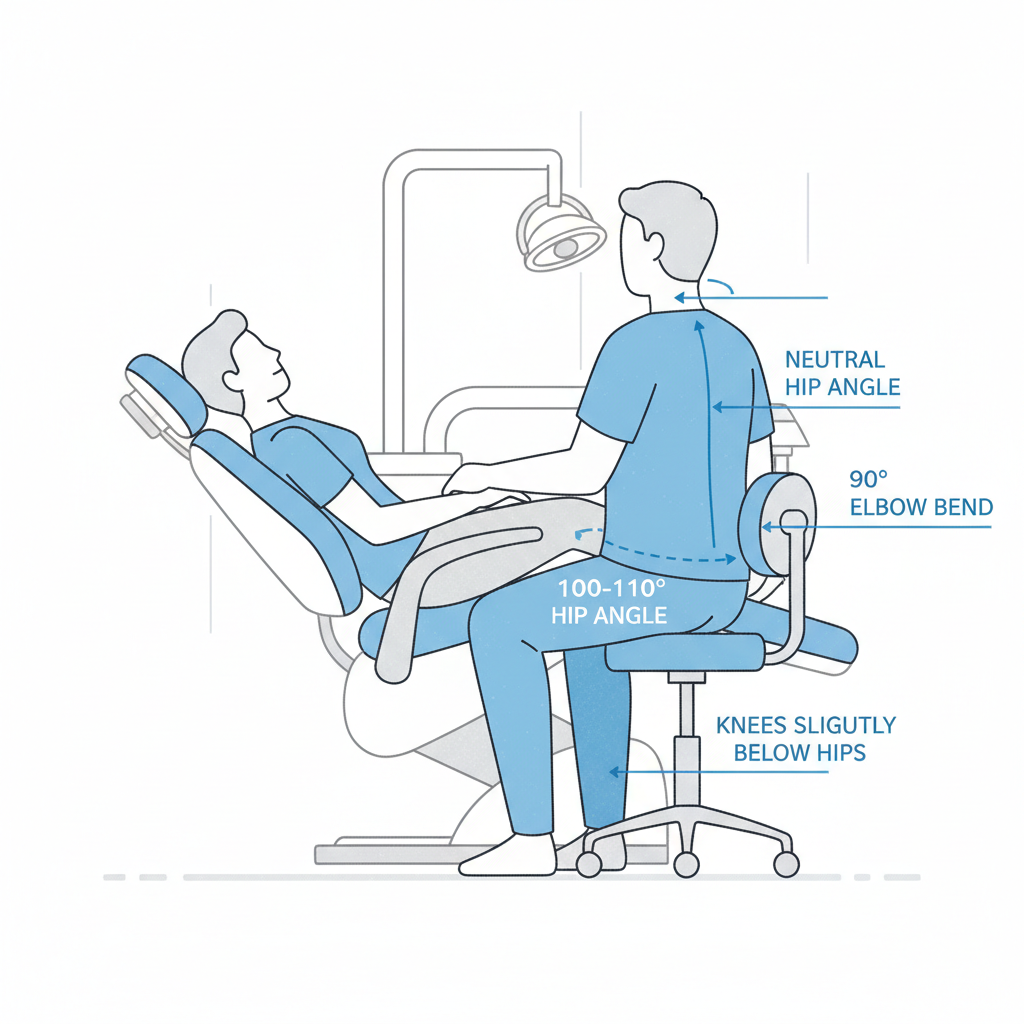
- Start with Your Foundation: Adjust the chair height so your feet are flat on the floor. Your knees should be at or just below the level of your hips. If your feet don’t reach the floor, use a firm, stable footrest.
- Set Your Pelvic Tilt: Sit back fully in the chair and adjust the seat tilt to create a slight forward angle of 5–10 degrees. This helps rotate the pelvis forward, which makes it easier to maintain the natural curve in your lower back.
- Support Your Spine: Adjust the backrest angle to open your hip angle to between 100 and 110 degrees. Ensure the lumbar support of the chair fits comfortably into the curve of your lower back.
- Relax Your Shoulders: Position the armrests so that your elbows are bent at roughly a 90-degree angle with your shoulders in a relaxed, neutral position. You shouldn’t have to shrug or slouch to use them.
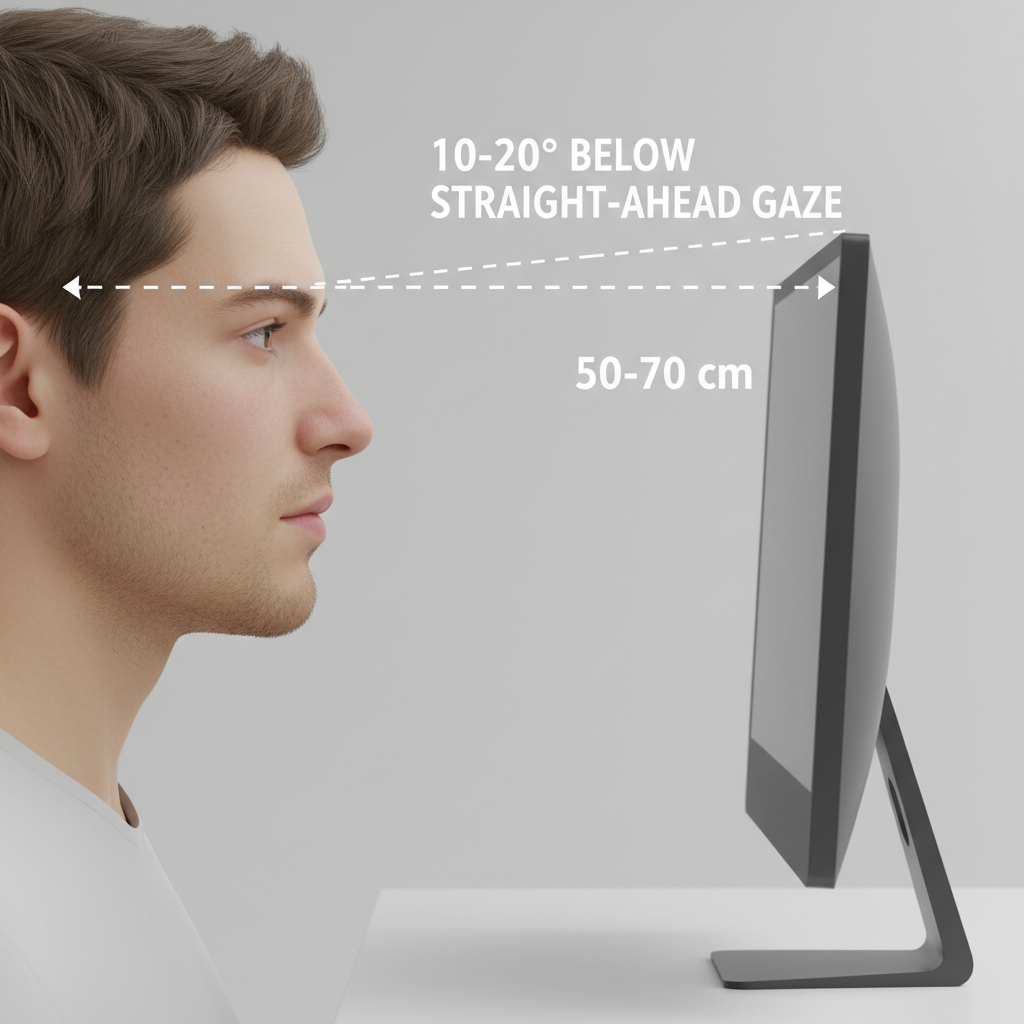
- Position the Patient and Your View: Arrange the patient chair and your instrumentation to minimize twisting and reaching. When using monitors, position them approximately 50–70 cm from your eyes. The top of the screen should be at a level that requires a 10–20° downward gaze, which minimizes neck flexion. Critically, avoid sustained neck rotation of more than 20 degrees.
Beyond the Chair: High-Impact, Low-Cost Enhancements
True ergonomic wellness is about more than just the chair. It involves your entire working environment and habits. Here are two common “gotchas” and their simple, affordable solutions.
-
The Problem of Static Posture: Holding any single posture, even a “perfect” one, for too long leads to muscle fatigue and strain. The key is to encourage dynamic movement.
- The Fix: Implement “dynamic microbreaks.” This is a concept I train in every clinic I work with. It doesn’t mean a full coffee break. It means taking 1-2 minutes every 20-30 minutes to stand up, stretch your back, and look away from the patient. This small habit makes a massive difference in end-of-day fatigue.
-
The Problem of Hard Floors: Standing for even short intervals on hard clinical flooring is surprisingly tiring and can lead to leg and back pain.
- The Fix: An anti-fatigue mat. This seemed like an optional accessory to me at first, but it easily doubled the amount of time I could work comfortably without discomfort. It’s one of the most effective low-cost upgrades you can make.
Finally, think about longevity. When purchasing equipment, ask about the availability of spare parts like gas lifts and actuators. A chair that can be easily repaired is far more cost-effective in the long run. Choosing smooth, tightly-seamed upholstery also aids in infection control and is easier to maintain, a key consideration under regulations like the FDA’s Quality System Regulation.
Key Takeaways
Achieving excellent ergonomics on a budget is not only possible but practical. It requires a shift in mindset from chasing high-end brand names to prioritizing core functional adjustments. By focusing on a chair that fits your body, mastering a daily setup routine, and incorporating dynamic movement and simple environmental upgrades, you can build a foundation for a long, healthy, and productive career in dentistry.
Frequently Asked Questions (FAQ)
How often should I perform the ergonomic setup checklist?
You should run through the core steps of the setup checklist at the beginning of every workday. A quick check might also be needed if you feel discomfort after a particularly long or challenging procedure.
What is the single most important feature in an ergonomic dental chair?
While all adjustable features are important, seat height and backrest adjustability that allow for a neutral spine and an open hip angle are foundational. Without a stable and supported core posture, other adjustments have limited benefit.
Is it worth investing in a chair with more adjustment features?
It depends. Features like pivoting armrests or advanced synchronous tilt mechanisms are beneficial but deliver diminishing returns compared to the core four adjustments. If your budget allows, they are nice to have. However, you will get 90% of the ergonomic benefit by mastering the setup of a chair with good core adjustability.
Disclaimer: This article is for informational purposes only and does not constitute professional medical advice. The ergonomic recommendations provided are general guidelines. Practitioners, especially those with pre-existing musculoskeletal conditions, should consult with a qualified physician or physical therapist to determine the best ergonomic strategies for their specific needs.
References
About the Author